background image

PREFABRICATED FFLUE BBOXES

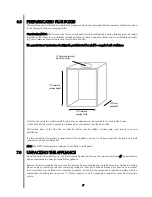
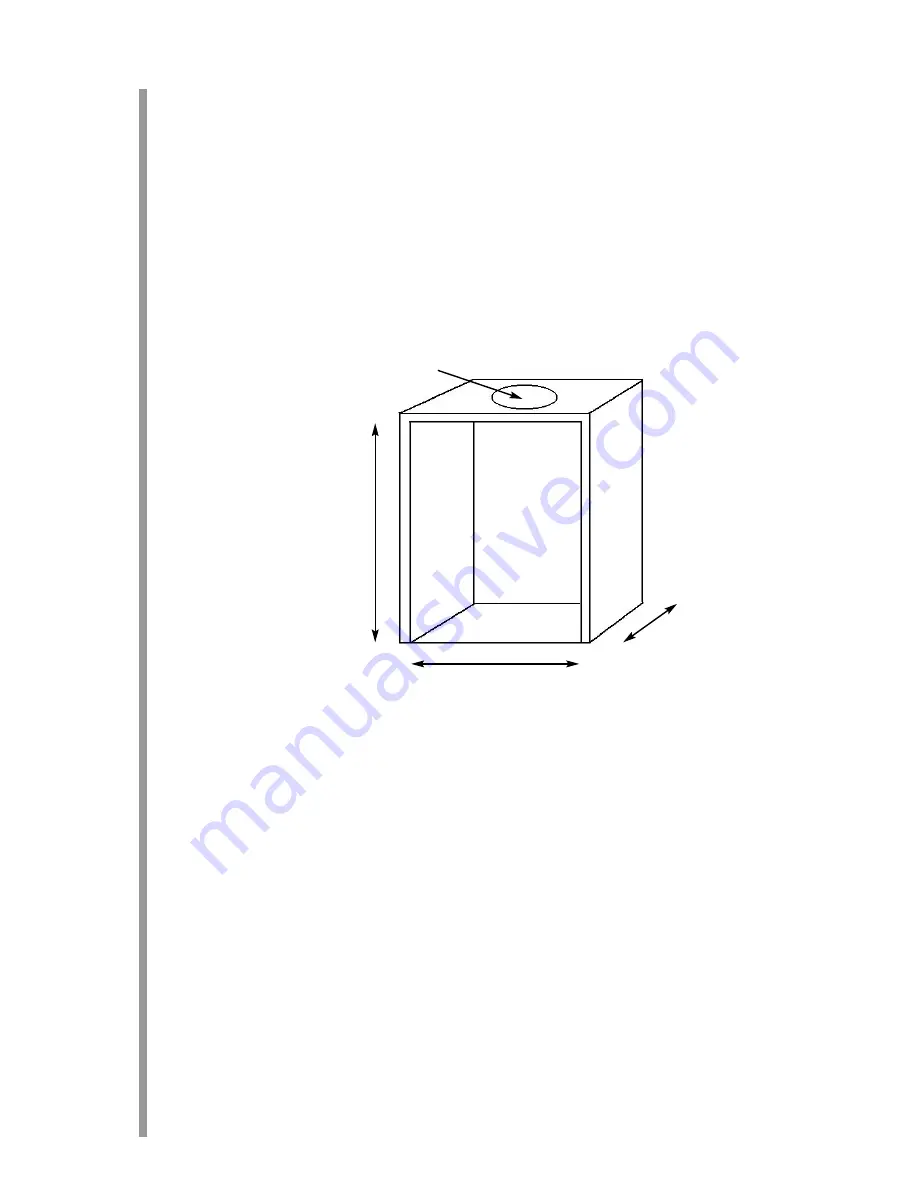
This appliance can be fitted into a number of proprietary flue boxes provided that the minimum dimensions given
in the diagram below are complied with.

Consstrucctional N

Note: The frame of the fire, any back panel or other infill panels, and the flue box must be sealed

together so that there is no possibility of leakage between them. Adequate clearances to combustible materials
(e.g. false chimney breast construction) must be maintained.

The m

manufaccturerss’ iinsstrucctionss ffor ffittingg tthe pprefabriccated bbox sshall bbe ccomplied w

with aat aall ttimess.

To fit the fire using the cable fixing kit, some minor adaption may be necessary for certain flue boxes.
A check should be made to ensure the firebox does not obscure the flue box outlet.

The firebox, base of the flue box, and hearth below may be drilled to allow plugs and screws to secure
installation.

It is important that the sealing requirements of the appliance are met at all times and that the flue box is well
sealed to any back or infill panel.

Note: The DEPTH dimension is inclusive of any back or infill panel.

UNPACKING THE APPLIANCE

Stand the carton the right way up, cut the strapping bands and remove the top endcap. Read all the instructions
before continuing to unpack or install this appliance.

Remove the box containing the cast front fret, and the bags containing the coals. Remove the cardboard packing
pieces, and any other bags or boxes containing fittings or other parts. When all loose parts have been removed,
the outer sleeve may be lifted off to reveal the appliance. Check that the components supplied correlate with the
component checklist given in section 7.1. Please dispose of all the packaging materials at you local recycling
centre.

5

125mm min internal
dia twin wall flue

505mm min
opening height

300mm min
opening width

140mm
min depth

6.0

7.0

Summary of Contents for KENSINGTON REALITY

Page 1: ...t to t the u user f for s safekeeping Revision A 01 99 Country s of destination GB IE Focal Point Fires plc Avon Trading Park Christchurch Dorset BH23 2BT 01202 499330 Fax 01202 499326 www focalpointf...

Page 2: ...d u used o only y i in a a suffic ciently y v ventilated s spac ce Consult a all i instruc ctions b before i installation a and u use o of t this a applianc ce This a applianc ce i is f free f from a...

Page 3: ...e and the flue must not vent more than one appliance i e not shared with a gas back boiler There must be no opening in the flue apart from the one that the appliance is installed into and the one vent...

Page 4: ...mum free internal area of 12500 sq mm Any existing under grate draught device must be sealed off The opening wall must be non combustible The appliance requires a hearth with non combustible surface o...

Page 5: ...MENT L LINES O OR B BLOCK F FLUE W WHICH I IS N NEW U UNUSED O OR P PREVIOUSLY O ONLY U USED W WITH A A GA AS F FIRE X D Dimension 2 20mm UNLINED F FLUE O OR C CHIMNEY W WHICH H HA AS B BEEN P PREVIOU...

Page 6: ...th below may be drilled to allow plugs and screws to secure installation It is important that the sealing requirements of the appliance are met at all times and that the flue box is well sealed to any...

Page 7: ...and on a dust sheet or similar Place the coals ceramics and fixings safely to one side Remove the burner from the assembly by removing the two screws in the data control plate Lift away the plate and...

Page 8: ...nd drill the fireframe or base and relevant points in the opening or on the wall Rawlplugs will be required NOTE Plastic rawlplugs are not suitable for this application Gas s s supply Following prepar...

Page 9: ...plus tension cable MUST NOT be cut off as this will prevent proper installation after servicing Coil up the surplus cable and tuck the coils out of the way as suggested in the photograph FITTING THE B...

Page 10: ...r rough edges MUST NOT be allowed to enter the flame ports Place the rear row of four coals making sure that the flat sides are firmly against the brick panel and side cheeks as shown Place the middle...

Page 11: ...n the front face of the casting behind the ashpan door Do not overtighten screw in until cast is held against firebox Ensure the casing is square and level to the backpanel Make adjustments where nece...

Page 12: ...e instructions The fire is factory set to achieve these pressures and any significant variation could indi cate a supply problem If the pressure is too high the gas supply meter may be set incorrectly...

Page 13: ...g Show the customer how to light and control the fire After commissioning the appliance the customer should be instructed on the safe use of the appliance and the need for regular servicing Frequency...

Page 14: ...ot to create dust from the coals Where necessary replace damaged components with genuine spares Re fit the coals by referring to the relevant section of these instructions DISMANTLING T THE B BURNER T...

Page 15: ...ously described The pilot unit can be removed by withdrawing the tubing nut and the two securing screws and lifting away Remove the tubing nut at the other end of the pilot pipe and blow through the p...

Page 16: ...s f for a a t time a and t then c cuts s o off Excessive room draught or flue pull rectify Loose or faulty thermocouple rectify ODS system in operation Firebox grommet seal not fitted rectify Lint in...

Page 17: ...ldren the elderly or infirm are concerned Combustible items such as flooring and furniture and soft wall coverings such as blown vinyl or embossed paper may discolour if fitted too close to the fire S...

Page 18: ...ts this will have been carried out by your CORGI registered installer For Republic of Ireland ventilation may be required see IS 813 ICP3 IS 327 and any other rules in force OPERATING I INSTRUCTIONS T...

Page 19: ...g a vacuum cleaner or dry cloth Heavy stains may be removed by using a damp cloth and mild household detergent Brass parts of the firefront may be cleaned using a suitable brass cleaner Replace the fr...

Reviews: