background image

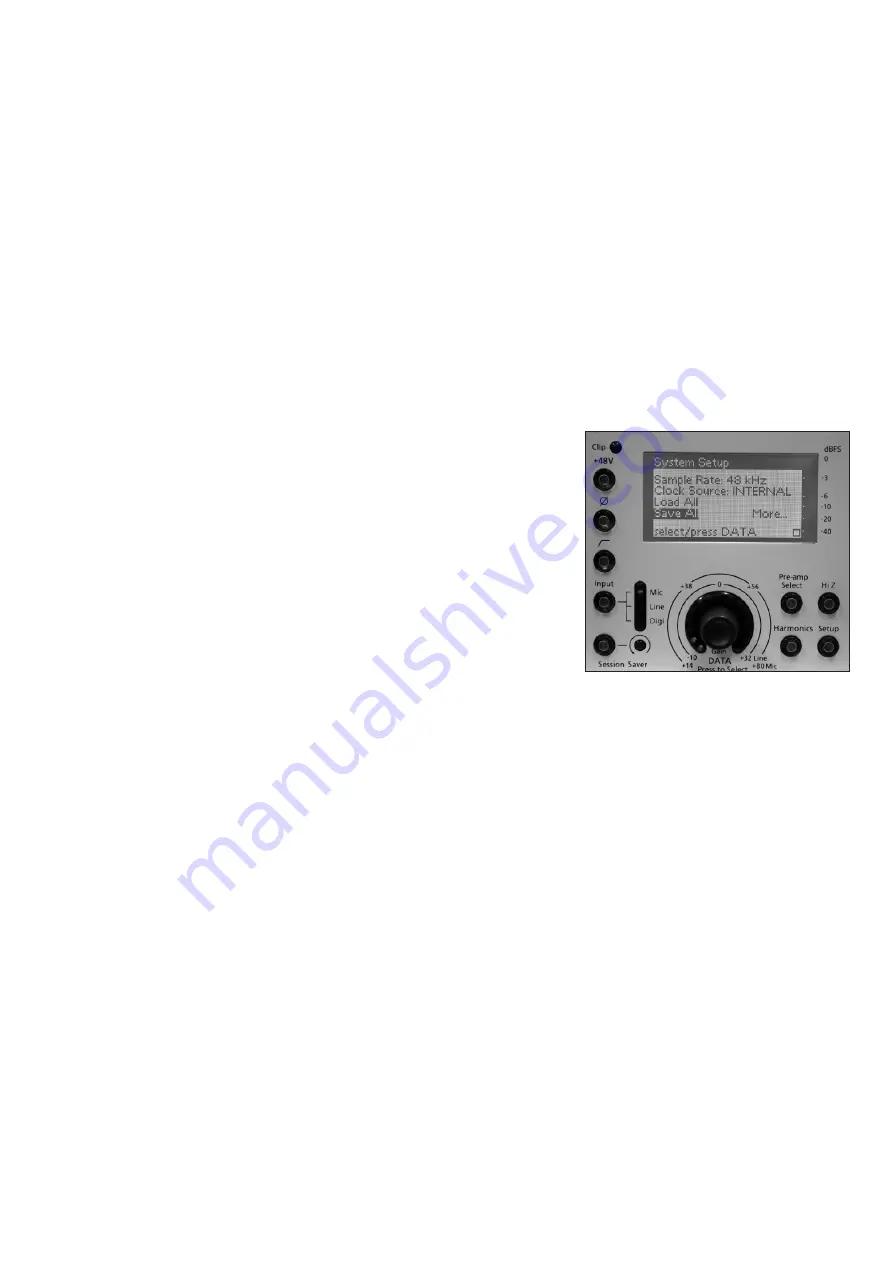
4. Now select the 

Load

option and press down on the DATA encoder.

5. Turn the DATA encoder to select a program memory.

Used memory locations are displayed with the program memory name, and the names of the four individual channel 
settings which are stored within the program memory.

6. Now press down on the DATA encoder to load the memory. The settings are loaded and the display will show 

loaded ok

Note that if you try and load an empty memory location, then the display will report that the memory 

couldn’t load

Channel Setup Options

This section covers each of the 

Channel Setup

options in more detail. We will assume that you are familiar with the basic

operations of setup page navigation, editing and naming. If not, please refer back to the examples on page 14.

Press the 

Setup

button on the appropriate channel to change the LCD to 

Channel Setup

view. From here, you can access

the following options: 

Name (Page 1)

You may give each channel of the Liquid 4PRE™ a name, up to 12 characters
in length. You may want to do this if you are going to link multiple units and
therefore have lots of sources, or you are going to save settings into a 
channel memory.

We’ve already covered this operation, so please refer back to page 15 for
details.

Load and Save (Page 1)

These options allow you to load and save up to 99 channel memories. Please refer back to page 16 for details on these
options.

Digi Input (Page 2)

When a channel is switched to Digital input, from the 

Input

button, the signal can be taken from any digital input to the

Liquid 4PRE™. This pre-selection is made on a channel-by-channel basis using the 

Digi Input

option as follows:

Ether 1

to 

Ether 8

– any channel from the optional Ethersound IN connection;

Adat 1

to 

Adat 8

– any channel from the ADAT FROM SLAVE connection;

AES Left

or 

AES Right

– either channel of the AES INPUT.

Note when the Liquid 4PRE™ operates at normal sample rates (44.1kHz or 48kHz), each of the 8 channels of the
Ethersound card and ADAT connection are available individually. However, when higher sample rates are selected, then
the Ethersound and ADAT channels are grouped to supply double or quadruple sample rates. So, for example, at 96kHz,
you can select 

ADAT 1

ADAT 2

ADAT 3 

or

ADAT 4

. At 192kHz, you can select either 

ADAT 1

or 

ADAT 2

. Note that this

restriction does not apply to the AES input.

21

Summary of Contents for Liquid 4PRE

Page 1: ...Liquid 4PRE User Guide Mode d emploi Bedienungsanleitung FA0186 01 ...

Page 2: ...2 ...

Page 3: ...afety Instructions 4 Power Connections 4 Liquid 4PRE Architecture 5 Front Panel Quick Reference Guide 7 Rear Panel Connections 9 Basic Channel Operation 10 The Setup Pages Basic Operation 16 Program and Channel Memories 18 Channel Setup Options 21 System Setup Options 23 Frequently Asked Questions FAQs 26 Technical Specification 29 Mode d emploi 36 Bedienungsanleitung 67 Liquid4Control Software Pl...

Page 4: ...d grounding prong The wider blade or the third prong is provided for your safety When the plug provided does not fit into your outlet consult an electrician for replacement of the obsolete outlet This unit is capable of operating over a range of mains voltages as marked on the rear panel Ensure correct mains voltage setting and correct fuse before connecting mains supply Do not change mains voltag...

Page 5: ...t port on the rear panel links to a computer running the free Liquid4Control software application enabling the archiving of both emulations and surplus program memories as well as providing full editing and remote operation of the unit itself The Liquid 4PRE comes complete with emulations of 40 classic mic pres but is infinitely expandable since the Ethernet port also facilitates the upload of fur...

Page 6: ...n The unique sonic characteristics of the selected pre amp emulation are then applied to the signal The signal then routes to the digital output and via the D A to the analogue output Analogue signals connected to the line input follow the same signal path as above but bypass the initial mic pre stage routing directly to the A D With Line input selected on the front panel the pre amp type is fixed...

Page 7: ... set options such as the sample rate of the unit and external clock source save and load program memories lock out the front panel controls define a cluster for linking 2 units for single ADAT link operation define a unit name set metering options and define the unit s Ethernet parameters See Page 21 for details Press the System Setup button again to return the LCD to CHANNEL 1 mode Channel Contro...

Page 8: ...reen to access the Channel Setup pages Here you can set options such as the channel name save and load channel memories select the type of digital input and select a Link Bus for control linking See Page 19 for details Press the Setup button again to exit the Channel Setup pages Hi Z Press to set the mic impedance to high This button allows you to bypass the automatic impedance setting recalled by...

Page 9: ...or 96kHz 2 channels at 176 4kHz or 192kHz AES A single AES EBU input carries two channels of digital audio plus AES clock on female XLR Two AES EBU outputs carry channels 1 2 and channels 3 4 on individual male XLRs Each AES EBU input and output connector carries two channels of digital audio at any sample rate from 44 1kHz to 192kHz Wordclock The WORD CLOCK IN BNC allows the unit to be locked to ...

Page 10: ...tion of the input gain stage varies according to the type of input For example for MIC inputs you are adjusting the analogue mic pre amp gain for DIGI inputs you are adjusting digital gain within the convolution stage Therefore the amount of gain varies depending on the input selection 14dB to 80dB for Mic inputs 10dB to 32 dB for Line and Digital inputs Gain is adjusted in 1dB intervals and is sh...

Page 11: ...LIP LED when working in this mode The horizontal meter options are set globally for all 4 channels of the unit from the System Setup pages Clip LED In addition to the input meter a separate LED lights if the channel input overloads This indicates that digital clipping has occurred To avoid clipping reduce the input gain or use the Session Saver function Hi Z Input Impedance Press the Hi Z button t...

Page 12: ... so it turns off or turn the input gain control as Session Saver gain reduction is cleared following a manual gain adjustment Note that the Session Saver s action is different from a limiter s action as the signal isn t compressed in any way just turned down by an appropriate amount to avoid overloading Pre amp Selectt Using the Liquid 4PRE s pre amp emulations you can closely emulate the sound of...

Page 13: ...out having to overdrive the pre amp Careful use of the Harmonics control allows you to tune in The Liquid 4PRE emulations to your own vintage unit The exact amount of second third and fifth order harmonics depends both on the type of pre amp chosen and the amount of mic pre gain This is because the amount of each harmonic with respect to each other is different for pre amps with valves compared to...

Page 14: ...r of the last channel memory to be saved or loaded from M1 to M99 Note that if this number is marked with an asterisk then the channel has been edited since the last save or load Horizontal Input Meter This area is used for input metering You may choose either VU metering as in our example or digital peak level metering This option is set globally across all 4 channels from the System Setup pages ...

Page 15: ... AES inputs only This condition occurs if the audio data is not in sync with the reference clock and may cause the audio to glitch as it slips between samples If this occurs change your clock source to the AES input signal SS 3dB shows the amount of gain reduction applied by the Session Saver function e g 3dB Varispeed appears on all channels if the external clock speed is varispeeded up within th...

Page 16: ...tions each option is highlighted in grey when selected 3 We need to access the next page so scroll down and select More 4 Then press down on the DATA encoder Channel Setup page 2 will now appear TIP At any time you can go back to the previous page by selecting the square symbol on the bottom right of the screen But beware if you do this from page 1 you will exit the setup pages 5 On page 2 turn th...

Page 17: ...haracters on the display Let s take the example of naming a channel 1 First press the Setup button to access page 1 of the Channel Setup options the Name option should be highlighted in grey 2 Press down on the DATA encoder to edit the option the first character of the current name e g b will be highlighted in grey 3 Now turn the DATA encoder to scroll up and down through the letters of the alphab...

Page 18: ...channel memory stores all the settings of an individual channel apart from phantom power Any of the 99 memories can be loaded to any channel within the unit TIP when a channel memory is saved it is stored using a number location from 1 to 99 and a name the name of the channel Therefore it is often a good idea to name the channel first before saving See the previous page for more details Save To sa...

Page 19: ...A encoder to load the memory The channel settings are loaded and the display will show loaded ok Note that if you try and load an empty memory location then the display will report that the memory couldn t load Channel LCD The number of the last channel memory to be saved or loaded appears next to the channel name at the top of the Channel LCD in our example M3 Note that if this number is marked w...

Page 20: ...me 4 Now select the Save option and press down on the DATA encoder 5 Turn the DATA encoder to select a memory position between 1 and 99 Empty memory locations are displayed with the text mem empty Used memory locations are displayed with their name and the names of the four individual channel settings which have been stored within the program memory Note that if you select a used memory location t...

Page 21: ...nits and therefore have lots of sources or you are going to save settings into a channel memory We ve already covered this operation so please refer back to page 15 for details Load and Save Page 1 These options allow you to load and save up to 99 channel memories Please refer back to page 16 for details on these options Digi Input Page 2 When a channel is switched to Digital input from the Input ...

Page 22: ... digital input pre select channel name channel memory status and phantom power So for example to link channels 3 and 4 for stereo operation 1 On channel 3 press the Setup button to open the Channel Setup pages 2 Navigate to the Link Bus option on page 2 3 Select BUS 1 all to add channel 3 to the link bus 4 Deselect the Setup button to exit the Channel Setup pages The linking status is shown within...

Page 23: ... the digital multi channel Ethersound and ADAT connections Higher sample rates are supported as follows S Sa am mp pl le e R Ra at te e 4 48 8k kH Hz z C Ch ha an n 1 1 C Ch ha an n 2 2 C Ch ha an n 3 3 C Ch ha an n 4 4 C Ch ha an n 5 5 C Ch ha an n 6 6 C Ch ha an n 7 7 C Ch ha an n 8 8 9 96 6k kH Hz z C Ch ha an n 1 1 C Ch ha an n 2 2 C Ch ha an n 3 3 C Ch ha an n 4 4 1 19 92 2k kH Hz z C Ch ha a...

Page 24: ...er Page 2 This option can be used to generate a single 8 channel ADAT output from two Liquid 4PRE units Note that this method of operation is only available at 44 1kHz or 48kHz The ADAT AUX OUTPUT from one unit the Slave feeds the ADAT FROM SLAVE input on the other the Master By setting the cluster option within each unit the master will then append the 4 slave channels to its ADAT and optional Et...

Page 25: ... refer to page 9 for details Ethernet Page 3 To control the Liquid 4PRE remotely from the Liquid4Control software application you will need to connect your computer via the Network Control port on the rear panel and configure a TCP IP network connection The Ethernet option is used to set the Mode IP address and other network settings of the unit To edit these settings use the encoder to scroll to ...

Page 26: ...ting a single impulse an entire impulse train is used starting at peak excitation and ending at the noise floor This lengthy sampling process has been carried out at Focusrite HQ with a great number of classic pre amps and compressors and EQs see the other Liquid range products to build up a huge database of samples for all the processors being emulated Liquid 4PRE stores these banks of samples fo...

Page 27: ...g point 0dBFS Whilst armed session saver switch illuminated if the signal level reaches 0dBFS the input gain will be turned down by 1dB and the session saver indicator LED will illuminate active If the signal continues to clip then the Liquid 4PRE will continue to turn down the signal in 1dB steps until it is below clipping point When the gain is changed manually using the dial the session saver r...

Page 28: ...e additional channels of ADAT and EtherSound are used for digitally sending the outputs of two linked Liquid 4PREs combined At higher sample rates the number of channels falls as they link together to allow for double the number of samples see next question Q Does the digital channel count decrease at higher sample rates A The AES EBU remains the same However the ADAT and Ethersound halve as the s...

Page 29: ...kHz bandpass A weighted filter Frequency Response 0 05 dB between 20 Hz 20 kHz Maximum input level 22 dBu THD N 0 0007 103 dB D A Dynamic Range 118 dB measured with 20 Hz 22 kHz bandpass A weighted filter Frequency Response 0 05 dB between 20 Hz 20 kHz Maximum output level 22 dBu THD N 0 001 100 dB Jitter Internal Clock 50 ps AES Output 1 ns External Clock 3 ns 29 ...

Page 30: ...and 20 Hz 22 kHz bandpass filter Noise Analogue Out 92 dBu measured at 14 dB gain with 20 Hz 22 kHz bandpass A weighted filter Noise AES Digital Out 119 dBFS measured at 14 dB gain with 20 Hz 22 kHz bandpass A weighted filter Maximum Input Level 8 dBu Input Impedance Variable set by pre amp emulation chosen CMRR Electronic 85 dB 60 dB of gain Line Input Gain Range 32 dB to 10 dB switched in 1 dB s...

Page 31: ... at 0dBFS level dependant distortion Rear Panel Connections Mic Inputs 1 to 4 XLR female Line Inputs 1 to 4 XLR female Line Outputs 1 to 4 XLR male AES Digital Input XLR female AES Digital Outputs CH 1 2 and CH 3 4 XLR male Wordclock Input BNC hi Z or 75 ohm input impedance soft switchable Wordclock Output BNC Low Z input impedance ADAT From Slave Toslink optical Input socket ADAT Main Output and ...

Page 32: ...not be powered and advice sought from suitably qualified personnel Avertissements alertes L appareil ne doit pas être exposé au ruissellement ni aux éclaboussures et aucun objet contenant du liquide tel qu un vase ne doit être placé sur l appareil La ventilation ne doit pas être entravée par des objets journaux tissus rideaux etc couvrant les ouvertures de ventilation Aucune source de flamme nue c...

Page 33: ...t oder eingeschaltet werden und es sollte umgehend der Rat von qualifiziertem Personal eingeholt werden Avvertimenti Precauzioni L apparecchiatura non dovrà essere esposta a sgocciolamento o versamento di liquidi e quindi nessun oggetto contenente liquidi come per esempio un vaso dovrà essere appoggiato sull apparecchiatura Non bisogna impedire la ventilazione coprendo le aperture apposite con ogg...

Page 34: ...Audio Engineering Ltd DYNAMIC CONVOLUTION is a trademark of Sintefex All other product names trademarks and trade names are the properties of their respective owners which are in no way associated or affiliated with Focusrite or its LIQUID CHANNEL product and which have not endorsed Focusrite s LIQUID CHANNEL product These other product names trademarks and trade names owned by other companies are...

Page 35: ...f repaired other than by the distributor in the country of purchase or Focusrite in the UK Consequential loss or damage direct or indirect of any kind however caused Any damage or faults caused by abuse negligence improper operation storage or maintenance If a product is faulty please first contact your dealer in the country of purchase alternatively contact the factory If the product is to be shi...

Reviews: