5
ENGLISH
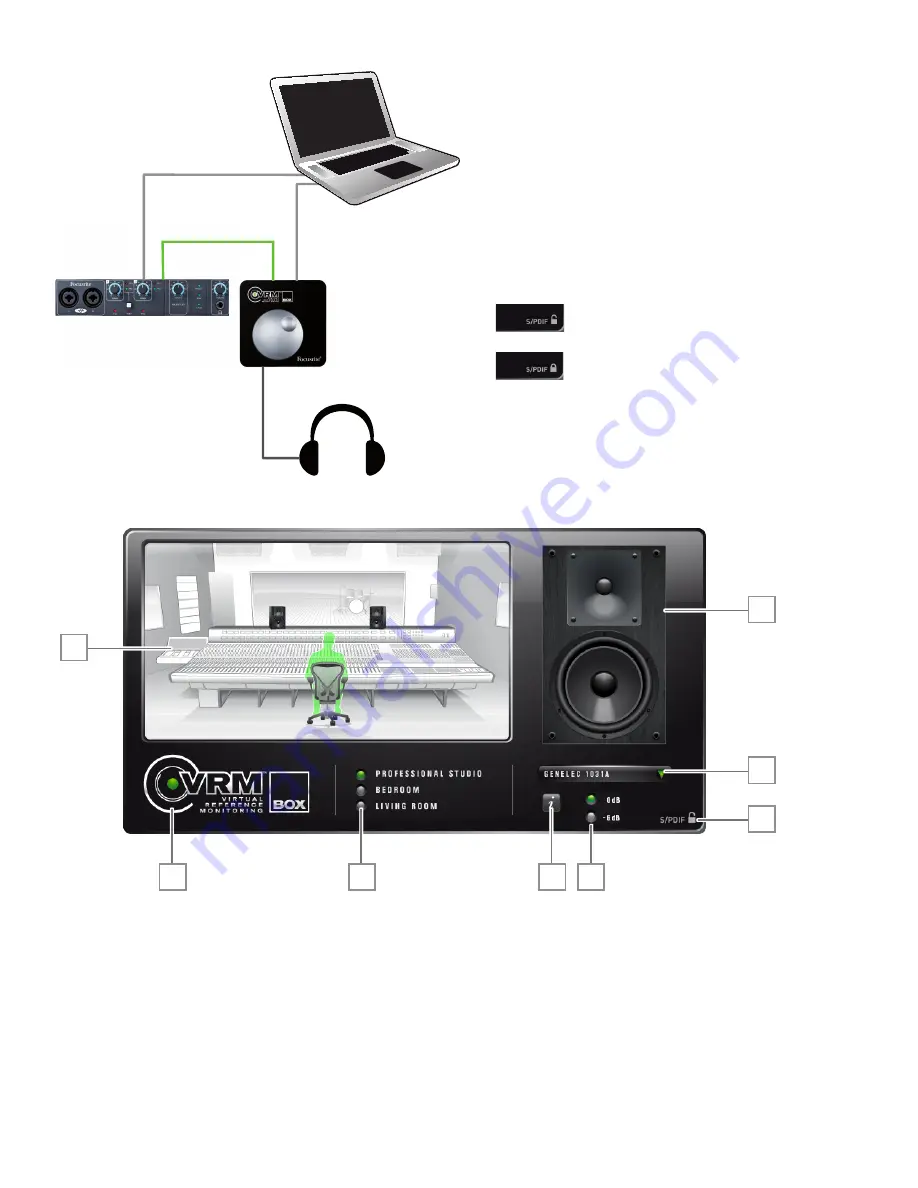
VRM Box in conjunction with another audio interface
1.
Using the USB cable provided, connect the VRM Box to the
USB port of your computer
2.
Connect the S/PDIF output on your audio interface into the
VRM Box S/PDIF input
3.
In your audio interface’s control panel, ensure that audio is
sent to the S/PDIF output of your audio interface
4.
With the volume control turned down, connect your
headphones to VRM Box
5.
Open the VRM software, check the icon in the bottom right
corner of the VRM software that the VRM Box has
locked to the S/PDIF signal
S/PDIF is unlocked
S/PDIF is locked (VRM Box is synchronised to
the incoming S/PDIF signal)
6.
Start playing audio from your DAW software or any media
player
7.
Turn up the volume control on the VRM Box until you have
the required level in your headphones
VRM Box control panel software
1. Currently selected monitor speaker
2. Monitor speaker selection drop down list: Click to select the monitor speakers
3. S/PDIF input status: (see above for more details)
4. VRM on / off: Click the logo to turn VRM on / off. When on, the dot in VRM logo and the LED on the hardware will light green
5. Environment selection: Click to change the listening environment
6. Information button: When pressed, text information about the listening environment, monitor speakers, and listening position is displayed
7. Input level buttons: When playing louder audio material (e.g. a mastered mp3), the additional processing from VRM Box may cause the output to
clip. Press the -6dB button to prevent this happening. Conversely, when playing quieter audio material (e.g. a non-mastered recording session), press
the 0dB button to achieve more level in your headphones
8. Environment display: This gives a graphical representation of the listening environment, monitor speaker placement and listening position
1
2
3
6
5
4
8
7
USB
USB / FireWire
USB
S/PDIF
OUT
IN


