background image


1.

在安裝前,請詳細閱讀本安裝說明並依指示安裝使用。請妥善保存本說明書,以便日後參考。


Please read this manual carefully before installation and install by following the instructions. Please keep this 
manual for future reference.   

正しくお使いいただくため、取付け前に本マニュアルをよくお読みください。なお、いつでも参照できるよう、お読みに
なった後は、大切に保管してください。 


2.

本製造商不涵蓋因意外事件、濫用、誤用、錯誤的安裝與不當的使用及未授權之拆解、維修或更改等,所造成

的人員傷害與設備毀壞,本製造商將完全不負責所有衍生相關的法律責任。


The manufacturer shall not be responsible legally for damage to equipment or personal injuries that results 

from accident, abuse, misuse, natural or personal disaster, or any unauthorized disassembly, repair or 
modification.  

不慮のこと、誤用や濫用及び取付け不備による製品の損害並びに、人為的な誤り及び無断取外し、修繕や改造など

により発生した設備の損害及び人員の傷害に対しては、弊社は一切法的責任を負いません。 


3.

本產品的設計重點為安裝與拆卸容易,若因人為或天然災害

(

如地震、颱風

...

)

不可抗拒之因素所造成之人員傷

害與設備毀壞,本製造商將完全不負責所有衍生相關的法律責任。


The projector ceiling mount bracket is designed for installing and removing easily. The manufacturer shall not 

be liable for the damage to equipment and personnel injuries due to human factors or natural disaster, such as 
earthquake and hurricane.   

本製品は取付け及び取外しが容易に出来るよう設計されます。人為的或いは自然災害(例えば地震、台風…)のよ
うな不可抗力によって人員の傷害及び設備の損害に対しては、弊社は一切法的責任を負いません。 


4.

安裝產品需由專業人員執行安裝。


The projector ceiling mount bracket must be installed by professional personnel. 

本製品のサポートは専門業者による取り付けのみです。 


5.

在安裝或移除本產品時,至少須由兩人以上執行,並避免物品掉落導致人員或物品的傷害。


At least two persons are needed to install or remove the product in order to prevent from any hazard caused by 
falling objects.   

物品の落下による人員或いは物品の損傷を避ける為、取付け/取外しに際しては、必ず 2 人以上で行ってください。 


6.

安裝前請先確認產品安裝周圍的環境:


Please check carefully before installation the area where the ceiling mount bracket will be installed. 

取付け前に、予め周囲環境を確認してください。 
 

◎  避免安裝在溼度或溫度過高與會接觸的水的地方。


              Avoid any place with high temperature or humidity or any place where will contact water. 


多湿、高温又は水のかかる場所をお避けください。 

◎  請勿安裝於空調設備的出入風口附近,及避免在大量灰塵及油煙處。


Do not install the product close to the vents of air conditions and avoid dusty and fumy places. 

エアコンの通気孔付近、又は埃や煙の多い場所をお避けください。 

◎  請勿安裝在傾斜或不規則的壁面,建議安裝於水平的天花板。


Do not install on inclined ceiling and irregular surface.   

傾き、不規則な天井板の取付けはお避けください。水平な天井板にお取り付けください。 


請勿安裝於容易震動或容易受撞擊處。


Do not install at places subject to vibrations and shocks.   


振動や衝撃を受けやすい場所はお避けください。 


7.

安裝本產品前,請先於投影機周圍預留足夠的空間,以確保安裝方便與空氣流通。


Please make sure the space around the projector is enough for installation to ensure smooth installation 
process and adequate ventilation. 

容易に取付け及び吸気孔や排気孔の風通しをよくするため、プロジェクターの周囲に空間を設けてください。 


安全警告


CAUTION


注意


- 1 -

Summary of Contents for TKLA-7220

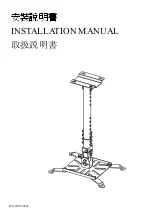
Page 1: ...INSTALLATION MANUAL 4712302590382...

Page 2: ...rthquake and hurricane 4 The projector ceiling mount bracket must be installed by professional personnel 5 At least two persons are needed to install or remove the product in order to prevent from any...

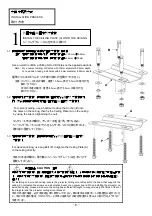
Page 3: ...nt bracket is removed the drilled holes and bolts will be left in the ceiling or the applied position Stains may occur after long term use 13 The projector ceiling mount bracket is designed to support...

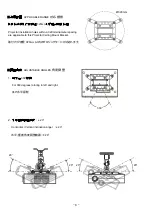
Page 4: ...5 CROSS HEAD SCREW DRIVER HEIGHT 1 190mm 621mm Vertical Range of Ceiling Mount Form 190mm up to 621mm 190mm 621mm 2 481mm 621mm 20mm Adjustable height Form 481mm to 621mm with intervals of 20mm 481mm...

Page 5: ...n holes within a 320mm diameter spacing are applicable to this Projector Ceiling Mount Bracket 320mm ADJUSTABLE ANGLES 1 360 For 360 degrees rotating to left and right 360 2 20 Horizontal Vertical inc...

Page 6: ...IC SLEEVE 8PCS 12mmL BOLT 4PCS 40mmL BOLT 6PCS OUTSIDE PIPE 1PC INSIDE PIPE 1PC LAG BOLT 4PCS ENCLOSED PARTS G Due to different specifications of screw holes for different Projectors please confirm th...

Page 7: ...the wrench tightening the nuts B A 1 3 P A For wooden ceiling use Lag Bolt P to tighten the Ceiling Plate A to the ceiling directly A P INSTALLATION PROCESS A INSTALL THE CEILING PLATE A ONTO THE CEIL...

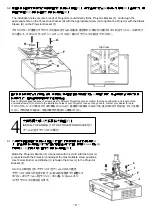
Page 8: ...lease make sure the Nylon Nut E is tightened very firmly D C C F E F D F 1mm E 3 1 G H J I G Go through the appropriate hole on the Three Hole Washer H with the appropriate Screw G to tighten the Arms...

Page 9: ...ected with the Joint with the Arms J connected with the Projector and adjust the most suitable screw positions Use 12mmL Bolt L and Washer I to fasten the Arms J to the Projector Bracket F F J F J I 1...

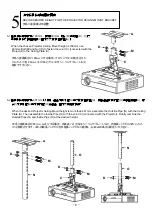
Page 10: ...81mm N A O C N O When the desired Projector Ceiling Mount height is more than 481mm assemble the Outside Pipe N with the Ceiling Plate A Then assemble the Inside Pipe O with the Joint C connected with...

Page 11: ...are tightened very firmly and every part of the ceiling mount bracket is assembled very rigidly 6 2 After horizontal adjustment please tighten the nut 6 3 After adjusting the angle please tighten the...

Reviews: