background image

3-2 

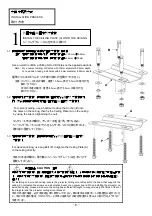
某些投影機型號的安裝孔位可直接固定於投影機支撐盤

(F)

上,選定合適的螺絲

(G)

穿過三孔華司

(H)

上合適的孔,連

同塑膠套管

(K)

將投影機固定於投影機支撐盤

(F)

上。


The installation holes of some brands of Projectors could directly fit the Projector Bracket (F). Go through the 
appropriate hole on the Three Hole Washer (H) with the appropriate Screw (G) to tighten the Projector with the Plastic 
Sleeve (K) on the Projector Bracket (F). 

 
プロジェクターが直接にブラケット(F)と組み立てられる場合、選択された取付穴に適するネジ(G)をワッシャー(H)の合う

穴に通して、プロジェクターとビニールチューブ(K)を一緒にブラケット(F)と組立ててください。 


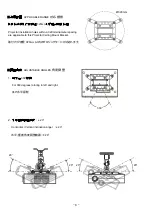
4-1 

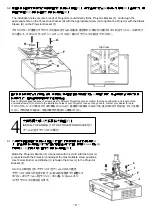
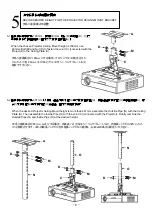
將安裝好調整關節的投影機支撐盤

(F)

放置於已安裝投影機的懸臂支架

(J) 

上,配合投影機支撐盤

(F)

的孔位自行調整合適的位置,使用

12mmL

螺絲

(L) 

及華司

(I)

,將懸臂支架

(J)

固定於投影機支撐盤

(F)

上。


Match the Projector Bracket (F) (connected with the Joint) with the Arms (J)   

(connected with the Projector) and adjust the most suitable screw positions.   

Use 12mmL Bolt (L) and Washer (I) to fasten the Arms (J) to the Projector 

Bracket (F).   

 
ジョイントと結合させたブラケット(F)をアーム(J)の上に置き、 
ブラケット(F)のネジ穴を合わせて、お好みの位置までに調整して 
ください。次にアーム(J)をワッシャー(I)に通した 12mmL ネジ 
(L)でブラケット(F)と結合させます。 


由於投影機安裝螺絲孔位規格不同,安裝前必須先確認配件包所附的螺絲

(

G

)

規格及長度,是否適用於欲安裝之投影

機安裝孔位,若有任何問題請與您的經銷商聯絡。


Due to different specifications of screw holes for different Projectors, please confirm that the specification and length of the 
enclosed screws(G) conform to the installation holes of your Projector; incase of any doubts, contact your dealer for help. 

プロジェクターによって取付穴寸法が異なることにより、設置前に同梱ネジ(G)の寸法・長さは対応できるかを十分ご注意く
ださい。不明の点があれば、当地の販売代理店にご連絡ください。 

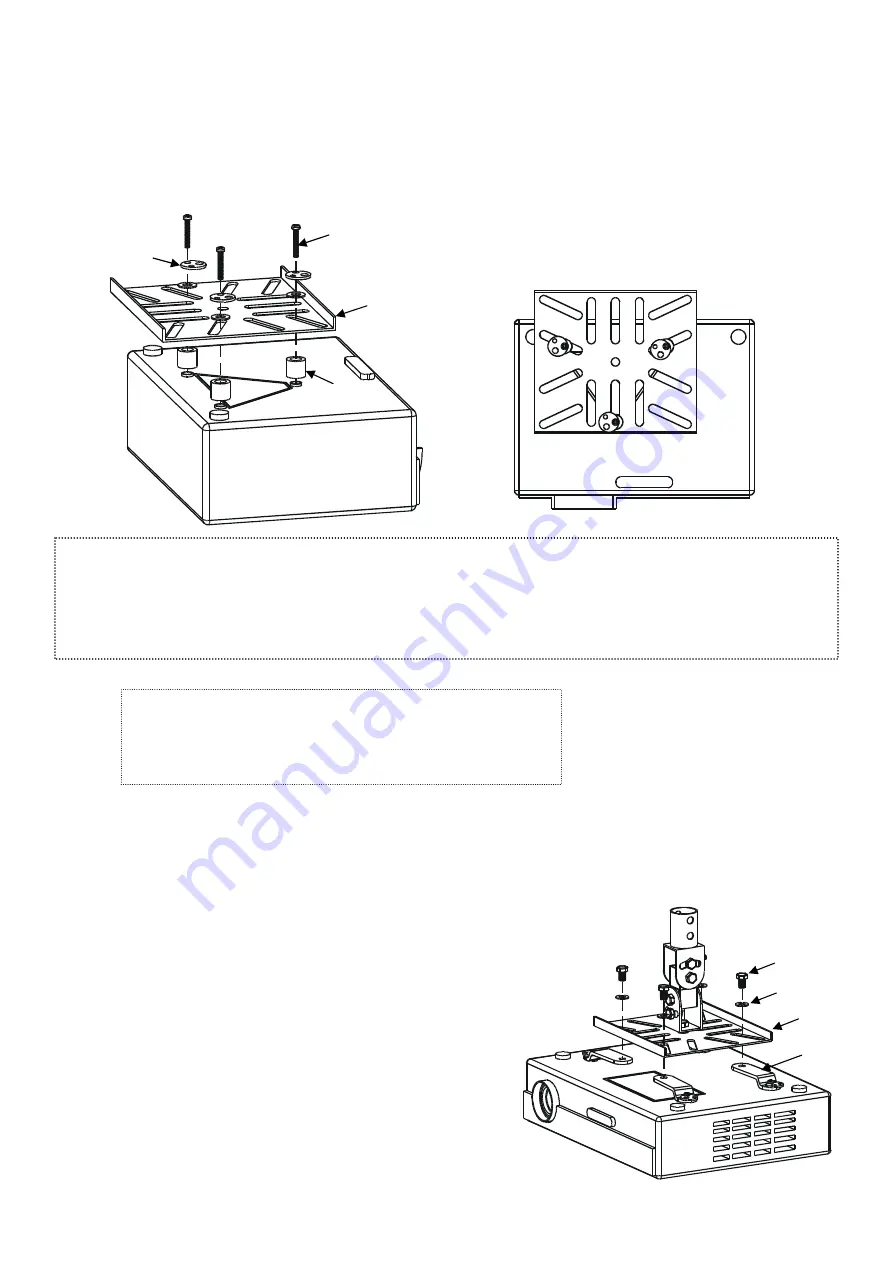
安裝懸臂支架

(J)

於投影機支撐盤

(F)


INSTALL THE ARMS(J) TO THE PROJECTOR BRACKET(F) 

アーム(J)をブラケット(F)に取付 

4

Top View 

- 8 -

Summary of Contents for TKLA-7220

Page 1: ...INSTALLATION MANUAL 4712302590382...

Page 2: ...rthquake and hurricane 4 The projector ceiling mount bracket must be installed by professional personnel 5 At least two persons are needed to install or remove the product in order to prevent from any...

Page 3: ...nt bracket is removed the drilled holes and bolts will be left in the ceiling or the applied position Stains may occur after long term use 13 The projector ceiling mount bracket is designed to support...

Page 4: ...5 CROSS HEAD SCREW DRIVER HEIGHT 1 190mm 621mm Vertical Range of Ceiling Mount Form 190mm up to 621mm 190mm 621mm 2 481mm 621mm 20mm Adjustable height Form 481mm to 621mm with intervals of 20mm 481mm...

Page 5: ...n holes within a 320mm diameter spacing are applicable to this Projector Ceiling Mount Bracket 320mm ADJUSTABLE ANGLES 1 360 For 360 degrees rotating to left and right 360 2 20 Horizontal Vertical inc...

Page 6: ...IC SLEEVE 8PCS 12mmL BOLT 4PCS 40mmL BOLT 6PCS OUTSIDE PIPE 1PC INSIDE PIPE 1PC LAG BOLT 4PCS ENCLOSED PARTS G Due to different specifications of screw holes for different Projectors please confirm th...

Page 7: ...the wrench tightening the nuts B A 1 3 P A For wooden ceiling use Lag Bolt P to tighten the Ceiling Plate A to the ceiling directly A P INSTALLATION PROCESS A INSTALL THE CEILING PLATE A ONTO THE CEIL...

Page 8: ...lease make sure the Nylon Nut E is tightened very firmly D C C F E F D F 1mm E 3 1 G H J I G Go through the appropriate hole on the Three Hole Washer H with the appropriate Screw G to tighten the Arms...

Page 9: ...ected with the Joint with the Arms J connected with the Projector and adjust the most suitable screw positions Use 12mmL Bolt L and Washer I to fasten the Arms J to the Projector Bracket F F J F J I 1...

Page 10: ...81mm N A O C N O When the desired Projector Ceiling Mount height is more than 481mm assemble the Outside Pipe N with the Ceiling Plate A Then assemble the Inside Pipe O with the Joint C connected with...

Page 11: ...are tightened very firmly and every part of the ceiling mount bracket is assembled very rigidly 6 2 After horizontal adjustment please tighten the nut 6 3 After adjusting the angle please tighten the...

Reviews: