background image


2


Contents 

1.1

 Important Safety Instructions 4


1.1.1 Explanation of Terms 4


1.1.2 General Safety Instructions 4


1.1.3 Acoustic Safety Information 5


1.1.4 Connections and Cabling 5


1.2 Operating Conditions 6


1.2.1 Information on Abnormal Operation 6


1.3 Storage and Transportation 6


2. The Product 7


2.1 Product Description 7


2.2 Delivery 7


2.3 Unpacking 7


3. Installation 8


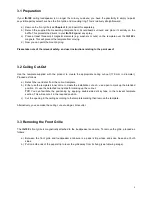
3.1 Preparation 9


3.2 Ceiling Cut-Out 9


3.3 Removing the Front Grille 9


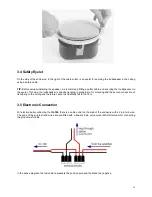
3.4 Safety Eyelet 10


3.5 Electronic Connection 10


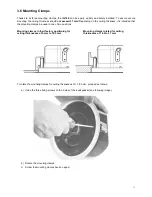
3.6 Mounting Clamps 11


3.7 Installing the Ceiling Loudspeaker 12


4. Technical Documentation 13


4.1 Technical Data 13


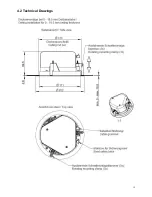
4.2 Technical Drawings 15


4.3 Measurement Diagrams 18


Summary of Contents for INTEGRATO IG-100

Page 1: ...INTEGRATO SERIES IG 100 CEILING SPEAKER USER MANUAL EN Please read this user manual through carefully before putting the system into operation and keep it for future reference ...

Page 2: ...ormal Operation 6 1 3 Storage and Transportation 6 2 The Product 7 2 1 Product Description 7 2 2 Delivery 7 2 3 Unpacking 7 3 Installation 8 3 1 Preparation 9 3 2 Ceiling Cut Out 9 3 3 Removing the Front Grille 9 3 4 Safety Eyelet 10 3 5 Electronic Connection 10 3 6 Mounting Clamps 11 3 7 Installing the Ceiling Loudspeaker 12 4 Technical Documentation 13 4 1 Technical Data 13 4 2 Technical Drawing...

Page 3: ...e and Repair 22 5 1 Maintenance Measures 22 6 Appendix 23 6 1 Environmental Information 23 6 2 CE Marking and Declaration of Conformity 23 6 3 Trademarks 23 6 4 Disclaimer and Copyright 23 6 5 Contact Address 24 ...

Page 4: ...his signal word indicates a hazard with a lower risk level which if not avoided could result in minor or moderate injury 1 1 2 General Safety Instructions Danger To avoid danger to life or limb please ensure that all personnel involved in installing operating or dismantling the system have read and understood the contents of this manual The information presented here however should be regarded as ...

Page 5: ...eriod has been subjected to poor transportation conditions e g with unsuitable packaging or damp humidity If necessary please contact your FOHHN dealer and the transportation company immediately 1 1 3 Acoustic Safety Information FOHHN systems are capable of generating very high sound pressure levels which can cause irreparable damage to hearing Warning To avoid potential hearing impairment never s...

Page 6: ...r if a foreign body or liquid has got into the interior of the device the device has been exposed to rain the device is not working normally i e it is showing marked differences in performance the device is damaged e g after a fall 1 3 Storage and Transportation Please note the following The device should only be transported in its original packaging Store the device in a dry environment with a co...

Page 7: ...uct is examined in accordance with the highest quality and safety standards prior to despatch Please check your product carefully for any signs of transport damage and in the event of any damage having occurred inform your dealer and the transportation company immediately Please also check that the packaging contains all the components belonging to the device Your IG 100 system is delivered with t...

Page 8: ...h the aid of installation housing To build the IG 100 into a concrete ceiling we recommend the HaloX 250 System from Kaiser Elektro www kaiser elektro de with the following components o Housing HaloX 250 Kaiser article no 1283 00 o Front section HaloX 250 Universal Front Part Kaiser article no 1283 10 Extension rings are not required as the installation depth of the IG 100 is less than the HaloX s...

Page 9: ...ed with the product to create the appropriate ceiling cut out 176 mm in diameter Proceed as follows a Detach the round disk from the cut out template b Either use the template s inner circle to create the installation cut out use a pen to mark up the intended position Or use the detached round disk for marking up the cut out TIP You can facilitate the positioning by applying double sided sticky ta...

Page 10: ...ady hanging in preparation for mounting and the secure connection of its cabling to the ceiling and therefore cannot accidentally fall to the floor 3 5 Electronic Connection For electronically connecting the IG 100 there is a cable outlet on the side of the enclosure with a 2 pin twin wire The ends of the single strand wires are pre fitted with a flexible 3 pin quick mount WAGO terminal for connec...

Page 11: ...he mounting clamps be used in one of two positions Mounting clamps in their factory positioning for Mounting clamps rotated for ceiling ceiling thicknesses of 0 mm to 18 5 mm thicknesses of 18 5 to 37 mm To rotate the mounting clamps for ceiling thicknesses of 18 5 mm proceed as follows a Undo the three fixing screws on the inside of the loudspeaker see following image b Rotate the mounting clamps...

Page 12: ...ll fold out and pull the IG 100 into the ceiling c Using the selector switch choose your desired setting Use a slotted screwdriver for this The selector switch offers the following settings 100 V 100 30 W 100 V 50 15 W 100 V 25 7 5 W OFF switch off e g during installation or calibration LOW IMPEDANCE for low ohm control 16 ohms d Replace the front grille IMPORTANT To remove the front grille again ...

Page 13: ...hms 3 109 dB Frequency range 5 85 Hz 20 kHz Nominal dispersion 6 100 conical Nominal impedance 6 Ohm switchable to 100 V 30 15 7 5 W General Features Enclosure steel fire dome powder coated Protection grille steel grille powder coated Mounting points 3 x rotating mounting clamp 1 x steel safety latch Connections tool free quick connectors with loop through option Integrated 100 V transformer switc...

Page 14: ...short term 3 Peak 20 ms with bandpass filtered pick noise signal according to IEC 60268 2 at one octave above the lower limit of the frequency range 4 2 83 V at 8 ohms 2 V at 4 ohms 4 V at 16 ohms at a distance of 1 meter under anechoic halfspace conditions 5 10 dB under anechoic halfspace conditions 6 nominal dispersion at 6 dB 7 net weight without optional equipment ...

Page 15: ...15 4 2 Technical Drawings ...

Page 16: ...16 ...

Page 17: ...17 ...

Page 18: ...18 4 3 Measurement Diagrams Polar response horizontal ...

Page 19: ...19 Conical coverage horizontal Directivity ...

Page 20: ...20 Frequency response Impedance ...

Page 21: ...21 Spectogram ...

Page 22: ...that in the event of any problem occurring it can be returned in its original packaging This will minimize the risk of any potential damage during transportation 5 1 Maintenance Measures To clean your loudspeaker system only use a dry or slightly damp well wrung out cloth Do not use any aggressive cleaning agents waxes or solvents such as cleansing alcohol or paint thinner as these could spoil the...

Page 23: ... exception of those specifically granted In the absence of an explicitly labelled registered trademark in this manual it cannot be necessarily concluded that a name is free of third party rights 6 4 Disclaimer and Copyright Disclaimer The contents of this user manual have been created with great care However FOHHN AUDIO AG cannot guarantee that the information therein images text and other represe...

Page 24: ...24 6 5 Contact Address FOHHN AUDIO AG Hohes Gestade 3 8 72622 Nürtingen Germany Tel 49 7022 93323 0 Fax 49 7022 93324 0 www fohhn com info fohhn com DB0090X 04 18 ...

Reviews: