background image

2

1

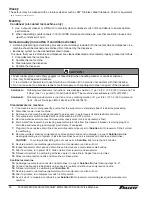
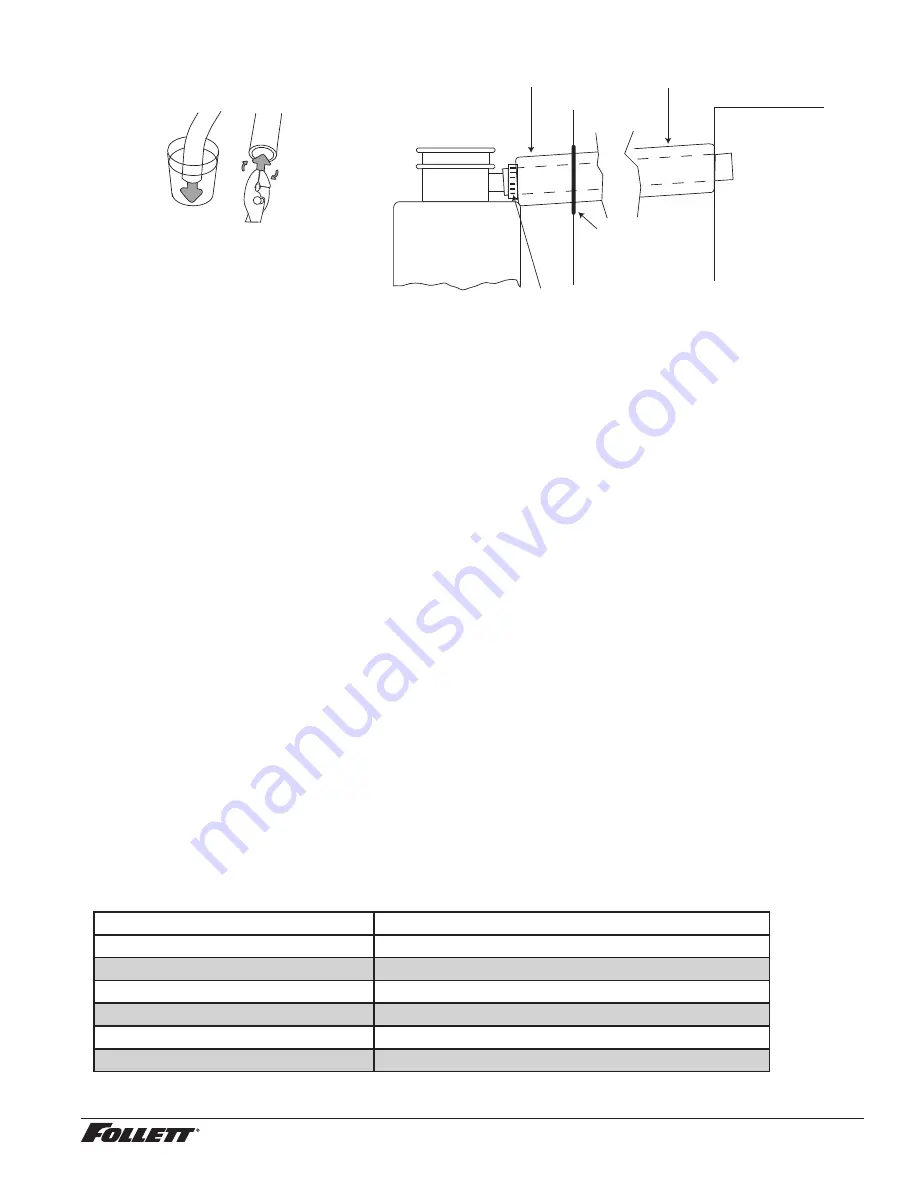
Heat end of transport tube in cup of 160 F 
(71 C) hot water to soften (

1) and spread with 

pliers before making connection (

2).  

install insulation on full run of tube

Evaporator

Dispenser

install clamp behind lip  
on evaporator port

grommet

RIDE model ice machine start up procedure

The start-up procedure below is intended to ensure that ice machine is operating properly after installation has been 

made. Check each item listed and call factory immediately for assistance if you experience problems with unit.

Before turning on power

1.  Turn on water to ice machine. 
2.  Push down on float to force water through overflow chamber into evaporator drain pan and check for proper 

drainage of drain pan.

3.  Check that float valve shuts off incoming water when raised.
4.  Check that hose clamp securely holds ice transport tube on evaporator port.

After turning on power

1.  Turn on power to ice machine and confirm that gearmotor, fan motor and compressor start immediately.
2.  Check that ice begins to enter dispenser bin area within approximately 10 minutes.
3.  Check that float reservoir water level is approximately 3/8" (.95mm) below overflow during ice machine 

operation and adjust to this level if necessary.

4.  Put ice against bin level thermostat in dispenser bin and check that compressor and fan motor shut down 

approximately 10 seconds after thermostat opens. Gearmotor should run for an additional 60 seconds.

5.  Check that ice machine comes back on in approximately 20 minutes (bin signal must be present).

Ice transport tube installation detail

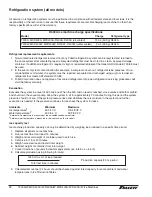
Cleaning/descaling and sanitizing

Periodic cleaning/descaling and sanitizing of Follett’s ice machine system is required to ensure peak performance 

and delivery of clean, sanitary ice. The recommended cleaning procedures that follow should be performed at least 

as frequently as recommended and more often if environmental conditions dictate.
Cleaning of the condenser can usually be performed by facility personnel. Cleaning/descaling and sanitizing of 

the ice machine system should be performed by your facility’s trained maintenance staff or a Follett authorized 

service agent. Regardless of who performs the cleaning, it is the operator’s responsibility to see that this cleaning is 

performed according to the schedule below. Service problems resulting from lack of preventive maintenance will not 

be covered under the Follett warranty.

Symphony

Frequency

Drain Line

weekly

Drain Pan/Drip Pan

weekly

Exterior

as needed

Condenser

monthly (air-cooled only)

Ice Machine

semi-annually

Transport Tube

semi-annually

*  Ice machine must be cleaned and sanitized prior to start-up.


T400A/W, MCD400A/W, R400A/W, MFD400A/W, D400A/W Ice Machines 17

Summary of Contents for D400A

Page 1: ...040 USA Toll free 877 612 5086 1 610 252 7301 www follettice com Installation Operation and Service Manual Serial numbers above D25455 T400A W MCD400A W R400A W MFD400A W D400A W Ice Machines Following installation please forward this manual to the appropriate operations person ...

Page 2: ...2 T400A W MCD400A W R400A W MFD400A W D400A W Ice Machines ...

Page 3: ... Semi annually 18 Service 19 Ice machine operation 19 Technical specifications 20 Refrigeration system diagram 20 Refrigeration pressure data 20 Compressor data 20 Gearmotor data 21 MCD400A W wiring diagram 21 Electrical control system operation 22 Refrigeration system 28 Service procedures 29 Evaporator disassembly 29 Evaporator reassembly 29 Gearmotor replacement 29 Troubleshooting 30 Replacemen...

Page 4: ...o provide information about the type and capacity of Follett equipment Following is an explanation of the different model numbers in the 400 series Important cautions Moving parts Do not operate with front cover removed Hot parts Do not operate with cover removed To reduce risk of shock disconnect power before servicing Most ice machine cleaners contain citric or phosphoric acid which can cause sk...

Page 5: ...ired dispenser 15A max fuse size ice machine 20A max fuse size VU155R400A W VU300R400A W VU155BR400A W VU300BR400A W VU155R400A WX VU155BR400A WX dispenser ice machine and bin signal cord plug provided 115 60 1 2 circuits required dispenser 15A max fuse size ice machine 20A max fuse size VU155NR400A W UD300R400A W VU155R800A W VU300R800A W VU155R800A WX VU155BR800A W VU300BR800A W VU155R800A WX di...

Page 6: ...ated Separate drains for ice machine and condenser To prevent back flow do NOT connect drains Follett recommends a Follett water filter system be installed in the ice machine inlet water line standard capacity 00130299 high capacity 00978957 carbonless high capacity 01050442 Ambient Air temperature 100 F 38 C max 50 F 10 C min best performance below 80 F 27 C Water temperature 90 F 32 C max 40 F 4...

Page 7: ...ew air cooled top mount Ice machine plug configuration NEMA 5 20 6 875 17 5 cm 2 51 mm Dimensions and clearances Entire front of ice machine must be clear of obstructions connections to allow removal 12 30 5 cm clearance above ice machine for service 6 15 3 cm minimum clearance between exhaust side of ice machine and any adjacent equipment MCD400A R400A 18 45 7 cm minimum 10 ft 3 m maximum clearan...

Page 8: ... bin top as shown Position ice machine on bin top front of ice machine top view shown 6 Make final plumbing and electrical connections 7 Working from inside bin storage area push end of transport tube without fasteners up through grommets into ice machine leaving about 2 51 mm hanging down in bin 8 Route free end of tube to evaporator port 9 Slip a hose clamp in free end of tube 10 Push free end o...

Page 9: ... group immediately at 877 612 5086 or 1 610 252 7301 Installing RIDE model ice machine and rough in utilities without optional slide out accessory The requirements below are for ice machine installation without the Follett slide out accessory These procedures ensure that the ice machine can be easily removed as one unit for cleaning and maintenance For installation with the slide out accessory ref...

Page 10: ...tion boxes using supplied holes in ice machine face 4 Make power and bin signal connections Field wiring diagrams for RIDE model ice machine installations All field wiring must be installed in accordance with NEC and local electrical codes Field wiring diagram is intended only to aid electrician or technician in understanding how equipment works Should local codes require a hard wired connection a...

Page 11: ...on ice machine stand in desired location and adjust stand legs to proper height and level in both directions 4 Using holes in flanged legs as template mark floor for 12 anchoring holes to be drilled 5 Remove stand track assembly and drill marked holes 6 Reposition and anchor stand to floor with 12 fasteners appropriate to floor material not supplied CAUTION Stand must be anchored to avoid tipping ...

Page 12: ...electrical plugs from ice machine to utility panel B When ice machine is installed in and shipped with counter 1 Remove two outer rear screws from ice machine and install supplied spacer and screw Fig 3 2 Place ice machine on slide out track assembly 3 Connect drain and water lines 4 Connect electrical plug from ice machine to utility panel 5 Remove pin from adjustable leg 6 Place hold down strap ...

Page 13: ...r cooled only 3 8 OD push in condenser drain water cooled only 3 8 OD push in ice machine water inlet icemaker power cord bin signal cord connector to connect to dispenser bin signal cord 22 75 57 8 cm 25 875 65 8 cm 19 25 48 9 mm 16 40 7 cm 1 563 40 mm Ice machine front 16 75 41 5 cm 22 75 57 8 cm 3 4 MPT ice machine drain cord holder 1 563 40 mm Plan view Side view All customer field connections...

Page 14: ...supplied grille on outside of counter opening Exhaust air all ice machines MCD400A W R400A W Provide 100 sq in 645 sq cm of counter opening for exhaust air at least 18 45 7 cm from intake opening but not more than 10 ft 3 m away MCD400AHS MCD400AVS R400A Side View Exhaust air Air intake Standard louvered grille supplied Supplied 2 51mm duct MUST be installed to front of ice machine and mated flush...

Page 15: ...ve ice machine top panel 5 Install supplied insulation on entire length of tube 6 Run insulated tube without dips between ice machine and dispenser and secure in place 7 Cut insulation off tube where tube enters grommet 8 Slide end of tube without insulation through grommet and run to evaporator port 9 Cut tube to that length 10 Install a section of insulation on tube from grommet to evaporator po...

Page 16: ...al ice transport tube connection specifications for Vision series ice and beverage dispensers Check to make sure bin signal on ice machine control board is switched to 24 V connection 1 Push one end of ice transport tube s through hole s provided in side of dispenser 2 Route tube into ice tube bracket inside dispenser and engage bracket tabs in holes located in end of ice transport tube s see draw...

Page 17: ...at in dispenser bin and check that compressor and fan motor shut down approximately 10 seconds after thermostat opens Gearmotor should run for an additional 60 seconds 5 Check that ice machine comes back on in approximately 20 minutes bin signal must be present Ice transport tube installation detail Cleaning descaling and sanitizing Periodic cleaning descaling and sanitizing of Follett s ice machi...

Page 18: ...porator is completely free of ice before proceeding 2 Disconnect power to ice machine 3 Remove any ice machine panels required to gain access to water reservoir and electrical control box 4 Turn compressor switch on electrical box of ice machine to OFF position 5 Remove water reservoir cover and close water supply valve or block up reservoir float 6 Drain water from reservoir by releasing evaporat...

Page 19: ...roduce the desired hardness Note MFD series flake ice machines have no compression nozzle As the formation of ice continues ice in the transport tube is pushed through the tube to the storage compartment in the ice dispenser or ice storage bin A solid state control board located in the electrical box of the ice machine controls the normal operation of the ice machine and monitors gearmotor torque ...

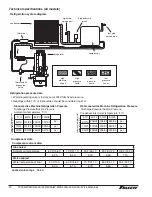
Page 20: ... cooled Ice Machine Refrigeration Pressure F C 50 10 70 21 90 32 Condenser inlet water temperature F C Air cooled Ice Machine Refrigeration Pressure Ambient air temperature F C Ice machine inlet water temperature F C Discharge Pressure Suction Pressure psi psi psi 100 38 237 37 326 38 347 40 80 27 245 31 244 30 265 32 60 16 174 23 174 23 190 25 F C 50 10 70 21 90 32 Ice machine inlet water tempera...

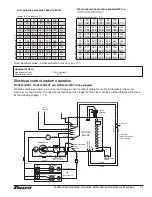
Page 21: ...nce with new RG Group 1 2 ton coil Note Data expressed in lbs hr and kg hr Note Nominal values actual production may vary by 10 Electrical control system operation MCD400A WBT MCD400A WHT and MFD400A WBT wiring diagram Follett ice machines used on top of an ice storage bin have a slightly different circuitry A diagram for these ice machines is shown below The operational and diagnostic stages for ...

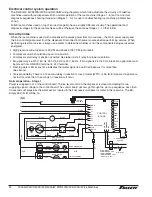
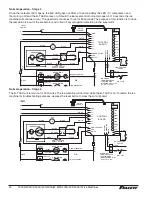
Page 22: ... 24 V 60 Hz black bin signal wire must be moved from LINE VAC terminal to 24 V terminal Flashing water LED at any time indicates that water signal to board had been lost for more than one second Ten second delay There is a 10 second delay in reaction to loss of water WTR or bin B E signals If signals are not lost for more than 10 seconds no reaction will occur Normal operation Stage 1 Power is sup...

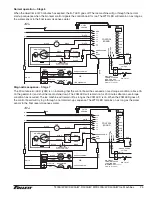
Page 23: ...GEARMOTOR RED START RUN RUN START START CAP LINIX GEARMOTOR OR Normal operation Stage 3 After the initial high current draw drops off the gearmotor start relay contacts open dropping out the start winding or start capacitor As the compressor comes up to normal running speed the compressor start relay contacts open dropping out the start winding of the compressor The ice machine is now in a normal ...

Page 24: ... PRESSURE SAFETY SWITCH M BLACK WHITE WHITE BLUE RELAY START T O L BLACK 4 2 3 YELLOW GEAR MOTOR T O L GEAR MOTOR RED START RUN RUN START START CAP BISON GEARMOTOR LINIX GEARMOTOR OR Normal operation Stage 5 The B T LED will remain on for 20 minutes The ice machine will not start while the B T LED is on To restart the ice machine for troubleshooting purposes depress the reset button to clear the c...

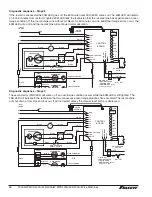
Page 25: ... minute error LED 20M is on indicating that the control board has sensed an over torque condition above 3A on the gearmotor and shut the ice machine down The 20M LED will remain on for 20 minutes after an over torque condition has occurred The ice machine will remain off as long as the 20M LED is on When the 20M LED goes off the control board will try to go through a normal start up sequence The W...

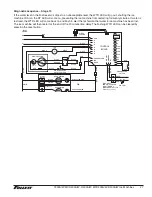
Page 26: ...K 4 2 3 YELLOW GEAR MOTOR T O L GEAR MOTOR RED START RUN RUN START START CAP BISON GEARMOTOR LINIX GEARMOTOR OR Diagnostic sequence Stage 9 The second error 2ND LED will come on if an over torque condition occurs while the 60M LED is still lighted The 2ND LED will indicate to the technician that two consecutive over torque situations have occurred The ice machine will shut down at this time and lo...

Page 27: ...eared by pressing the reset button GRD L1 L1 L2 L2 L2 L2 L2 COMPRESSOR FAN DRIVE DR C 20M 60M 2ND WTR B T B E RESET GRD G B W FAN BLACK WHITE BLACK BLACK R ORANGE S S L COMPRESSOR C RED BLACK BLACK INPUT POWER WATER SENSOR CONTROL BOARD 24V COMMON LINE VAC RED RED WHITE BLACK BIN T STAT BIN SIGNAL FROM DISPENSER JUNCTION BOX MCD400A WVS series blk wire is on 24V WHITE RED WHITE M 1 COMPRESSOR SWIT...

Page 28: ...tion Evacuate the system to a level of 500 microns When the 500 micron level is reached close valves and both manifold and shut down the vacuum pump Allow the system to sit for approximately 20 minutes During this period the system pressure should not rise If the system pressure rises and stabilizes there is moisture in the system and further evacuation is needed If the pressure continues to rise ...

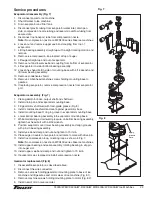
Page 29: ...or mounting base 3 Fill gearmotor shaft well with food grade grease Fig 8 4 Install condensate shield and seat against gearmotor boss 5 Install mounting base O ring in groove in evaporator mounting base 6 Lower bottom bearing assembly into evaporator mounting base 7 While maintaining a downward pressure on bottom bearing assembly tighten hex head bolt with a 5 16 wrench 8 Position evaporator over ...

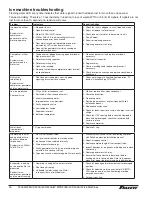
Page 30: ...stricted air flow to condenser coil 3 Mineral coated evaporator 4 Improper exhaust air provisions 5 Faulty expansion valve 6 Low refrigerant charge 7 Superheat incorrect 8 Inefficient compressor 1 Clean or replace filter clean condenser 2 Remove obstruction 3 Clean evaporator 4 Provide proper exhaust air provisions per Follett installation manual 5 Replace expansion valve 6 Check for leaks repair ...

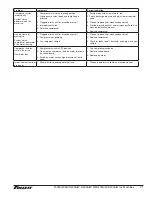
Page 31: ...machine installation manual 5 Replace compressor Unit runs but not making ice System status compressor gearmotor fan motor running 1 Clogged or dirty air filter or condenser coil 2 Compressor not pumping 3 Low refrigerant charge 1 Clean or replace filter clean condenser coil 2 Replace compressor 3 Check for leaks repair evacuate and weigh in correct charge Compressor and fan motor will not run Gea...

Page 32: ...4 20 x 1 2 set of 4 501080 11 Mounting base evap includes 501063 502733 12 Bolt mounting base 502227 13 Gearbox motor includes 307192 502730 Not shown Mounting base gearbox 502729 15 Compression nozzle with single drain 502221 16 Drain pan evaporator 502727 17 Clamp compression nozzle and screw 502226 18 Tubing compression nozzle drain s sold by foot 500680 Not shown Grease Chevron SRI 2 14 oz 501...

Page 33: ...Evaporator Order parts online www follettice com 2 15 17 18 1 3 4 5 20 19 7 6 8 10 11 12 16 9 22 21 13 1 T400A W MCD400A W R400A W MFD400A W D400A W Ice Machines 33 ...

Page 34: ...Air cooled ice machines 2 15 17 3 4 5 7 6 10 11 12 16 9 13 1 14 8 Order parts online www follettice com 34 T400A W MCD400A W R400A W MFD400A W D400A W Ice Machines ...

Page 35: ...501966 10 Mounting bracket gearbox 502729 11 Gearbox motor assembly 115 V 60 Hz 502730 12 Tubing plastic food grade 1 2 13mm ID sold by foot 501191 13 Fan blade 500474 14 Motor fan 115 V 60 Hz 500672 15 Bracket fan motor 501188 Not shown Overload compressor 115 V 60 Hz 502782 16 Compressor 115 V 60 Hz 502731 17 Base L400A 502728 Not shown Strainer water threaded connections 500376 Not shown Strain...

Page 36: ...15 17 3 4 5 7 6 10 11 12 16 9 13 1 14 8 19 19 18 20 Water cooled ice machines before serial number C57245 Order parts online www follettice com 36 T400A W MCD400A W R400A W MFD400A W D400A W Ice Machines ...

Page 37: ...old by foot 501966 9 Gearbox motor assembly 115 V 60 Hz 502730 10 Mounting bracket gearbox 502729 11 Tubing plastic food grade 1 2 13 mm ID sold by foot 501191 12 Motor fan 115V 60Hz 500672 13 Bracket fan motor 501188 14 Fan blade 500790 Not shown Overload compressor 115 V 60 Hz 502782 15 Compressor 115 V 60 Hz 502731 16 Coil condenser 00111898 17 Base L400W 502741 Not shown Strainer water threade...

Page 38: ...2 15 3 4 5 7 6 10 11 12 16 9 13 1 14 8 17 17 Water cooled ice machines after serial number C57244 Order parts online www follettice com 38 T400A W MCD400A W R400A W MFD400A W D400A W Ice Machines ...

Page 39: ...9 mm ID x 1 26 mm OD sold by foot 501966 9 Gearbox motor assembly 115 V 60 Hz 502730 10 Mounting bracket gearbox 502729 11 Tubing plastic food grade 1 2 13mm ID sold by foot 501191 Not shown Overload compressor 115 V 60 Hz 502782 12 Compressor 115 V 60 Hz 502731 13 Coil condenser 00195933 14 Base L400W 502741 Not shown Strainer water threaded connections 500376 Not shown Strainer push in connectio...

Page 40: ...tch on off compressor 502392 Not shown Bin thermostat MCD400A WBT MCD400A WHT MFD400A WBT and MFD400A WHT only 500514 5 Board stand off control 4 required 501959 SOFTWARE LABEL COMP DRIVE L2 FAN L2 EARTH L2 L2 L1 L1 L2 60M 2ND B T WTR B E SWITCH COMP COMM VAC 24 LINE VAC I D DR 20M C POWER RESET I D PROBE WATER 3 2 1 5 4 Order parts online www follettice com 40 T400A W MCD400A W R400A W MFD400A W ...

Page 41: ...unt and freestanding dispensers 501702 Control board adapter R404A to R12 502051 Cord and twist lock plug male ice machine bin signal 502052 Cord and twist lock plug male ice machine power 502333 Plug twist lock two lead male 502334 Plug twist lock two lead female 502235 Plug twist lock three lead male 502336 Plug twist lock three lead female 502794 Panel right hand louvered R400A MCD400A W 502795...

Page 42: ...e filter single 00130211 Not shown Water pre filter cartridge pre filter carton of 12 00954305 Carbonless high capacity filter system Not shown Carbonless high capacity water filter system one per ice machine Horizon and Maestro series ice machines 01050442 Not shown Carbonless high capacity water filter cartridge primary single 01050426 Not shown Carbonless high capacity water filter cartridge pr...

Page 43: ... with air cooled ice machines MCD400A All U150 VU155 series with water cooled ice machines MCD400W All VU300 series with air cooled ice machines MCD400A All VU300 series with water cooled ice machines MCD400W Dispenser models Replacement ice machine model Freestanding dispensers with ice machines in the base 25FB400A D400A 25FB400W D400W 50FB400A D400A 50FB400W D400W 110FB400A D400A 110FB400W D400...

Page 44: ... 18040 USA Toll free 877 612 5086 1 610 252 7301 www follettice com Harmony SafeCLEAN Symphony and Vision are trademarks of Follett Corporation Chewblet RIDE and Follett are registered trademarks and Horizon is a trademark of Follett Corporation registered in US ...

Reviews: