


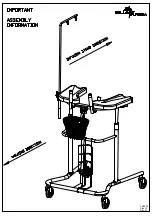

Unpacking / Installation:
1. Make sure that the product has not been damaged (hurt) in
transport.
2. Fit the walker according to assembly instructions.
3. Assemble all the accessories that have been ordered.
4. Test all the various functions and setting options.
Security Information:
1. If there is any damage or defects in the walker should not be
used until these are rectified.
2. The Walker is designed for indoor use.
3. When adjusting height and depression, make sure that nothing
is pinched between the frame parts.
4. The Walker should never be charged with more than the
approved static use weight.
5. Infusion stand has to be mounted parallel to the walker. (See
illustration on page 16).
6. The Walker must not be modified or used with other
accessories than the original. Producer responsibility for CE
marking terminates any self-modification.
7. The electric walker should not be used with the charger
attached to the wall outlet.
Instructions for use:
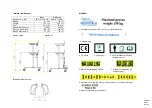
Height Control of walker with gas spring: The handle on the front
of the top frame activates the gas spring. Squeeze the handle to
the top frame to adjust the walker up or down. To lower the
walker, squeeze the handle and load the armrest with body
weight, then drop the handle at the desired level.
Height Control of walker with electric motor: The height of the
armrests is adjusted with the controller to the desired height. The
product is also delivered with maneuvering feature integrated into
the handles.
Cushions adjustment: Loosen the handles. Adjust the cushions to
the desired position, tighten the handles. (Make sure they are
tightened). Please note: support handles follow the armrest
setting and facilitates appropriate support and use.
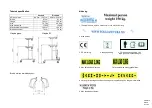
Wheels locking: The rear wheels have locks. To unlock the
brakes press down the "locking" with the foot. To release the
brakes tilt "locking" up again with the toe.
Maintenance / inspection:
Control at regular intervals (for example every third months):
1. That all screws are tight and all functions are working properly.
2. That there is no damage or wear and tear on the walker and
the walker is stable.
3. That the braking effect on the brakes is adequate.
4. That the telescopic tubes are lubricated regularly (with a thin
layer of, for example, Vaseline or silicone).
The cushions are made of polyurethane foam, and can easily be
wiped off with most detergents.
Attention! Alcohol-based products discolor the cushions. The
motor, the control box and the controller should be wiped off with
a slightly moist cloth.
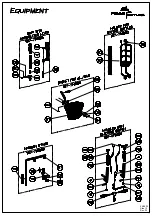
Reconditioning:
• Reconditioning of the product must be performed by
professionals.
• Before cleaning / disinfection, remove the cushions. Control Box
is attached with Velcro must be easily removed from the base
frame, a hand control follows with. Engine disassembles easily by
removing two M10 bolts and nuts, see the groundbreaking
design.
• After cleaning / disinfecting, wipe product carefully so that
moisture dislodges. It is very important that all cavities are
inspected for moisture.
• When the product is dry, Telescopic tube must be lubricated
with silicone spray and top frame is moved up and down a few
times so that the parts slide easily. After mounting of cushions,
check the sideway adjust alignment and if the felt is in place.
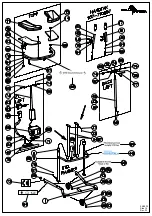
• Replace worn parts and ordered by the supplier, see the
exploded drawing and part list.
• All worn / damaged Information - and warning labels must be
replaced. These ordered from the supplier.
• The product assembles in accordance with groundbreaking
design.
Recycling:
The motor, the control box and the hand control are disposed of
as electronic waste. The cushions are disposed of as combustible
waste, while the stand etc. are sorted as metal.
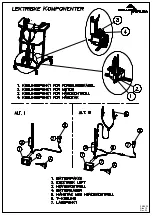
Charge Routines:
When charging the Follo Stabilis Walker, the charger should
always first be connected to the walker before plugging into the
wall outlet. Disconnection is performed in the reverse order.
The batteries are usually fully charged at delivery, but they should
nevertheless be set to charge overnight before Follo Stabilis
Walker is applied. The charging should always be done in room
temperature. It should always be charged when the warning
sound appears (a beep sound). The battery should never be
completely emptied. The battery will not be destroyed by too
much charge.
NOTE: The walker should NOT be used with the charging
device (A) connected.
The charging takes place via the battery pack (B) or via the
controller (C). The charging unit (A) is inserted into a hole on the
left side products. The unit is charged via a common wall outlet.
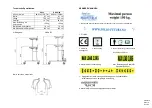
24/06/10
Side 7
Rev: 02
Summary of Contents for STABILIS
Page 1: ...FOLLO STABILIS WALKER...
Page 11: ...24 06 10 Side 11 Rev 02...
Page 12: ...24 06 10 Side 12 Rev 02...
Page 13: ...24 06 10 Side 13 Rev 02...
Page 14: ...24 06 10 Side 14 Rev 02...
Page 16: ...24 06 10 Side 16 Rev 02...


