background image

IST 03 C 1321 - 02


MODULAR HEAT GENERATORS 

ITACA CH KR

MODULE ON FRAME

INDOOR INSTALLATION ONLY

INSTALLATION, USE

It is compulsory to read this manual before proceeding with the product installation, use and 

maintenance operations.

This system is intended for production of hot technical water only:

•  For heating of residential, commercial and industrial rooms.

•  For heating of industrial process water.

•  For indirect production of domestic hot water.

Any other use is forbidden.

EN

Summary of Contents for ITACA CH KR 105

Page 1: ...ad this manual before proceeding with the product installation use and maintenance operations This system is intended for production of hot technical water only For heating of residential commercial and industrial rooms For heating of industrial process water For indirect production of domestic hot water Any other use is forbidden EN ...

Page 2: ...requirements set forth by the prevailing rules We hereby inform you that certain models versions and or accessories relevant to the products this manual refers to might not be available in some countries Therefore it is recommended to contact the manufacturer or the importer in order to get the necessary information about the actual availability of such models versions and or accessories The manuf...

Page 3: ... legislation in force is forbid den DANGER This boiler must be installed according to the manufacturer s instructions given in this manual Incorrect installation may cause injury to persons and or animals and damage to property The manufacturer shall not be held liable for any such injury and or damage WARNING This boiler must be installed inside the building or in a partially sheltered place A pa...

Page 4: ...ilure to comply with all the instructions above Before installing the boiler check that the technical data correspond to the requirements for its correct use in the system Check that the boiler is intact and it has not been damaged during transport and handling Do not install equipment which is clearly damaged and or faulty Damage and or injury caused by incorrect installation or use and or damage...

Page 5: ...ll prevailing law require ments and trained to properly carry out these operations In the event of long periods of inactivity of the boiler disconnect it from the electrical power mains and close the gas cock WARNING With the electrical power disconnected and the gas cock closed the device s electrical anti freeze function does not work Should there be a risk of freezing add antifreeze it is not a...

Page 6: ...of the expansion module 39 1 9 Operations to close flow and return taps 48 1 10 Pump matching 48 1 11 Assembling the hydraulic separator 49 1 12 Plate exchanger technical data 51 1 13 Assembling the plate exchanger 53 1 14 Flue gas collector assembly and configuration tables 59 1 15 Nominal data tables 74 1 16 Nominal electrical data tables 76 1 17 Tables of dimensions weights connections and volu...

Page 7: ...ctor assembly 60 Fig 20 Hydraulic separator flow resistance on system side 83 Fig 21 120 kW plate exchanger flow resistance on primary side and secondary side 83 Fig 22 205 kW plate exchanger flow resistance on primary side and secondary side 84 Fig 23 300 kW plate exchanger flow resistance on primary side and secondary side 84 Fig 24 360 kW plate exchanger flow resistance on primary side and seco...

Page 8: ...510 76 Tab 26 Nominal electrical data for configurations from 540 to 720 77 Tab 27 Nominal electrical data for configurations from 750 to 900 77 Tab 28 Dimensions weights connections and volumes for configurations from 45 to 105 77 Tab 29 Dimensions weights connections and volumes for configurations from 120 to 300 78 Tab 30 Dimensions weights connections and volumes for configurations from 325 to...

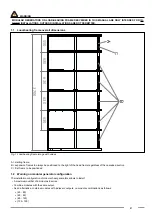
Page 9: ... A starting frame B expansion frames to always be positioned to the right of the head frame regardless of the cascade direction C first frame to be positioned 1 2 Warning on modular generator configuration The installation configuration of modular heat generators allows to install A maximum number of 6 modules in series Combine modules with the same output As an alternative combine modules with ad...

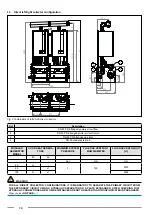
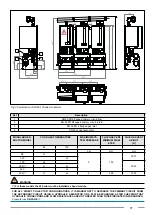
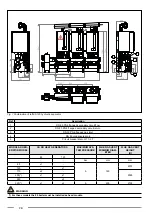
Page 10: ...et 4 DN 50 condensate drain MODULAR GENERATOR MODEL CH KR HEAT GENERA TORS MAXIMUM SYSTEM PRESSURE FLUE GAS VENT MINI MUM DIAMETER FLUE GAS VENT HEIGHT H 45 60 bar mm mm 45 x1 3 160 2075 60 x1 105 x1 x1 2095 WARNING FOR ALL DIRECT COLLECTOR CONFIGURATIONS IT IS MANDATORY TO SEPARATE THE PRIMARY CIRCUIT FROM THE SECONDARY CIRCUIT USING A HYDRAULIC SEPARATOR OR A PLATE EXCHANGER AFTER CHECKING THAT ...

Page 11: ...RATORS MAXIMUM SYS TEM PRESSURE FLUE GAS VENT MINIMUM DIAM ETER FLUE GAS VENT HEIGHT H 85 120 bar mm mm 85 x1 5 160 2075 120 x1 170 x2 2095 205 x1 x1 240 x2 325 x1 x2 5 200 2135 WARNING For these models the 85 boiler must be installed as head module FOR ALL DIRECT COLLECTOR CONFIGURATIONS IT IS MANDATORY TO SEPARATE THE PRIMARY CIRCUIT FROM THE SECONDARY CIRCUIT USING A HYDRAULIC SEPARATOR OR A PL...

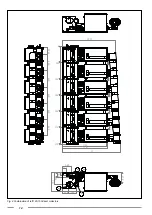
Page 12: ...12 1730 1761 H 130 130 130 130 130 0 630 1260 1890 2520 3150 3796 2079 630 630 630 630 630 274 5 122 190 474 171 343 235 300 741 416 1 2 3 4 Fig 4 Combination of left 120 150 direct collectors ...

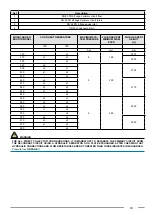
Page 13: ...270 x1 x1 2095 300 x2 360 x3 5 200 2135 390 x2 x1 420 x1 x2 450 x3 480 x4 2170 510 x3 x1 540 x2 x2 570 x1 x3 600 x4 630 x4 x1 5 250 2230 660 x3 x2 690 x2 x3 720 x1 x4 750 x5 780 x4 x2 2260 810 x3 x3 870 x1 x5 900 x6 WARNING FOR ALL DIRECT COLLECTOR CONFIGURATIONS IT IS MANDATORY TO SEPARATE THE PRIMARY CIRCUIT FROM THE SECONDARY CIRCUIT USING A HYDRAULIC SEPARATOR OR A PLATE EXCHANGER AFTER CHECKI...

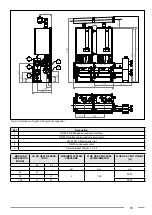
Page 14: ...ic separator Ref Description 1 DN 80 PN 6 flanged secondary circuit flow 2 DN 80 PN 6 flanged secondary circuit return 3 DN 50 PN 6 flanged gas inlet 4 DN 50 condensate drain 5 Circuit breaker drain G 1 1 2 F MODULAR GENERATOR MODEL CH KR HEAT GENERA TORS MAXIMUM SYSTEM PRESSURE FLUE GAS VENT MINI MUM DIAMETER FLUE GAS VENT HEIGHT H 45 60 bar mm mm 45 x1 3 160 2075 60 x1 105 x1 x1 2095 ...

Page 15: ...ption 1 DN 80 PN 6 flanged secondary circuit flow 2 DN 80 PN 6 flanged secondary circuit return 3 DN 50 PN 6 flanged gas inlet 4 DN 50 condensate drain 5 Circuit breaker drain G 1 1 2 F MODULAR GENERATOR MODEL CH KR HEAT GENERA TORS MAXIMUM SYSTEM PRESSURE FLUE GAS VENT MINI MUM DIAMETER FLUE GAS VENT HEIGHT H 45 60 bar mm mm 45 x1 3 160 2075 60 x1 105 x1 x1 2095 ...

Page 16: ...y circuit flow 2 DN 80 PN 6 flanged secondary circuit return 3 DN 50 PN 6 flanged gas inlet 4 DN 50 condensate drain 5 Circuit breaker drain G 1 1 2 F MODULAR GEN ERATOR MODEL CH KR HEAT GENERATORS MAXIMUM SYS TEM PRESSURE FLUE GAS VENT MINIMUM DIAM ETER FLUE GAS VENT HEIGHT H 85 120 bar mm mm 85 x1 5 160 2075 120 x1 170 x2 2095 205 x1 x1 240 x2 325 x1 x2 5 200 2135 WARNING For these models the 85...

Page 17: ...ary circuit flow 2 DN 80 PN 6 flanged secondary circuit return 3 DN 50 PN 6 flanged gas inlet 4 DN 50 condensate drain 5 Circuit breaker drain G 1 1 2 F MODULAR GEN ERATOR MODEL CH KR HEAT GENERATORS MAXIMUM SYS TEM PRESSURE FLUE GAS VENT MINIMUM DIAM ETER FLUE GAS VENT HEIGHT H 85 120 bar mm mm 85 x1 5 160 2075 120 x1 170 x2 2095 205 x1 x1 240 x2 325 x1 x2 5 200 2135 WARNING For these models the ...

Page 18: ...18 1730 1761 H 130 130 130 130 130 0 630 1260 1890 2520 3150 3796 2079 550 630 630 630 630 630 274 5 122 190 474 171 343 235 300 741 416 1 2 3 4 5 Fig 9 Combination of left 120 150 hydraulic separator ...

Page 19: ... G 1 1 2 F MODULAR GEN ERATOR MODEL CH KR HEAT GENERATORS MAXIMUM SYS TEM PRESSURE FLUE GAS VENT MINIMUM DIAM ETER FLUE GAS VENT HEIGHT H 120 150 bar mm mm 150 x1 5 160 2075 270 x1 x1 2095 300 x2 360 x3 5 200 2135 390 x2 x1 420 x1 x2 450 x3 480 x4 2170 510 x3 x1 540 x2 x2 570 x1 x3 600 x4 630 x4 x1 5 250 2230 660 x3 x2 690 x2 x3 720 x1 x4 750 x5 780 x4 x2 2260 810 x3 x3 870 x1 x5 900 x6 ...

Page 20: ... 130 130 130 130 130 2079 0 551 630 1260 1890 2520 3150 3796 630 630 630 630 630 274 5 122 190 474 171 343 235 741 416 535 171 339 122 190 474 135 311 1 2 5 3 4 Fig 10 Combination of right 120 150 hydraulic separator ...

Page 21: ... G 1 1 2 F MODULAR GEN ERATOR MODEL CH KR HEAT GENERATORS MAXIMUM SYS TEM PRESSURE FLUE GAS VENT MINIMUM DIAM ETER FLUE GAS VENT HEIGHT H 120 150 bar mm mm 150 x1 5 160 2075 270 x1 x1 2095 300 x2 360 x3 5 200 2135 390 x2 x1 420 x1 x2 450 x3 480 x4 2170 510 x3 x1 540 x2 x2 570 x1 x3 600 x4 630 x4 x1 5 250 2230 660 x3 x2 690 x2 x3 720 x1 x4 750 x5 780 x4 x2 2260 810 x3 x3 870 x1 x5 900 x6 ...

Page 22: ...d secondary circuit flow 2 DN 80 PN 6 flanged secondary circuit return 3 DN 50 PN 6 flanged gas inlet 4 DN 50 condensate drain ATTENTION flow and return manifolds to be connected to the secondary circuit of the plate exchanger are op tional MODULAR GENERATOR MODEL CH KR HEAT GENERA TORS MAXIMUM SYSTEM PRESSURE FLUE GAS VENT MINI MUM DIAMETER FLUE GAS VENT HEIGHT H 45 60 bar mm mm 45 x1 3 160 2075 ...

Page 23: ...it flow 2 DN 80 PN 6 flanged secondary circuit return 3 DN 50 PN 6 flanged gas inlet 4 DN 50 condensate drain ATTENTION flow and return manifolds to be connected to the secondary circuit of the plate exchanger are op tional MODULAR GENERATOR MODEL CH KR HEAT GENERA TORS MAXIMUM SYSTEM PRESSURE FLUE GAS VENT MINI MUM DIAMETER FLUE GAS VENT HEIGHT H 45 60 bar mm mm 45 x1 3 160 2075 60 x1 105 x1 x1 2...

Page 24: ...ondary circuit return 3 DN 50 PN 6 flanged gas inlet 4 DN 50 condensate drain ATTENTION flow and return manifolds to be connected to the secondary circuit of the plate exchanger are op tional MODULAR GEN ERATOR MODEL CH KR HEAT GENERATORS MAXIMUM SYS TEM PRESSURE FLUE GAS VENT MINIMUM DIAM ETER FLUE GAS VENT HEIGHT H 85 120 bar mm mm 85 x1 5 160 2075 120 x1 170 x2 2095 205 x1 x1 240 x2 325 x1 x2 5...

Page 25: ...secondary circuit return 3 DN 50 PN 6 flanged gas inlet 4 DN 50 condensate drain ATTENTION flow and return manifolds to be connected to the secondary circuit of the plate exchanger are op tional MODULAR GEN ERATOR MODEL CH KR HEAT GENERATORS MAXIMUM SYS TEM PRESSURE FLUE GAS VENT MINIMUM DIAM ETER FLUE GAS VENT HEIGHT H 85 120 bar mm mm 85 x1 5 160 2075 120 x1 170 x2 2095 205 x1 x1 240 x2 325 x1 x...

Page 26: ...30 130 130 130 130 2079 0 630 1260 1890 2520 3150 3796 1090 630 630 630 630 630 274 5 122 190 474 171 343 741 416 641 1062 170 203 1 2 3 4 122 190 474 171 342 235 535 Fig 15 Combination of left 120 150 plate exchanger ...

Page 27: ...ndary circuit of the plate exchanger are op tional MODULAR GEN ERATOR MODEL CH KR HEAT GENERATORS MAXIMUM SYS TEM PRESSURE FLUE GAS VENT MINIMUM DIAM ETER FLUE GAS VENT HEIGHT H 120 150 bar mm mm 150 x1 5 160 2075 270 x1 x1 2095 300 x2 360 x3 5 200 2135 390 x2 x1 420 x1 x2 450 x3 480 x4 2170 510 x3 x1 540 x2 x2 570 x1 x3 600 x4 630 x4 x1 5 250 2230 660 x3 x2 690 x2 x3 720 x1 x4 750 x5 780 x4 x2 22...

Page 28: ...61 H 130 130 130 130 130 2079 0 630 1260 1890 2520 3150 3796 1090 630 630 630 630 630 274 5 122 190 474 171 343 741 416 122 190 171 342 641 1061 214 180 1 2 3 4 Fig 16 Combination of right 120 150 plate exchanger ...

Page 29: ...ndary circuit of the plate exchanger are op tional MODULAR GEN ERATOR MODEL CH KR HEAT GENERATORS MAXIMUM SYS TEM PRESSURE FLUE GAS VENT MINIMUM DIAM ETER FLUE GAS VENT HEIGHT H 120 150 bar mm mm 150 x1 5 160 2075 270 x1 x1 2095 300 x2 360 x3 5 200 2135 390 x2 x1 420 x1 x2 450 x3 480 x4 2170 510 x3 x1 540 x2 x2 570 x1 x3 600 x4 630 x4 x1 5 250 2230 660 x3 x2 690 x2 x3 720 x1 x4 750 x5 780 x4 x2 22...

Page 30: ... pipes and the relevant flue gas caps on all generators as shown in the figure Fasten the generators to the rack as shown in the figure 319 630 270 25 25 25 25 Check that the two generators are positioned on the rack according to the values indicated in the figure ...

Page 31: ...bove 150 Check that the condensate drain is approximately positioned according to the value indicated in the figure 80 85 Fasten the cap to the gas collector using the gasket supplied Position the gas collector as shown in the figure above Check that the gas collector is approximately positioned according to the value indicated in the figure ...

Page 32: ...to the condensate trap Using screws fasten the bracket with the trap to the lower part of the boiler as shown in the figure Metal clamp Fasten the trap with the metal clamp as shown in the figure Connect the trap drain to the drain pipe ...

Page 33: ...33 85 45 Fit the gasket and the gas fitting only for boiler models from 45 to 85 Utilizzare teflon Use teflon Fit the gas tap Fasten the gas pipe by placing the gaskets supplied in between ...

Page 34: ...pipe in case of models from 120 to 150 In case of boilers models from 120 to 150 it is not necessary to install the gas fitting Fasten the insulating material and the cap to the return collector by placing the proper gasket supplied in between Fix the tap on the return collector before positioning it on the structure ...

Page 35: ...models before mounting the pump under the boiler it is necessary to mount the supplied wiring to the pump DIRECTION TOWARDS THE BOILER DIRECTION TOWARDS THE BOILER Fasten the components of the hydraulic part paying attention to the installation direction of the non return valve and the installation direction of the circulation pump Fasten the hydraulic components between the boiler and the return ...

Page 36: ...e flow collector Place the flow collector in the position shown in the figure The direction does not change according to the expansion direction of the right or left cascade WARNING 1 fitting for connection of expansion tank and or system filler drain cock In case of hydraulic separator installation the drain can be made on the pre arranged connection on the hydraulic separator ...

Page 37: ...37 Only for models from 45 to 85 Use teflon Use teflon 1 connector for expansion vessel installation Fasten the components shown in the figure Use teflon Use teflon Use teflon ...

Page 38: ...e flow collector Fasten the cap to the return collector WARNING Fitting for connection of expansion tank and or filler drain cock In case of hydraulic separator installation the drain can be made on the pre arranged connection on the hydraulic separator ...

Page 39: ...39 1 8 Assembling the hydraulic and gas components of the expansion module Assemble the condensate drain following the instructions in the figure above ...

Page 40: ...40 Fasten the cap to the gas collector with the gasket supplied Fasten the gas collector with screws and nuts by placing the gasket between the two collectors ...

Page 41: ...on Fit the gas tap The fitting operations of an hydraulic unit for 120 150 boiler model are described below If a boiler with output up to 85 is installed refer to the figures above 120 150 Fasten the gas pipe by placing the gaskets supplied in between WARNING For models from 45 to 85 add the fitting under the boiler ...

Page 42: ... to the return collector by placing the proper gasket supplied in between Fix the tap on the return collector before positioning it on the structure Fasten the return collector with screws and nuts by placing the gasket between the two collectors ...

Page 43: ...e supplied wiring to the pump DIRECTION TOWARDS THE BOILER DIRECTION TOWARDS THE BOILER Fasten the components of the hydraulic part paying attention to the installation direction of the non return valve and the installation direction of the circulation pump Fasten the hydraulic components between the boiler and the return collector ...

Page 44: ...aterial and the caps in the upper and rear part of the flow collector Place the flow collector in the position shown in the figure WARNING 1 fitting for connection of expansion tank and or system filler drain cock In case of hydraulic separator installation the drain can be made on the pre arranged connection on the hydraulic separator ...

Page 45: ...45 Fasten the flow collector with screws and nuts by placing the gasket between the two collectors Use teflon 1 connector for expansion vessel installation Fasten the components shown in the figure ...

Page 46: ...46 Use teflon Use teflon Fit the just assembled unit to the boiler and the flow collector ...

Page 47: ...er drain cock In case of hydraulic separator installation the drain can be made on the pre arranged connection on the hydraulic separator If expansion modules are not installed it is necessary to close the flow and return collectors the gas collector and the drain with the components shown in the figure ...

Page 48: ...lector boiler return section clockwise With pumps stopped turn the tap with red knob on the flow collector boiler flow section clockwise The knobs must be fully rotated Now the system between collectors and boiler can be considered as disconnected Blue knob Red knob 1 10 Pump matching Generator model 45 60 85 120 150 Yonos para RS 25 7 5 PWM 7 5 m X Stratos para 25 1 8 T10 PWM 8 m ok X Stratos par...

Page 49: ...de probe Bleed valve Use teflon Use teflon Use teflon Use teflon Use teflon 1 4 1 2 adapter Cascade probe port WARNING Apply conductive paste to the surface of the component sensitive element Use teflon Fasten the components shown in the figure to the upper part of the hydraulic separator Fasten the cap in the rear part of the hydraulic separator ...

Page 50: ...SECONDARY CIRCUIT FLOW CONNECTION 4 DN 80 PN 6 SECONDARY CIRCUIT RETURN CONNECTION 5 CONNECTION FOR 1 1 2 F DRAIN Fasten the hydraulic separator with screws and nuts by placing the gaskets between the two flow and return collectors of the head unit To align the hydraulic separator with the flow and return collector adjust the feet fastened to its lower part ...

Page 51: ...CAMPIA32 UP TO 540 KW 51 127 5 6 98 6 98 141 157 0SCAMPIA33 UP TO 600 KW 57 142 5 7 81 7 81 145 163 0SCAMPIA34 UP TO 690 KW 63 157 5 8 65 8 65 151 171 0SCAMPIA35 UP TO 780 KW 71 177 5 9 76 9 76 157 179 0SCAMPIA36 UP TO 900 KW 79 197 5 10 88 10 88 163 187 A C C E S S O R Y CODE PLATE EXCHANG ER EXCHANGE SURFACE PRIMARY SECONDARY ΔP IN OUT IN OUT PRIMARY SECONDARY m2 C C C C kPa kPa 0SCAMPIA27 UP TO...

Page 52: ...LY CUT THE FLANGES AS SHOWN IN THE FIGURE ABOVE FONDITAL CONNECTION ACCESSORIES ARE PRESET TO THIS PURPOSE MATERIALS AND CONNECTIONS Frame P355NH Plates AISI304 Gaskets EPDM Primary connections P355NH Secondary connections P355NH Tie rods A193B7 Plate thickness mm 0 5 Primary and secondary connections Flanged DN 65 M16 tie rods ...

Page 53: ...53 1 13 Assembling the plate exchanger Fasten the plates with screws and nuts Screw the feet to the lower part of the exchanger ...

Page 54: ...54 Fasten the secondary system return collector optional with screws and nuts by placing the gasket between collector and plate ex changer ...

Page 55: ...55 Fasten the secondary system flow collector optional with screws and nuts by placing the gasket between collector and plate ex changer ...

Page 56: ...56 Fasten the boiler return collector with screws and nuts by placing the gasket between collector and plate exchanger ...

Page 57: ... OF THE COMPONENT SENSITIVE ELEMENT Use teflon Fasten the boiler flow collector with screws and nuts by placing the gasket between collector and plate exchanger Fasten the components shown in the figure to the upper part of the collector Fasten the cap in the rear part of the collector ...

Page 58: ... by placing the gasket between collectors of the hydraulic unit and collectors of the plate exchanger To align collectors of the plate exchanger and collectors of the head hydraulic unit adjust the feet fastened to the lower part of the exchanger ...

Page 59: ... collectors is required value A of D100 extension to tilt the flue gas collector is ensured by the height of D80 100 fitting Therefore it is not necessary to install the D100 extension when the 45 60 85 boiler is in head position of the cascade WARNING In case of 325 installations and in all cases where a 85 boiler is matched with a 120 boiler the 85 boiler with lower output must be positioned on ...

Page 60: ...60 F E D C B A 2 1 Fig 19 120 150 flue gas collector assembly 1 D 250 200 flue gas collector depending on the battery power 2 D 250 200 connection extension depending on the battery power ...

Page 61: ...00 230 260 Tab 3 Stub pipe lengths For boiler models from 45 to 85 it is necessary to use a D80 100 flue gas fitting For boiler matching in the modular generator when a 45 60 85 model boiler is installed and positioned in the first position in the cascade the D80 100 adapter has the same height as value A therefore it is not necessary to use the D100 connection extension Code Image 45 60 105 0COLL...

Page 62: ...0COLLFUM03 1 1 2 2 2 D 160 0COLLFUM02 3 3 D 200 0PROLUNG25 2 2 D 200 0PROLUNG28 300 A 1 1 1 0PROLUNG28 300 B 1 1 1 1 1 0PROLUNG28 300 C 1 1 0RIDUZIO13 1 2 1 1 0GRIGASP01 1 2 1 1 0GRIGASP02 1 1 2 2 3 Tab 5 85 120 range generator configurations ...

Page 63: ... 420 0COLLFUM03 1 2 2 D 160 0COLLFUM02 3 3 D 200 0PROLUNG25 2 2 D 200 0PROLUNG28 300 A 1 1 1 1 1 0PROLUNG28 300 B 1 1 1 1 0PROLUNG28 300 C 1 1 0RIDUZIO13 0GRIGASP01 0GRIGASP02 1 2 2 3 3 Tab 6 120 150 range generator configurations ...

Page 64: ...0COLLFUM02 3 4 4 4 4 4 D 200 0PROLUNG25 2 3 3 3 3 3 D 200 0PROLUNG28 300 A 1 1 1 1 1 1 0PROLUNG28 300 B 1 1 1 1 1 1 0PROLUNG28 300 C 1 1 1 1 1 1 0PROLUNG28 300 D 1 1 1 1 1 0GRIGASP02 3 4 4 4 4 4 Tab 7 120 150 range generator configurations ...

Page 65: ...4 5 5 5 5 5 D 250 0PROLUNG26 4 4 4 4 4 D 250 0PROLUNG28 300 A 1 1 1 1 1 0PROLUNG28 300 B 1 1 1 1 1 0PROLUNG28 300 C 1 1 1 1 1 0PROLUNG28 300 D 1 1 1 1 1 0PROLUNG28 300 E 1 1 1 1 1 0GRIGASP02 5 5 5 5 5 Tab 8 120 150 range generator configurations ...

Page 66: ... 6 D 250 0PROLUNG26 5 5 5 5 D 250 0PROLUNG28 300 A 1 1 1 1 0PROLUNG28 300 B 1 1 1 1 0PROLUNG28 300 C 1 1 1 1 0PROLUNG28 300 D 1 1 1 1 0PROLUNG28 300 E 1 1 1 1 0PROLUNG28 300 F 1 1 1 1 0GRIGASP02 6 6 6 6 Tab 9 120 150 range generator configurations ...

Page 67: ...uction opening 0GRIGASP02 200 1 0 0 D 100 suction opening 0SIFCOND00 173 5 18 19 57 Trap for flue gas collector condensate drain 0PROLUNG28 300 D 100 L 300 extension to be cut Tab 10 Various accessories D 100 extension to be cut according to the indications in the table Tab 17 Stub pipe lengths on page 74 ...

Page 68: ...COLLFUM03 680 339 208 160 60 100 Flue gas collector for D 160 heat module 0PROLUNG31 500 160 60 L 500 D 160 extension 0PROLUNG10 1000 75 160 L 1000 D 160 extension 0CURVAXX12 160 161 90 elbow M F D 160 Tab 11 D 160 accessories I ...

Page 69: ...ow M F D 160 0CURVAXX28 1 6 0 3 0 103 178 43 30 elbow M F D 160 0CURVAXX30 1 6 0 60 15 115 20 187 15 elbow M F D 160 0RACCORT04 300 155 160 52 160 T shaped fitting M M F D 160 0SCARCON01 Cap for D 160 collector with condensate drain hole Tab 12 D 160 accessories II ...

Page 70: ...e gas collector for D 200 heat module 0PROLUNG25 370 200 78 Connection extension D 200 L 370 mm 0PROLUNG15 475 200 115 D 200 L 475 m extension 0PROLUNG13 1000 115 200 D 200 L 1000 m extension 0CURVAXX13 262 296 200 90 elbow M F D 200 Tab 13 D 200 accessories I ...

Page 71: ...bow M F D 200 0CURVAXX27 200 3 0 78 239 112 30 elbow M F D 200 0CURVAXX29 200 15 78 24 111 15 elbow M F D 200 0RACCORT05 160 160 155 300 52 T shaped fitting M M F D 200 0SCARCON02 Cap for D 200 collector with condensate drain hole Tab 14 D 200 accessories II ...

Page 72: ... gas collector for D 250 heat module 0PROLUNG26 250 370 78 Connection extension D 250 L 370 mm 0PROLUNG29 250 500 78 D 250 L 500 mm extension 0PROLUNG30 1000 250 78 D250 L 1000 mm extension 0CURVAXX26 78 250 155 227 10 85 241 D250 90 elbow Tab 15 D 250 accessories I ...

Page 73: ... 267 113 D250 45 elbow 0CURVAXX24 2 5 0 3 0 78 138 257 D250 30 elbow 0CURVAXX23 2 5 0 78 15 121 239 D250 15 elbow 0RACCORD28 230 232 250 250 T shaped fitting M M F D 250 0SCARCON04 Cap for D 250 collector with condensate drain Tab 16 D 250 accessories II ...

Page 74: ...0 8 0 8 DHW temperature setting range C 65 35 DHW maximum temperature C 65 Tab 18 Nominal data for configurations from 45 to 105 NOMINAL DATA 120 150 170 205 240 270 300 Type of installation C13 C33 C43 C53 C63 C83 C93 C13X C33X C43X C63X C93X B23 B23P C 10 C 11 Nominal heat input Qn kW 115 140 162 196 230 255 280 Nominal heat output 80 60 C Pn kW 112 136 3 157 190 5 224 248 3 272 6 Nominal heat o...

Page 75: ...nge C 65 35 DHW maximum temperature C 65 Tab 20 Nominal data for configurations from 325 to 510 NOMINAL DATA 540 570 600 630 660 690 720 Type of installation C13 C33 C43 C53 C63 C83 C93 C13X C33X C43X C63X C93X B23 B23P C 10 C 11 Nominal heat input Qn kW 510 535 560 600 625 650 675 Nominal heat output 80 60 C Pn kW 496 6 520 9 545 2 584 3 608 6 632 9 657 2 Nominal heat output 50 30 C Pn kW 541 4 5...

Page 76: ...ressure bar 5 5 5 5 5 Heating water minimum pressure bar 0 8 0 8 0 8 0 8 0 8 DHW temperature setting range C 65 35 DHW maximum temperature C 65 Tab 22 Nominal data for configurations from 750 to 900 1 16 Nominal electrical data tables NOMINAL ELECTRICAL DATA 45 60 85 90 105 Input voltage V 230 Frequency Hz 50 Module power consumption W 94 119 156 188 213 Module power consumption in standby conditi...

Page 77: ...les in the rack without flue gas vent mm 1761 Depth of modules in the rack mm 745 Width of modules in the rack with separator mm 1211 1211 1211 1841 1841 Width of modules in the rack with exchanger mm 1750 1750 1750 2380 2380 Total weight with direct collectors kg 131 135 160 233 238 Total weight with separator kg 162 166 191 264 269 Total weight with matched plates kg 240 244 269 342 347 Total we...

Page 78: ...31 39 41 44 47 49 Tab 29 Dimensions weights connections and volumes for configurations from 120 to 300 DIMENSIONS WEIGHTS CONNECTIONS VOLUMES 325 360 390 420 450 480 510 Height of modules in the rack without flue gas vent mm 1761 Depth of modules in the rack mm 745 Width of modules in the rack with separator mm 2471 2471 2471 2471 2471 3101 3101 Width of modules in the rack with exchanger mm 3010 ...

Page 79: ...plates and connection collectors l 84 86 89 98 100 103 106 Tab 31 Dimensions weights connections and volumes for configurations from 540 to 720 DIMENSIONS WEIGHTS CONNECTIONS VOLUMES 750 780 810 870 900 Height of modules in the rack without flue gas vent mm 1761 Depth of modules in the rack mm 745 Width of modules in the rack with separator mm 3731 4361 4361 4361 4361 Width of modules in the rack ...

Page 80: ...160 160 Tab 34 Flue shared collector dimensioning for configurations from 120 to 300 FLUE SHARED COLLECTOR DIMENSIONING 325 360 390 420 450 480 510 Drain rating B23P Qn CO2 9 9 9 9 9 9 9 Qn Flue gas temperature Air temperature C 51 7 54 0 53 5 53 0 52 6 54 0 53 6 Qn Flue mass flow g sec 142 6 158 1 169 6 181 1 192 6 210 8 222 3 Qn Residual head available Pa 30 30 30 30 30 30 30 Qr CO2 9 9 9 9 9 9 ...

Page 81: ...eat loss with burner off 0 21 0 17 0 141 0 21 0 17 Qr Flue system heat loss with burner on 2 19 1 98 1 87 2 19 1 98 Qr Flue system heat loss with burner off Qr WILO pump absorption with hydraulic separator W 75 130 120 150 205 Qr WILO pump absorption with plate exchanger W 75 130 120 150 205 Tab 38 Design data for configurations from 45 to 105 DESIGN DATA 120 150 170 205 240 270 300 Qn Casing heat...

Page 82: ...aulic separator W 1040 1040 1040 1300 1300 1300 1300 Qn WILO pump absorption with plate exchanger W 1040 1040 1040 1300 1300 1300 1300 Qr Casing heat loss with burner on 2 06 2 06 2 17 2 06 2 06 2 06 2 06 Qr Casing heat loss with burner off 0 084 0 084 0 09 0 084 0 084 0 084 0 084 Qr Flue system heat loss with burner on 1 7 1 7 1 83 1 7 1 7 1 7 1 7 Qr Flue system heat loss with burner off Qr WILO ...

Page 83: ... 000 40 000 P Q Fig 20 Hydraulic separator flow resistance on system side 0 20 40 60 80 100 120 140 160 180 200 0 500 1 000 1 500 2 000 2 500 3 000 3 500 4 000 4 500 5 000 5 500 P Q Fig 21 120 kW plate exchanger flow resistance on primary side and secondary side ΔP Hydraulic resistance mbar Q Flow rate dm3 h ...

Page 84: ...ate exchanger flow resistance on primary side and secondary side 0 20 40 60 80 100 120 140 160 180 200 0 1 000 2 000 3 000 4 000 5 000 6 000 7 000 8 000 9 000 10 000 11 000 12 000 13 000 P Q Fig 23 300 kW plate exchanger flow resistance on primary side and secondary side ΔP Hydraulic resistance mbar Q Flow rate dm3 h ...

Page 85: ...5 000 16 000 P Q Fig 24 360 kW plate exchanger flow resistance on primary side and secondary side 0 20 40 60 80 100 120 140 160 180 200 220 0 2 000 4 000 6 000 8 000 10 000 12 000 14 000 16 000 18 000 20 000 P Q Fig 25 450 kW plate exchanger flow resistance on primary side and secondary side ΔP Hydraulic resistance mbar Q Flow rate dm3 h ...

Page 86: ...6 540 kW plate exchanger flow resistance on primary side and secondary side 0 20 40 60 80 100 120 140 160 180 200 220 0 2 000 4 000 6 000 8 000 10 000 12 000 14 000 16 000 18 000 20 000 22 000 24 000 26 000 P Q Fig 27 600 kW plate exchanger flow resistance on primary side and secondary side ΔP Hydraulic resistance mbar Q Flow rate dm3 h ...

Page 87: ...kW plate exchanger flow resistance on primary side and secondary side 0 20 40 60 80 100 120 140 160 180 200 220 240 260 280 0 3 000 6 000 9 000 12 000 15 000 18 000 21 000 24 000 27 000 30 000 33 000 36 000 P Q Fig 29 780 kW plate exchanger flow resistance on primary side and secondary side ΔP Hydraulic resistance mbar Q Flow rate dm3 h ...

Page 88: ...70 300 330 360 0 3 000 6 000 9 000 12 000 15 000 18 000 21 000 24 000 27 000 30 000 33 000 36 000 39 000 P Q Fig 30 900 kW plate exchanger flow resistance on primary side and secondary side ΔP Hydraulic resistance mbar Q Flow rate dm3 h ...

Page 89: ...11 12 pwm 24 pwm pwm_gnd pwm 6 dhw sensor dhw sensor solar sensor solar sensor rx master gnd master tx master 5V master rx slave gnd slave tx slave 5V slave opentherm opentherm 10Vdc in 10Vdc in Ta Ta collector sensor collector sensor external sensor external sensor M3 M4 1 9 2 0 2 1 2 2 2 3 2 4 2 5 2 6 2 7 2 8 2 9 3 0 3 1 3 2 3 3 3 4 3 5 3 6 3 7 3 8 3 9 4 0 4 1 4 2 4 3 4 4 1 3 2 4 1 2 3 6 7 8 1 3...

Page 90: ...NAIL PR TS TA SE CS 10VCD IN 10VDC IN OT OT SOLS PI 24V PI PWM PI GND PI 6V SB RX GND TX 5V RX GND TX 5V MA SL RL RL PB EMC N4 L2 U1 U3 FUSE 5X20mm 4A 250V T4AL250V 230 Vac 50 Hz PC N L Fig 32 Connections performed by the installer ...

Page 91: ...NC 7 TS Safety thermostat COM 8 TS Safety thermostat NO PR Safety pressure switch NO discretionary 9 PR Safety pressure switch COM 10 PR Safety pressure switch NC 11 12 RL Auxiliary relay remote alarm or external LPG valve manager 13 14 PC Cascade pump max 0 8 A cosφ 0 6 15 16 PB Boiler pump max 1 5 A cosφ 0 6 17 18 M3 Electric power supply 230V 50Hz already connected 17 Phase 18 Neutral M3 Ground...

Page 92: ...pwm_gnd pwm 6 dhw sensor dhw sensor solar sensor solar sensor rx master gnd master tx master 5V master rx slave gnd slave tx slave 5V slave opentherm opentherm 10Vdc in 10Vdc in Ta Ta collector sensor collector sensor external sensor external sensor M3 M4 1 9 2 0 2 1 2 2 2 3 2 4 2 5 2 6 2 7 2 8 2 9 3 0 3 1 3 2 3 3 3 4 3 5 3 6 3 7 3 8 3 9 4 0 4 1 4 2 4 3 4 4 1 3 2 4 1 2 3 6 7 8 1 3 2 4 5 6 7 9 8 10...

Page 93: ...d pwm 6 dhw sensor dhw sensor solar sensor solar sensor rx master gnd master tx master 5V master rx slave gnd slave tx slave 5V slave opentherm opentherm 10Vdc in 10Vdc in Ta Ta collector sensor collector sensor external sensor external sensor M3 M4 1 9 2 0 2 1 2 2 2 3 2 4 2 5 2 6 2 7 2 8 2 9 3 0 3 1 3 2 3 3 3 4 3 5 3 6 3 7 3 8 3 9 4 0 4 1 4 2 4 3 4 4 1 3 2 4 1 2 3 6 7 8 1 3 2 4 5 6 7 9 8 10 1 3 5...

Page 94: ...NAIL PR TS TA SE CS 10VCD IN 10VDC IN OT OT SOLS PI 24V PI PWM PI GND PI 6V SB RX GND TX 5V RX GND TX 5V MA SL RL RL PB EMC N4 L2 U1 U3 FUSE 5X20mm 4A 250V T4AL250V 230 Vac 50 Hz PC N L Fig 35 Connections performed by the installer ...

Page 95: ... TS Safety thermostat NC 7 TS Safety thermostat COM 8 TS Safety thermostat NO PR Safety pressure switch NO discretionary 9 PR Safety pressure switch COM 10 PR Safety pressure switch NC 11 12 RL Auxiliary relay remote alarm or external LPG valve manager 13 14 PC Cascade pump max 0 8 A cosφ 0 6 15 16 PB Boiler pump max 1 5 A cosφ 0 6 17 18 M3 Electric power supply 230V 50Hz already connected 17 Phas...

Page 96: ...be or thermostat 13 14 Cascade pump 4 5 Water heater pump 19 20 Cascade probe Water heater 23 24 Thermostat Room External Probe 21 22 0 10 V input 25 26 M3 M4 M3 M4 230 Vac 50 Hz 230 Vac 50 Hz 230 Vac 50 Hz M3 MASTER M4 SLAVE 1 22 1 Electrical connections For electrical connection of cascade boilers use the cables supplied with the proper cable glands that must be fastened to the boiler bottom For...

Page 97: ... Minimum available cascade output 6 1 3 Single burner power Maximum heat output of an individual burner 6 1 4 Boiler for DHW Number of boilers in the cascade dedicated both to CH function and to DHW function 6 1 5 PI loop period Time range to recalculate the power required by the system 6 2 Cascade info Displaying the cascade system information Where symbol is present press ok to display the param...

Page 98: ...lers connected in cascade If this value does not correspond to the number of present generators electrical connections must be checked and the auto configuration procedure must be repeated WARNING The auto configuration procedure must be carried out upon first installation after a change in the number of generators or in their order within the cascade sequence or after a change in the MASTER gener...

Page 99: ...rmostat Cascade pump Cascade probe Water heater pump Water heater PB PDHW PC MASTER boiler electrical connections loads PB EMC N4 L2 U1 U3 FUSE 5X20mm 4A 250V T4AL250V 230 Vac 50 Hz PC N L P INAIL PR TS DHW Master boiler cascade configuration parameters 6 1 2 Minimum modulation heat output as defined in the table Tab 43 Minimum modulation head output setting on page 97 6 1 3 Individual burner heat...

Page 100: ...e the faulty one to the generator subsequent to the faulty one If MASTER generator needs to be excluded disconnect the connection with the second generator which is the first SLAVE which will become the new MASTER All connections for cascade management cascade thermostat and probe water heater thermostat probe etc must be moved onto it Once the electrical connections have been changed proceed with...

Page 101: ...ied out by qualified personnel only The user is not authorised to carry out such operations Decommissioning disassembly and disposal operations must be performed with boiler cold and disconnected from gas and power mains The materials the boiler is made of can all be recycled Once disassembled boiler must be disposed of in accordance with the national prevailing regulations ...

Page 102: ...102 Page left intentionally blank ...

Page 103: ...103 Page left intentionally blank ...

Page 104: ... 0365 878 31 Fax 39 0365 878 304 e mail info fondital it www fondital com The manufacturer reserves the right to modify his her products as deemed necessary without altering the basic characteristics of the products themselves Uff Pubblicità Fondital IST 03 C 1321 02 Maggio 2020 05 2020 ...

Reviews: