background image

- 10 -

EN
RESET 

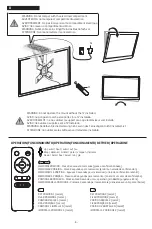
1. Switch the mains adapter off and on again.
2. Press OK for 5 seconds. The mount will move to the highest position.

ADJUSTING MAXIMUM POSITION FOR SLOPING CEILINGS

1. RESET and perform steps 2 and 3 for the next 2 minutes.
2. Lower the mount to the lowest position desired.
3. Make 5 long presses of the MEM1 button. You will hear 4 short beeps and one long beep on the fifth press to confirm the setting.

MANUAL FOLDING

1. Push the TV slightly towards the ceiling and the motor will operate the folding of the stand.

REMOTE CONTROL SYNCHRONISATION

1. Press the setting button located on the base of the stand using a small object, you will hear a confirmation sound.
2. Press the SET button on the remote control and the stand will beep for 10 seconds to confirm the synchronisation. 
3. When the sound stops, the setup mode is closed.
To delete all synced remotes (20 max.) press and hold the SET button on the base of the cradle for 5 seconds, it will give 2 short 
confirmation beeps.

ES
RESET 

1. Desconectar y conectar el adaptador de corriente.
2. Pulsar OK 5 segundos. El soporte se moverá a la posición más alta.

AJUSTAR POSICIÓN MÁXIMA PARA TECHOS INCLINADOS

1. Hacer RESET y realizar los pasos 2 y 3 durante los 2 minutos siguientes.
2. Baje el soporte a la posición más baja que desee.
3. Realice 5 pulsaciones largas del botón MEM1. Escuchará 4 sonidos corto y uno sonido largo en la quinta pulsación para confirmar 
    el ajuste.

PLEGADO MANUAL

1. Empuje ligeramente el televisor hacia el techo y el motor accionará el plegado del soporte.

SINCRONIZACIÓN DEL MANDO A DISTANCIA

1. Pulse el botón de configuración situado en la base del soporte utilizando un objeto pequeño, escuchará un sonido de confirmación.
2. Pulse el botón SET del mando y el soporte emitirá sonidos durante 10 segundos para confirmar la sincronización. 
3. Cuando el sonido se detenga se habrá cerrado el modo de configuración.
Para eliminar todos los mandos sincronizados (20 máx.) mantenga pulsado el botón de configuración de la base del soporte durante 
5 segundos, emitirá 2 sonidos cortos de confirmación.

FR
RESET


1. éteignez et rallumez l'adaptateur secteur.
2. Appuyez sur OK pendant 5 secondes. Le support se déplacera vers la position la plus haute.

RÉGLAGE DE LA POSITION MAXIMALE POUR LES PLAF EN PENTE

1. Faites RESET et effectuez les étapes 2 et 3 pendant les 2 minutes suivantes.
2. Abaissez le support jusqu'à la position la plus basse souhaitée.
3. Effectuez 5 pressions longues sur le bouton MEM1. Vous entendrez 4 bips courts et un bip long à la cinquième pression pour 
    confirmer le réglage.

PLIAGE MANUEL

1. Poussez légèrement le téléviseur vers le plafond et le moteur actionnera le pliage du support.

SYNCHRONISATION DES TÉLÉCOMMANDES

1. appuyez sur le bouton de réglage situé sur la base du support à l'aide d'un petit objet, vous entendrez un son de confirmation.
2. Appuyez sur le bouton SET de la télécommande et le stand émettra un bip pendant 10 secondes pour confirmer la synchronisation. 
3. Lorsque le son s'arrête, le mode de configuration est fermé.
Pour supprimer toutes les télécommandes synchronisées (20 maximum), appuyez sur le bouton SET situé sur la base du socle 
pendant 5 secondes, il émettra 2 bips courts de confirmation.

Summary of Contents for STTEL-44N

Page 1: ...NUAL DE INSTRUÇÕES BEDIENUNGSANLEITUNG MANUALE D ISTRUZIONI MOTORISED TV CEILING MOUNT SOPORTE TV DE TECHO MOTORIZADO SUPPORT TV DE PLAFOND MOTORISÉ SUPORTE TV DE TETO MOTORIZADO MOTORISIERTE TV DECKENHALTERUNG SUPPORTO TV A SOFFITTO MOTORIZZATO STTEL 44N ...

Page 2: ...pourrait se produire dû au glissement du support du plafond par faille du même du système de fixation ou produit par une manipulation incorrecte PT 1 Siga as recomendações de instalação do manual de instruções 2 A superfície de instalação deve ser totalmente plana Certifique se de que os orifícios no teto estão centrados com os orifícios da placa Aparafuse o suporte ao teto unicamente na posição ver...

Page 3: ...CESSÓRIOS INCLUÍDOS ENTHALTENDE ZUBEHÖRTEILE ACCESSORI INCLUSI ST6 3x55 x6 W A Ø6 x4 W C M6x30 x4 M C M6x14 x4 M B M5x14 x4 M A M8x30 x4 M D M8x50 x4 M E Ø5 x4 M F Ø8 x4 M G Ø8x5 x8 M H Ø8x15 x8 M I SX10x50 x6 W B x1 A x1 B x1 C x4 I x1 H x1 G x2 F x2 E x2 D 30kg MAX ...

Page 4: ...1 4 ASSEMBLY INSTRUCTIONS INSTRUCCIONES DE MONTAJE INSTRUCTIONS POUR LE MONTAGE INSTRUÇÕES DE MONTAGEM MONTAGEANLEITUNG ISTRUZIONI PER IL MONTAGGIO A W A W A W C W B C ...

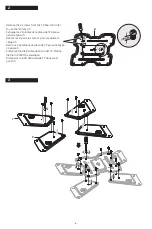
Page 5: ...aca de TV para su uso en el paso 5 Retirez les 2 vis de la carte TV pour les utiliser à l étape 5 Retire os 2 parafusos da placa da TV para utilização no passo 5 Entfernen Sie die 2 Schrauben von der TV Platine die Sie in Schritt 5 verwenden Rimuovere le 2 viti dalla scheda TV da usare al punto 5 2 3 B E F ...

Page 6: ... 6 4a M A M B M F M G 4b M C M D M G M H M C M D M G M H M I M C M D M G M I M E M G M I M E M G M I M H M E M G M I M H ...

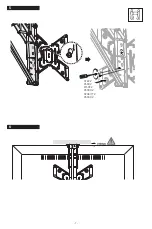
Page 7: ... 7 5 6 STEP 2 PASO 2 ÉTAPE 2 PASSO 2 SCHRITT 2 PASSO 2 ...

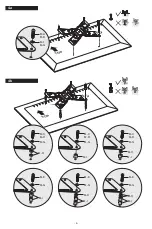
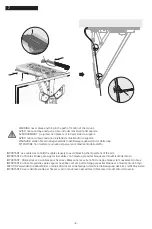
Page 8: ... hold the cables loosely to avoid blocking the movement of the arm IMPORTANTE utilice las bridas para sujetar los cables con holgura para evitar bloquear el movimiento del brazo IMPORTANT Utilisez des serre câbles pour fixer les câbles sans les serrer afin de ne pas bloquer le mouvement du bras IMPORTANTE utilize braçadeiras para segurar os cabos com uma certa folga para evitar bloquear o movimento ...

Page 9: ...entit MEMORIZAR A POSIÇÃO Pressione 3 segundos para memorizar irá emitir um som de confirmação POSITION ABSPEICHERN Drücken Sie 3 Sekunde um zu speichern ein Bestätigungston ertönt MEMORIZZARE LA POSIZIONE Premere 3 secondo per memorizzare viene emesso un bip di conferma SET POSITION 1 mem1 SET POSITION 2 mem2 FIJAR POSICIÓN 1 mem1 FIJAR POSICIÓN 2 mem2 POSITION RÉGLÉE 1 mem1 POSITION RÉGLÉE 2 mem...

Page 10: ...accionará el plegado del soporte SINCRONIZACIÓN DEL MANDO A DISTANCIA 1 Pulse el botón de configuración situado en la base del soporte utilizando un objeto pequeño escuchará un sonido de confirmación 2 Pulse el botón SET del mando y el soporte emitirá sonidos durante 10 segundos para confirmar la sincronización 3 Cuando el sonido se detenga se habrá cerrado el modo de configuración Para eliminar t...

Page 11: ...ung zu bestätigen MANUELLES FALTEN 1 Drücken Sie den Fernseher leicht in Richtung Decke und der Motor klappt den Standfuß ein SYNCHRONISIERUNG DER FERNSTEUERUNG 1 Drücken Sie mit einem kleinen Gegenstand auf den Einstellungsknopf an der Unterseite des Ständers Sie hören einen Bestätigungston 2 Drücken Sie die SET Taste auf der Fernbedienung und der Ständer piept 10 Sekunden lang um die Synchronisi...

Page 12: ...indica um erro de posição Faça RESET às configurações do suporte Verifique o estado das pilhas e substitua por novas se necessário Faça RESET às configurações do suporte Verifique se o LED indicador de funcionamento na base está ligado ou desligado Se estiver desligado verifique se a tomada tem corrente se o adaptador de corrente está bem ligado em ambas as extremidades e se está em bom estado Se ...

Page 13: ...l montaje El producto funciona con electricidad Lea atentamente las siguientes instrucciones para evitar quemaduras incendios descargas eléctricas y asegurar su uso de forma segura y correcta que ayude a mantener la integridad del sistema electrónico así como de su construcción PRECAUCIÓN Este aparato puede ser utilizado por niños a partir de 8 años bajo supervisión Las labores de limpieza y mante...

Page 14: ...le produit de l alimentation électrique avant tout nettoyage entretien ou réparation Débranchez le produit de l alimentation électrique lorsque le système n est pas utilisé et placez la fiche hors de portée des enfants NOTA leia todo o manual de instruções antes de iniciar a instalação e montagem O produto funciona com eletricidade Leia atentamente as seguintes instruções para evitar queimaduras i...

Page 15: ...paratur Trennen Sie das Produkt von der Stromversorgung wenn das System nicht benutzt wird und legen Sie den Stecker außerhalb der Reichweite von Kindern NOTA leggere l intero manuale di istruzioni prima di iniziare l installazione e il montaggio Il prodotto è azionato elettricamente Leggere attentamente le seguenti istruzioni per evitare ustioni incendi scosse elettriche e per garantire un uso si...

Page 16: ...ration UE de conformité est disponible à l adresse internet suivante fonestar com STTEL 44N PT DECLARAÇÃO UE DE CONFORMIDADE SIMPLIFICADA A abaixo assinada FONESTAR SISTEMAS S A declara que o suporte de TV STTEL 44N está em conformidade com a Diretiva 2014 53 UE O texto integral da declaração de conformidade está disponível no seguinte endereço de internet fonestar com STTEL 44N DE VEREINFACHTE EU...

Page 17: ... 17 ...

Page 18: ...www fonestar com ...

Reviews: