background image

4

www.FoodSaver.com

Important Safeguards

For your own safety, always follow these basic 

precautions when using a FoodSaver

®

 appliance:

1.   Read the User Manual carefully for operating 

instructions. Read all instructions in this  
manual before use.

2.   Do not use appliance on wet or hot surfaces,  

or near a heat source.

3. 

 Caution

: To protect against electric shock, do not 

immerse any part of appliance, power cord or plug in 
water or other liquid. Unplug from outlet when not in 
use and before cleaning.

4.   To disconnect, unplug power cord from electrical 

outlet. Do not disconnect by pulling on cord.

5.   Do not operate appliance with a damaged power cord 

or plug. Do not operate appliance if it malfunctions or 
is in any way damaged. For details, contact Consumer 
Services at 1-877-777-8042.

6.  Use appliance only for its intended use.
7.   Closely supervise children when using any electrical 

appliance. Do not allow appliance to be used as a toy.

8. 

 Caution

: Do not use extension cord. Appliance power 

cord should not drape over counter or tabletop where 
cord can be tripped over or pulled on unintentionally , 
especially by children. 

9.   Extreme caution must be used when sealing bags with 

hot liquids. 

10.   Do not place on or near a hot gas or electric burner, 

or heated oven. Extreme caution must be used when 
moving products containing hot liquids.

11.   Wait 20 seconds between seals to allow appliance  

to cool.

12. 

 Caution

: Place cord where the cord cannot be pulled, 

cause user to be entangled with the cord, or cause the 
product to be overturned.

13. 

 Caution

: Do not use outdoors.

For Household Use Only

SAVE THESE INSTRUCTIONS

Important Tips

1.     Vacuum packaging is NOT a substitute for the  

heat process of canning. Perishables still need  
to be refrigerated or frozen.

2.    For best results, use only with FoodSaver

®


GameSaver

®

 Bags, Rolls, Containers and 

Accessories.

3.   During the vacuum packaging process, small 

amounts of liquids, crumbs or food particles can  
be inadvertently pulled into the Vacuum Channel. 
Empty the Drip Tray after each use.

4.    Avoid overfilling, always leave at least 3 inches  

of bag material between bag contents and top of 
bag. This allows room for the bag material to cinch 
tightly against the food and prevents the bag from 
pulling out of the vacuum channel during the sealing 
process. Then leave at least one additional inch of 
bag material for each time you plan to reuse bag.

5.    Do not create your own side seams for a  

FoodSaver

®

 GameSaver

®

 Bag. These bags are 

manufactured with a special side seam, which is 
sealed all the way to the outer edge.

6.    To prevent wrinkles in the seal when vacuum 

packaging bulky items, gently stretch bag flat while 
inserting bag into vacuum channel and continue to 
hold bag until vacuum pump starts.

7.    When you are vacuum packaging items with sharp 

edges (dry spaghetti, silverware, etc.), protect bag 
from punctures by wrapping item in soft cushioning 
material, such as a paper towel. You may want to 
use a canister or Mason jar instead of a bag.

8.   When using accessories, remember to leave one 

inch of space at top of canister or container.

9.   Pre-freeze fruits and blanch vegetables before 

vacuum packaging for best results. See  
“Guidelines for Vacuum Sealing” section.

10.   Prevent Moisture or liquid from being pulled into 

the Vacuum Channel or trapped in the seal. Either 
pre-freeze moist foods such as raw meat for 1-2 
hours before vacuum packaging or place a folded 
paper towel between food and end of bag to absorb 
excess liquids. Be Sure to leave at least 3 inches 
between paper towel and end of bag so that bag 
seals properly with paper towel inside. (For best 
results use our GameSaver

®

 Dam Bags).

Important Safeguards & Tips

This appliance has a polarized plug (one blade is wider 
than the other). As a safety feature, this plug will fit in 
a polarized outlet only one way. If the plug does not fit 
fully in the outlet, reverse the plug. If it still does not fit, 
contact a qualified electrician. Do not attempt to defeat 
this plug safety feature.

Summary of Contents for GameSaver Big Game

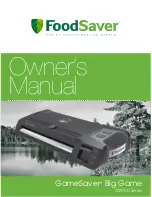
Page 1: ...GameSaver Big Game GM700 Series Owner s Manual...

Page 2: ...2 www FoodSaver com www FoodSaver com...

Page 3: ...GameSaver Rolls Vacuum Seal with FoodSaver GameSaver Bags Remove Air from a FoodSaver GameSaver Bag Vacuum Seal with FoodSaver Accessories Open FoodSaver Accessories after Vacuum Sealing Seal Only Car...

Page 4: ...mounts of liquids crumbs or food particles can be inadvertently pulled into the Vacuum Channel Empty the Drip Tray after each use 4 Avoid overfilling always leave at least 3 inches of bag material bet...

Page 5: ...d fresh longer in the refrigerator freezer and pantry The FoodSaver system is designed to remove air and extend freshness up to five times longer than conventional storage methods Keep your FoodSaver...

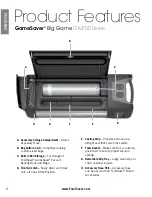
Page 6: ...Easily Open and Close unit also has Store Position FEATURES A B C D E F G H E Sealing Strip Provides extra secure airtight seal that s two times wider F Foam Gasket Make sure this is correctly positi...

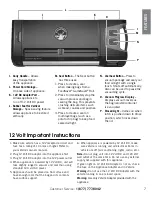
Page 7: ...mes on when latch is pushed down to Close position which locks down the lid I J K L M N O P 1 Make sure vehicle has a 12V receptacle circuit and fuse has a rating of 10 amps or higher Refer to your ve...

Page 8: ...Pull out desired bag length Close Appliance Lid and slide Bag Cutter across the roll Make sure you leave 3 of space at top for room to vacuum seal Fig 5 IMPORTANT TIP When making a bag from a roll mak...

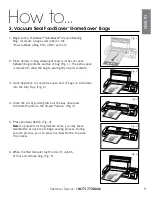
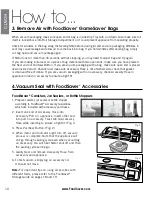
Page 9: ...Appliance Lid and place open end of bag curl side down into the Drip Tray Fig 2 4 Close the Lid by pushing latch all the way down past the Store Position to the Closed Position Fig 3 5 Press Vac Seal...

Page 10: ...aver Storage Guide on pages 18 and 19 Fig 1 Fig 2 HOW TO When vacuum packaging make sure open end of bag is inside Drip Tray with curl down Also make sure roll itself is tucked back into Roll Storage...

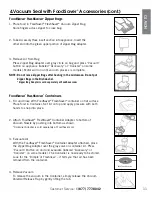
Page 11: ...ers 1 Fill and Close With FoodSaver FreshSaver container on flat surface Place food in Container Set lid on top and apply pressure with both hands to snap into place 2 Attach FoodSaver FreshSaver Cont...

Page 12: ...rsal Lids To release vacuum and open turn knob on lid to Open FoodSaver Jar Sealer with Mason Jars For use with Ball and Kerr brand Mason jars Important Do NOT use screw bands when vacuum packaging ja...

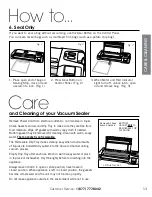
Page 13: ...off gasket with warm soapy cloth if needed Bottom gasket may be removed for cleaning Clean with warm soapy water The top gasket is not removable The Removable Drip Tray makes cleanup easy when small a...

Page 14: ...Botulinum the organism that causes Botulism can grow without air and sometimes cannot be detected by smell or taste Although it is extremely rare it can be very dangerous To preserve foods safely it...

Page 15: ...ry vegetables on a towel before vacuum sealing Note All vegetables including broccoli brussels sprouts cabbage cauliflower kale turnips naturally emit gases during storage Therefore after blanching th...

Page 16: ...or in your favorite combinations for easy fruit salad all year round If storing in the refrigerator we recommend using a FoodSaver Canister Preparation Guidelines for Baked Goods To vacuum seal soft o...

Page 17: ...Bags Canisters and Accessories To vacuum seal silver wrap fork tines in soft cushioning material such as a paper towel to avoid puncturing bag and seal as normal Your silver will be clean fresh and u...

Page 18: ...ower Freezer FoodSaver Bag 2 3 years 8 months Cabbage Brussels Sprouts Freezer FoodSaver Bag 2 3 years 8 months Corn cob or kernel Freezer FoodSaver Bag 2 3 years 8 months Green Beans Freezer FoodSave...

Page 19: ...Bag Canister 5 6 months 1 month Prepared Liquids Sauces Soups Stews Freezer FoodSaver Bag 1 2 years 3 6 months Bottled Liquids Oils Pantry FoodSaver Bottle Stopper 1 1 years 5 6 months Dry Foods Beans...

Page 20: ...le of drip tray with lid closed and latched Make sure accessory hose is not attached Make sure the lid is latched down all of the way Bag is not sealing properly There is too much liquid in bag freeze...

Page 21: ...the browned game hens into the slow cooker Whisk together the beef broth red wine Dijon mustard basil and black pepper and pour over the game hens Cover and cook on High for 4 to 5 hours or on Low fo...

Page 22: ...p water well and put mix and meat in plastic storage bag to marinate for 6 to 8 hours in the refrigerator before drying Helpful Hints Do not overlap strips on dehydrator trays Leave room between strip...

Page 23: ...rrent use contrary to the operating instructions disassembly repair or alteration by anyone other than JCS or an authorized JCS service center Further this Limited Lifetime Warranty does not cover Act...

Page 24: ...002021 REV B Registering your appliance is quick and easy at www foodsaver com register If you register on our website you will have the opportunity to receive special bag and accessory introductory o...

Reviews: