background image

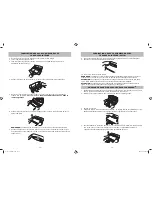
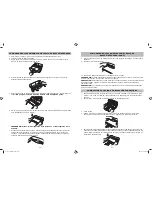
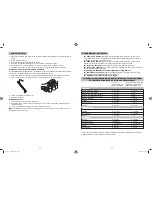
COME CREARE BUSTE DI VARIE MISURE CON IL ROTOLO INTEGRATO

1.  Aprire il coperchio e inserire il rotolo nel vano apposito.
2.  Sollevare la barra della taglierina.
3.  Estrarre una quantità di materiale sufficiente a contenere il prodotto da confezionare sottovuoto, 

più 7,5 cm supplementari. Abbassare la barra della taglierina. 

4.  Tagliare la lunghezza di materiale desiderata dal rotolo. Praticare il taglio quanto più diritto 

possibile. Inserire il cavo di alimentazione.

5.  Aprire il coperchio. Inserire un'estremità della busta tra la striscia di sigillazione e la guarnizione inferiore. 


NON inserire l'estremità aperta della busta nel vassoio di gocciolamento. 

6.  Richiudere il coperchio. Appoggiare le mani sui due lati del coperchio e premere con decisione su 

entrambi i lati fino all'avvio del motore. 


NB:

 La termosigillatrice non funziona se il coperchio non è chiuso correttamente.

7.  Continuare a tenere chiuso il coperchio. Quando la spia Mani libere si accende, rilasciare le mani 

dal coperchio. L'unità attiva il sottovuoto e sigilla la busta. La spia di sigillazione si accende nel 
momento in cui l'unità inizia l'operazione.

-41-

-40-

TERMOSIGILLATRICE SOTTOVUOTO FOODSAVER

TM

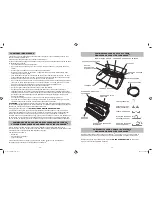
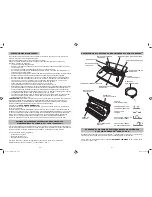
PREDISPOSIZIONE ALL'USO DELLA TERMOSIGILLATRICE 

SOTTOVUOTO FOODSAVER

TM

Disimballare con cura la termosigillatrice sottovuoto FoodSaver

TM

 e posarla su una superficie piana. 

Togliere tutti i materiali di imballo dai lati.

 
Prima dell'uso, pulire le parti in base alle istruzioni fornite nella sezione 

CURA E PULIZIA

 di 

questo manuale.

COPERTURA BUSTA

TASTO APRI/ANNULLA

SPIA MANI LIBERE

SPIA DI SIGILLAZIONE

PORTA ACCESSORI

TUBO ACCESSORIO

STRISCIA DI 
SIGILLAZIONE

GUARNIZIONE 
INFERIORE

VASSOIO DI GOCCIOLAMENTO 
ESTRAIBILE

SPIA DI SOTTOVUOTO

INTERRUTTORE DI LIVELLO SIGILLAZIONE

BARRA DELLA 
TAGLIERINA BUSTE

TAGLIERINA BUSTE

GUARNIZIONE 
SUPERIORE

PORTA ACCESSORI

PREMERE QUI CON LE 
MANI(PRESSIONE)

CANALE DEL 
SOTTOVUOTO

ATTENZIONE/ STRISCIA DI 
SIGILLAZIONE(SINISTRA)

ATTENZIONE/ 


STRISCIA DI 

SIGILLAZIONE(DESTRA)

V1040-I_10MLM1.indd   41-42

V1040-I_10MLM1.indd   41-42

3/8/10   2:07:40 PM

3/8/10   2:07:40 PM

Summary of Contents for V1040-I

Page 1: ...call 0870 060 1855 Holmes Products France 1015 Rue du Mar chal Juin Z I Vaux Le P nil 77000 Melun France Phone 33 1 64 10 45 80 Fax 33 1 64 10 02 32 France MACOM srl Via G da Procida 10 20149 Milano...

Page 2: ...tions carefully Do not use the Vacuum Food Sealer on wet or hot surfaces or near a heat source Always use the Vacuum Food Sealer on a level flat surface Do not immerse any part of the Vacuum Food Seal...

Page 3: ...ag Cutter Bar 3 Pull enough bag material from roll to hold item to be vacuum packaged plus 7 5 cm Lower the Bag Cutter Bar 4 Cut desired bag length from Bag Roll Make sure to cut a straight line Plug...

Page 4: ...move hands from the Lid The unit continues to vacuum and seal the bag HOW TO VACUUM SEAL WITH FOODSAVERTM BAGS 6 When the motor stops and the Progress Indicator Lights shut off sealing is complete 7 P...

Page 5: ...rom the bag Normal cleaning practices should be maintained 1 Lift the lid and carefully remove the Drip Tray as to not spill any contents 2 Wash the Drip Tray in warm soapy water or on the top rack of...

Page 6: ...g open and wipe top inside of bag and reseal Make sure you ve placed the bag in the proper place When making a bag from a roll make sure end of cut piece is on Sealing Strip NOT over Lower Sealing Gas...

Page 7: ...tiquement l appareil pendant une minute environ apr s avoir scell quelques sacs Cet appareil est con u pour une UTILISATION DOMESTIQUE SEULEMENT Il ne contient aucune pi ce que puisse r parer l utilis...

Page 8: ...t d annulation sert galement interrompre le processus avant la fin du cycle et ouvrir le couvercle Le bout du sac ne sera cependant pas soud ATTENTION Ce soude sac ne convient pas l usage commercial S...

Page 9: ...est convenablement ferm REMARQUE Le bouton d ouverture et d annulation sert galement interrompre le processus avant la fin du cycle et ouvrir le couvercle 1 D branchez toujours l appareil avant de le...

Page 10: ...ement de part et d autre du couvercle Laissez refroidir l appareil pendant 20 minutes puis r essayez L air que contient le sac n est pas vacu V rifiez qu il n y ait pas de plis trous ou autres dans le...

Page 11: ...gen zu bleiben oder versehentlich daran zu ziehen WICHTIGE SICHERHEITSHINWEISE UND NUN VIEL SPASS MIT IHREM FOODSAVERTM FOLIENSCHWEISSGER T Dank des innovativen Systems mit den Funktionen Dr cken Halt...

Page 12: ...e Ihre H nde vom Deckel nehmen Die Kontrollleuchte f r den Schwei vorgang beginnt zu leuchten wenn das Ger t mit dem Verschwei en beginnt SO K NNEN SIE BEUTEL AUS DER INTEGRIERTEN FOLIENROLLE SELBST Z...

Page 13: ...n Das Ger t f hrt selbstst ndig mit dem Vakuumieren und Verschwei en des Beutels fort VAKUUMVERSIEGELN MIT FOODSAVERTM BEUTELN 6 Der Versiegelungsvorgang ist beendet wenn sich der Motor abschaltet und...

Page 14: ...anschlie end Ihre Mahlzeit zu So sparen Sie Zeit Bereiten Sie Mahlzeiten schon im Vorfeld zu vakuumieren und verschwei en Sie diese und bewahren Sie sie im K hlschrank oder Gefrierfach auf Durch das A...

Page 15: ...il k nnten dazu f hren dass der Beutel nicht ordnungsgem verschwei t wird Schneiden Sie den Beutel auf wischen Sie das obere Ende innen ab und verschwei en Sie den Beutel erneut Pr fen Sie ob der Beut...

Page 16: ...ntos necesarios para ello a no ser que hayan sido supervisados o hayan recibido instrucciones relativas al uso del aparato por una persona responsable de su seguridad Vigile a los ni os y no permita q...

Page 17: ...nalizado 9 Presione el bot n Abrir Cancelar 10 La bolsa a medida est lista para ser envasada al vac o y sellada SUGERENCIA El bot n Abrir Cancelar tambi n puede utilizarse para cancelar el proceso a m...

Page 18: ...no funcionar si la tapa no se ha cerrado correctamente SUGERENCIA El bot n Abrir Cancelar tambi n puede utilizarse para cancelar el proceso a mitad del ciclo y abrir la tapa 1 Desenchufar siempre el a...

Page 19: ...emasiado caliente durante el proceso de sellado Deje que se enfr e la unidad durante 20 segundos entre uso y uso Si la bolsa sigue fundi ndose deje que se enfr e la unidad con la tapa en posici n vert...

Page 20: ...idurre il rischio di intrappolamento o di inciampo possibile utilizzare una prolunga ma in tal caso esercitare la massima cautela Se si utilizza una prolunga la potenza elettrica nominale non deve ess...

Page 21: ...Mani libere si accende rilasciare le mani dal coperchio L unit attiva il sottovuoto e sigilla la busta La spia di sigillazione si accende nel momento in cui l unit inizia l operazione 41 40 TERMOSIGIL...

Page 22: ...unit attiva il sottovuoto e sigilla la busta COME SIGILLARE SOTTOVUOTO LE BUSTE FOODSAVERTM 43 COME SIGILLARE SOTTOVUOTO LE BUSTE FOODSAVERTM SEGUE 6 Quando il motore si ferma e la spia di avanzamento...

Page 23: ...r risparmiare tempo preparare i pasti in anticipo sigillarli sottovuoto e conservarli in frigorifero o nel freezer baster poi riscaldarli velocemente e il pranzo servito Per evitare gli sprechi sigill...

Page 24: ...sta per aprirla asciugare il contenuto all interno e risigillarla Controllare di aver inserito la busta nella posizione corretta Quando si crea una busta da un rotolo sincerarsi che il lato tagliato a...

Reviews: