background image

13

•  ENGLISH •

•  ENGLISH •

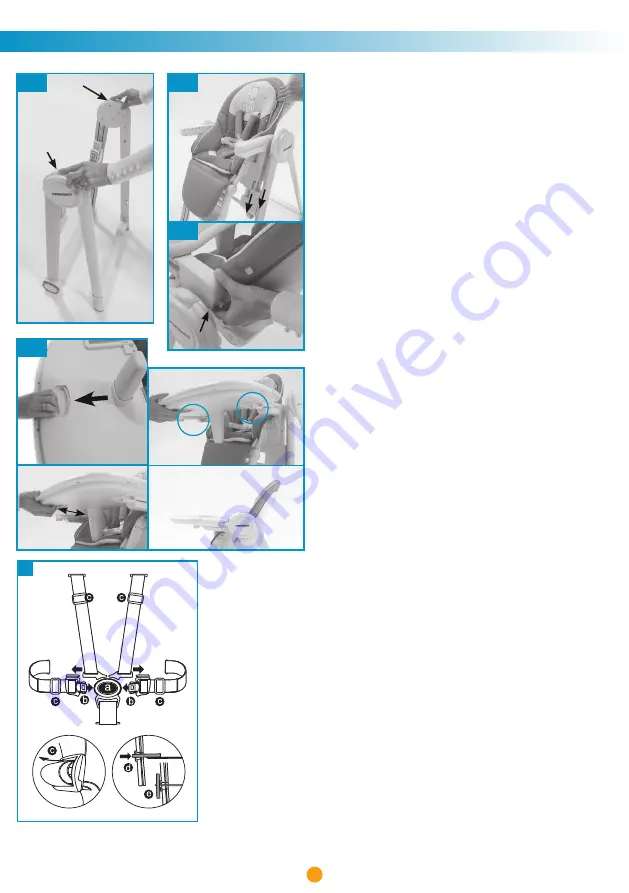
1. OPENING THE FRAME 

Press the open / close button on the frame and expand the legs
until you hear a click to indicate that they are locked in an open
position.

2. ASSEMBLING AND REMOVING THE SEAT

ASSEMBLY: 

Place the seat on the frame the right way around, 

facing the wheels, as shown in the figure.
Align and insert the plastic connectors of the seat into their slots 
on the frame.
Press until a click is heard indicating that it has been fastened 
correctly. 

WARNING: 

Before  use,  always  check  that  both  the  seat 

supports are fastened correctly to the chassis. When the seat is 
lifted upwards, it must not detach from the chassis.

REMOVING

:  press  button  “F”  on  both  sides  and  remove  the 

seat by lifting it.

IMPORTANT: 

Never remove the seat with the child inside.

3. ASSEMBLING THE TRAY

Hold down the lever on the underneath of the tray (7) and place 
the tray on the seat, checking that the armrests are inside the 
guides located on the bottom of the tray itself. Release the lever 
and push the tray towards the inside of the HIGH CHAIR, until it 
locks in place. A click will indicate that it has locked in position 
correctly.

CAUTION: 

Always  check  before  use  that  the  tray  is  attached 

and locked correctly on the armrests.

IMPORTANT

: Check before use that the tray is correctly locked 

in the chosen position by pulling it outwards without pressing
the lever; the tray should stay in place.

CAUTION: 

Do  not  allow  the  child  to  place  his  hand  on  the 

armrest when mounting the tray.

4. SAFETY HARNESS

CAUTION

: Using a safety harness with leg separator is essential 

to ensure your child’s safety.

CAUTION

: The tray alone being attached to the seat does not guarantee that your 

child is secured. Always use the safety harness!
The HIGH CHAIR is equipped with a 5-point safety harness.
• Unclipping the buckle: Press the button (a) and pull out the components (b).
• Clip the buckle: Insert the components (b) into the buckle (a); you will hear a click 
when they are attached correctly.
Adjust the harness depending on the size of the child, using the adjusters (c).
Adjust the position of the straps, or chest belts, depending on the height of the child. 
The straps must be adjusted in the slots close to the child’s shoulders.
• To adjust the straps or to remove the safety harness, rotate the plastic locking ring 
of the safety harness “straps” and “lap belt” on the rear side of the backrest (d), and 
remove the harness by pulling it from the inner side of the seat, through the slots in the 
seat shell and padding.
• To refit the straps,insert the plastic ring, fixed to the end of the strap, through the slots 
in the fabric and the corresponding slots in the seat shell.
Rotate the ring into a vertical position, on the outer side of the backrest (e).
Make sure that it is correctly mounted and locked. When pulling the straps from the 
inner side of the seat, the belts should not disengage.
Always make sure that the straps are positioned in the backrest slots located at the 

same height.

IMPORTANT

: The harness must only be used with all the components attached.

IMPORTANT

: Adjust the harness correctly each time the HIGH CHAIR is used.


ASSEMBLY

1

3

2a

B

A

A

2b

F

12

11

4

B

Summary of Contents for Misterchef

Page 1: ...et conserver pour r f rence ult rieure Conforme aux normes EN 14988 2017 EN 12790 2009 TRONA Manual de instrucciones lea atentamente las instrucciones y cons rvelas para futuras referencias Conforme a...

Page 2: ...ERENZE IMPORTANT READ THE INSTRUCTIONS CAREFULLY AND KEEP FOR FUTURE REFERENCE IMPORTANT LIRE ATTENTIVEMENT ET CONSERVER SOIGNEUSEMENT A PORTEE DE MAIN POUR UNE UTILISATION ULTERIEURE IMPORTANTE LEER...

Page 3: ...3 VA NO PRO ITAJTE PA LJIVO UPUTSTVA I SA UVAJTE ZA BUDU E KORI TENJE EL RU HR...

Page 4: ...4 ITALIANO COMPONENTI D E Vassoio Telaio seduta completo seduta imbottitura riduttore e cinture di sicurezza Telaio gambe Arco portagiochi Cestino A B C D E A C B...

Page 5: ...o quando si monta il vassoio 4 CINTURE DI SICUREZZA ATTENZIONE l uso delle cinture di sicurezza con sparti gambe indispensabile per garantire la sicurezza del bambino ATTENZIONE Il solo vassoio agganc...

Page 6: ...a seduta nella posizione desiderata Rilasciare i pulsanti Un click indicher il bloccaggio nella posizione Assicurarsi che la seduta sia correttamente bloccata nella nuova posizione ATTENZIONE effettua...

Page 7: ...o 10 MONTAGGIO DEL CESTINO PORTAOGGETTI Agganciare il cestino ai 4 bottoni clip presenti sul telaio posteriore con l apertura del cestino rivolta verso l alto 11 MONTAGGIO E USO DELLA BARRA PORTAGIOCH...

Page 8: ...ato interno della seduta attraverso le asole della scocca seduta e l imbottitura Ruotare l anello in plastica di bloccaggio della cintura spartigambe sul lato inferiore della seduta e sfilare la cintu...

Page 9: ...rodotto nel caso in cui il bambino si spinga con i piedi contro il tavolo o qualsiasi altra struttura L uso della cintura di sicurezza con spartigambe imbracatura correttamente fissata alla seduta del...

Page 10: ...del Seggiolone non vengano a contatto con il corpo del bambino Non permettete al vostro bambino di salire senza aiuto nel seggiolone di giocare con il seggiolone o penzolarsi dallo stesso Questo prod...

Page 11: ...ivi del medesimo Consumatore quali previsti dalla legge e o i diritti che il Consumatore pu vantare contro il Venditore Rivenditore del Prodotto ESCLUSIONI DELLA GARANZIA CONVENZIONALE La garanzia con...

Page 12: ...12 ENGLISH COMPONENTS Tray Seat frame set seat padding reducer and safety straps Leg frame Toy arch Basket A B C D E D E A C B...

Page 13: ...the tray 4 SAFETY HARNESS CAUTION Using a safety harness with leg separator is essential to ensure your child s safety CAUTION The tray alone being attached to the seat does not guarantee that your ch...

Page 14: ...ds at the same time and lower the seat to the desired position Release the buttons A click will indicate that it has locked in position Make sure that the seat is locked properly in the new position C...

Page 15: ...t it upwards 10 ASSEMBLING THE STORAGE BASKET Attach the basket to the 4 clip buttons on the back frame with the basket opening facing upwards 11 ASSEMBLING AND USING THE TOY BAR ATTENTION The TOY BAR...

Page 16: ...eat through the slots in the seat shell and padding Rotate the plastic locking ring of the leg separator on the underneath of the seat and remove the belt by pulling it from the inner side of the seat...

Page 17: ...order to guarantee the safety of your child when using this product it is necessary to use the safety harness with crotch strap correctly fitted to the seat the restraint barrier and the padded seat r...

Page 18: ...r child to climb into the HIGH CHAIR unaided or to play in it or dangle out of it This product is not a toy This product is intended for use by a single child Check periodically that all the component...

Page 19: ...s the mandatory rights of the Consumer as provided for by the law and or the rights that the Consumer may have with regard to the Dealer Retailer of the Product EXCLUSIONS TO THE FORMAL GUARANTEE The...

Page 20: ...FRAN AIS 20 LISTE DES COMPOSANTS Plateau Ch ssis de l assise complet rev tement de l assise rembourrage r ducteur et sangles de s curit Ch ssis des pieds Arche de jeux Panier A B C D E D E A C B...

Page 21: ...coudoir lors de la pose du plateau 4 HARNAIS DE S CURIT ATTENTION l utilisation du harnais de s curit est indispensable pour garantir la s curit de l enfant ATTENTION le plateau accroch au si ge ne su...

Page 22: ...imultan ment les boutons D situ s dans la partie inf rieure vers l ext rieur Baisser l assise dans la position d sir e Rel cher les boutons Un clic signalera que l assise est bloqu e dans la position...

Page 23: ...soulever vers le haut 10 POSE DU PANIER PORTE OBJETS Accrocher le panier aux 4 boutons pression situ s sur le ch ssis arri re en orientant l ouverture du panier vers le haut 11 POSE ET UTILISATION DE...

Page 24: ...ge au travers des boucles de la coque du si ge et du rembourrage Tourner l anneau de blocage en plastique de la sangle d entrejambe sur le c t inf rieur du si ge et retirer le harnais en tirant dessus...

Page 25: ...es Risque de basculement si l enfant a la possibilit d appuyer ses pieds contre une table ou tout autre l ment L utilisation de la ceinture de s curit avec harnais entrejambe fix e correctement l assi...

Page 26: ...pas laisser votre enfant monter tout seul sur la chaise haute jouer avec la chaise haute ou se pencher de la chaise haute Ce produit n est pas un jouet L utilisation de ce produit n est pr vue que po...

Page 27: ...i et ou les droits que le consommateur peut vanter contre le vendeur revendeur du produit EXCLUSIONS DE LA GARANTIE CONVENTIONNELLE La garantie conventionnelle exclut les dommages apport s au produit...

Page 28: ...8 ESPA OL LISTA DE COMPONENTES Bandeja Estructura completa de la silla coj n para la silla acolchada reductor y arn s de seguridad Estructura de las patas Arco porta juguetes Cesta A B C D E D E A C B...

Page 29: ...I N el uso de cinturones de seguridad con entrepierna es indispensable para garantizar la seguridad del ni o ATENCI N utilizar simplemente la bandeja enganchada al asiento no garantiza una sujeci n se...

Page 30: ...hasta la posici n que desee Suelte los botones Un clic le indicar que el bloqueo en la posici n deseada se ha realizado correctamente Aseg rese de que la silla quede correctamente bloqueada en la nuev...

Page 31: ...iba 10 MONTAJE DE LA CESTA PORTA OBJETOS Enganche la cesta en los 4 botones a presi n situados en la estructura posterior con la apertura de la cesta orientada hacia arriba 11 MONTAJE Y USO DE LA BARR...

Page 32: ...e la anilla de pl stico que bloquea el cintur n de la entrepierna situada en el lado inferior del asiento y saque el cintur n tirando de l desde el lado interior del asiento a trav s de los orificios...

Page 33: ...te un riesgo de vuelco si el ni o apoya los pies en una mesa o cualquier otra estructura El uso del cintur n de seguridad con entrepierna correctamente fijado al asiento de la barrera y del acolchado...

Page 34: ...e que las partes m viles de la trona no entren en contacto con el cuerpo del ni o No permita que el ni o se suba sin ayuda en la trona ni que juegue con la trona o se cuelgue de ella Este producto no...

Page 35: ...el Consumidor mismo como resultan previstos por la ley y o los derechos que el Consumidor puede exhibir contra el Vendedor Revendedor del Producto EXCLUSIONES DE LA GARANT A CONVENCIONAL La garant a c...

Page 36: ...36 i A B C D E D E A C B...

Page 37: ...37 1 2 P F 3 7 4 5 1 3 2a B A A 2b F 12 11 4 B...

Page 38: ...38 5 3 P1 P2 P3 C 6 3 6 5 D 7 8 n 8 3 6 7 8 D E E 5 C P1 P2 P3...

Page 39: ...39 9 9 10 4 clip 11 11 11b P1 P2 3 9 10 P1 P2 P3 11a 11b MAX 3 kg...

Page 40: ...40 12 9 6 A 12 C 12 A A 13...

Page 41: ...41 6 9 kg P3 EN 12790 2009 6 3 15 EN 14988 2017 3 15 6 9 kg o N N 3 15 6 15...

Page 42: ...42...

Page 43: ...43 01 01 2005 Foppa Pedretti S p A Foppa Pedretti S p A Grumello del Monte Italia Via Volta 11 12 Foppa Pedretti S p A Foppa Pedretti S p A Foppa Pedretti S p A...

Page 44: ...44 A B C D E D E A C B...

Page 45: ...45 1 2 F 3 4 b b d e 1 3 2a B A A 2b F 12 11 4 B...

Page 46: ...46 5 3 P1 P2 P3 C 6 3 6 5 D 7 8 8 3 E 6 7 8 D E E 5 C P1 P2 P3...

Page 47: ...47 9 9 10 4 11 11a 11b P1 P2 P3 9 10 P1 P2 P3 11a 11b MAX 3 kg...

Page 48: ...48 12 9 6 A 12 b C 12 A A 13...

Page 49: ...49 6 9 P3 EN 12790 2009 6 3 15 EN 14988 2017 3 15 6 9 3 15 6 15...

Page 50: ...50...

Page 51: ...51 01 01 2005 Foppa Pedretti S p A Foppa Pedretti S p A Grumello del Monte Italia Via Volta 11 12 Foppa Pedretti S p A Foppa Pedretti S p A Foppa Pedretti S p A...

Page 52: ...52 HRVATSKI DIJELOVI Poslu avnik Okvir sjedala set sjedala materijal Ulo ak za sjedalo za podstavu i sigurnosni remeni Dr a nogu cijeli sklop Luk s igra kama Ko ara A B C D E D E A C B...

Page 53: ...iranje dr a a za ruku ne dopustite djetetu da ga dira 4 SIGURNOSNI POJAS UPOZORENJE Kori tenje sigurnosnog pojasa zajedno s rastavlja em nogu potrebno je kako bi se osigurala sigurnost va eg djeteta U...

Page 54: ...D na dnu prema van u isto vrijeme i spustite sjedalo do eljene visine Otpustite gumb Klik e upu ivati na to da je sjedalo u pravilnom polo aju UPOZORENJE Ne prilago avajte visinu sjedalice za hranjenj...

Page 55: ...E ZA POHARNU Postavite ko aru na 4 gumba na stra njem dr a u s otvorom ko are okrenutim prema gore 11 SASTAVLJANJE I KORI TENJE IGRA AKA UPOZORENJE Igra ka lijevu i desnu kuku za podr ku postavite lij...

Page 56: ...e naslona a i uklonite pojas povla e i s unutarnje strane sjedala kroz proreze na sjedalici i postavi Zaokrenite plasti ni zaklju avaju i prsten razdjeljiva a nogu ispod sjedala i uklonite pojas povla...

Page 57: ...koja mogu samostalno sjediti do 3 godine i maksimalno 15kg UPOZORENJE Sjedalica za hranjenje treba biti postavljen isklju ivo od strane odrasle osobe Provjerite je li sve pravilno sastavljeno prije s...

Page 58: ...lno zaklju ane Sigurno uklonite pakiranje Dijete se mo e ugu iti igraju i se s plasti nim vre ama Budite sigurni da su si korisnici proizvoda svjesni upozorenja Provjerite da su svi sigurnosni dijelov...

Page 59: ...ava Kupca i ili prava koja Kupac mo e imati u vezi s Prodava em Proizvoda IZUZECI FORMALNOG JAMSTVA Formalno jamstvo ne vrijedi u slu aju tete na Proizvodu iz sljede ih razloga ako se proizvod koristi...

Page 60: ...Importato da Imported by Foppa Pedretti S p A Via A Volta 11 24064 Grumello del Monte Bergamo Italy tel 39 035 830497 fax 39 035 831283 www foppapedretti it MISTERCHEF R1...

Reviews: