22
5. Front Panel Operations
5-1. Powering ON
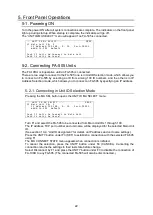
Turn the power ON after all system connections are complete. The indicators on the front panel
light up during startup. When startup is complete, the indicators will go off.
The
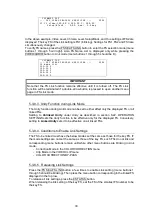
“UNIT ID MU SELECT” menu will appear if no FA-505 is connected.
- - -
U N I T I D M U S E L E C T - - - P 8 0 1
F 1 M a i n U n i t I D : 2
I P A d d r e s s : 1 9 2 . 1 6 8 . 0 . 1 0 P o r t : 5 0 0 1 1
N A M E : F A - 5 0 5 D e f a u l t
P u s h F 3 U n i t y S W C o n n e c t t o M a i n U n i t
P u s h F 4 U n i t y S W C a n c e l
5-2. Connecting FA-505 Units
The FA-10RU is inoperative until an FA-505 is connected.
There are two ways to connect to the FA-505; one is in Unit ID Selection mode, which allows you
to connect an FA-505 by selecting an ID from among 100 ID numbers, and the other is in IP
Address Selection mode, which allows you to connect an FA-505 by specifying an IP address.
5-2-1. Connecting in Unit ID Selection Mode
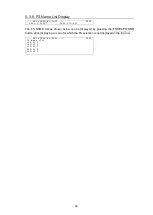
Pressing the MU SEL button opens the UNIT ID MU SELECT menu.
- - -
U N I T I D M U S E L E C T - - - P 8 0 1
F 1 M a i n U n i t I D : 2
I P A d d r e s s : 1 9 2 . 1 6 8 . 0 . 1 0 P o r t : 5 0 0 1 1
N A M E : F A - 5 0 5 D e f a u l t
P u s h F 3 U n i t y S W C o n n e c t t o M a i n U n i t
P u s h F 4 U n i t y S W C a n c e l
Turn F1 and select the FA-505 to be connected from Main Unit IDs 1 through 100.
The IP address, TCP port number and unit name will be displayed for the selected Main Unit
ID.
(See section 10-4.
“Unit ID Assignment” for details on IP address and unit name settings.)
Press the UNITY button under F3 (SET) to establish a connection with the selected FA-505
using F1.
The MU CONNECT STATE menu appears when connection is initiated.
To cancel the selection, press the UNITY button under F4 (CANCEL). Cancelling the
connection returns the settings to their last state before change.
Select Disconnect by F1 and press the UNITY button under F3 to disable the connection of
FA-10RU to any FA-505. (The connected FA-505 will also be disconnected.)

