background image

3

Ta

bl

e o

f C

o

n

te

n

ts

Im

p

o

rt

an

t S

af

et

y I

n

st

ru

ct

io

n

s

Table of Contents 

3

Important Safety Instructions 

3-5

Parts List 

6

Assembly 

7-9

Operation 

10

Cleaning and Maintenance 

11

Technical Specifications 

12

Warranty 

12

Warning!

 Please read and understand this entire manual before attempting to assemble, 

operate or install the product. Failure to follow the dangers, warnings and cautions contained 

in this instruction manual may result in a fire or explosion causing damage to property, serious 

bodily injury or death.

•  DO NOT USE CLOSE TO OPEN FLAMES AND OTHER HEATED PRODUCTS! CAUTION! LET THE APPLIANCE 

COOL DOWN BEFORE PUTTING THE COVER ON.

• For outdoor use only.

• Do not use as a cooking appliance.

• Hot surface.

• Do not use on a wood deck or combustible surface such as grass, leaves, mulch, etc.

• Do not use sample on heat sensitive or combustible structures.

• Wear protective gloves if necessary during assembly/use.

•  The installation of this unit must adhere to local codes or either the National Fuel Gas Code, ANSI Z223. 1/

NFPA54, OR CAN/CGA-B149.1, National Gas and Propane Installation Code. 

•  THIS UNIT IS INTENDED FOR OUTDOOR USE ONLY! This product shall be used outdoors, in a ventilated 

space and must not be used in any enclosed area. 

•  This unit is to be used with propane gas only! (sold separately) 

•  Do not attach a remote gas supply to this unit. 

•  Only use propane gas for this unit.

•  This unit is not intended for natural gas.

•  Converting this unit to natural gas is dangerous and not recommended. The conversion of this unit will void 

the manufacturer warranty.

•  If the propane gas tank is leaking gas, you may hear, see, or smell a hiss. Do the following: 

1. Disconnect the propane gas tank. 2. Do not attempt to fix the problem yourself. 3. Contact your gas supplier or 

fire department for help.

•  Never install or remove a propane tank from this unit while it is in use.

•  Applying too much propane may result in gas pooling and failure to burn. Allow fresh air into the unit so that 

the remaining gas may escape. 

•  Do not use a flame to check for gas leaks.

•  The max. inlet supply pressure: max. Gas supply 11" w.c. (2.74 kPa).

•  Use LP propane tanks with the following dimensions: diameter 4" ( 10.16cm), height 8" (20.32 cm), capacity 

1 lb (0.454 kg).

IMPORTANT: RETAIN FOR FUTURE REFERENCE, AND READ CAREFULLY.

Summary of Contents for 085-1559-4

Page 1: ... produce carbon monoxide which has no odour Using it in an enclosed space can kill you Never use this appliance in an enclosed space such as a camper tent car or home Save these instructions for future use If you are assembling this unit for someone else give this manual to him or her to read and save for the future Improper installation adjustment alteration service or maintenance can cause injur...

Page 2: ...Imported by Trileaf Distribution Trifeuil Toronto Canada M4S 2B8 Made in China ...

Page 3: ... B149 1 National Gas and Propane Installation Code THIS UNIT IS INTENDED FOR OUTDOOR USE ONLY This product shall be used outdoors in a ventilated space and must not be used in any enclosed area This unit is to be used with propane gas only sold separately Do not attach a remote gas supply to this unit Only use propane gas for this unit This unit is not intended for natural gas Converting this unit...

Page 4: ...d part should this occur Do not disconnect any part while unit is in use Do not store a spare propane tank on or near this unit If the heating unit is indoors detach the propane tank and leave outdoors Do not operate on a boat or vehicle This unit must be used on a flat surface and outdoors ONLY Always remove protective cover before operating if applicable cover not included Do not set the protect...

Page 5: ...y It is imperative that the control compartment burners and circulating airways of the appliance are kept clean IF APPLICABLE Allow heating item to cool completely before replacing lid DO NOT use heating item while lid is installed Always remove lid while heating item is in use Only use the regulator and hose assembly provided with this unit Replacement parts must be supplied directly by FOR LIVIN...

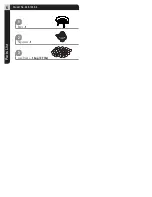
Page 6: ...6 Model No 085 1559 4 Parts List Body 1 Regulator 1 Lava Rocks 1 bag 7 7 lbs 1 2 3 ...

Page 7: ...s are present Compare parts with packaging contents list If any part is missing or if you have any questions contact the service centre at 1 877 483 6759 toll free Place all parts from the box in a cleared area and position them on the floor in front of you Remove all packing materials and place them back into the box Do not dispose of the packing materials until assembly is complete Read each step...

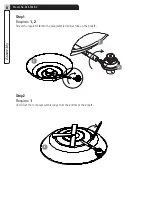
Page 8: ...l No 085 1559 4 Step 1 Requires 1 2 Screw the regulator 2 onto the preassembled burner tube on the body 1 Step 2 Requires 1 Unfold out the four preassembled legs from the bottom of the body 1 Assembly 1 1 2 1 ...

Page 9: ...ulator 2 is turned to the OFF position Attach a 1 lb propane gas tank not included into the bottom of the regulator 2 Step 4 Requires 1 3 Pour the bag of lava rocks 1 into the firebowl on the body 1 Be sure to fully cover the preassembled burner Assembly 2 1 3 1 ...

Page 10: ... lighting this unit stand away from the unit for the first 20 minutes after igniting Flame height should be a yellow blue colour 1 7 1 2 2 5 19 cm in height Wait 5 minutes after extinguishing flame prior to placing a lid if applicable or protective cover on heating item To Light To Extinguish After assembling the gas tank push and turn the control knob on the regulator counter clockwise then use a...

Page 11: ... cloth Harsh weather conditions may cause stubborn stains discoloration and possibly rust pitting Permanent damage may occur if powder or solvent comes in contact with painted or plastic components on this heating unit Keep the heating unit stored away from direct sunlight If storing this unit inside disconnect the propane gas tank from the gas valve Not using manufacturer approved or supplied par...

Page 12: ...grees to replace the defective product free of charge within the stated warranty period when returned by the original purchaser with proof of purchase This product is not guaranteed against wear or breakage due to misuse and or abuse Warranty Technical Specifications Dimensions Diameter 21 53 3 cm Height 9 1 2 24 1 cm Product weight 12 lb 15 oz 5 89 kg ...

Reviews: