For self-testing
FORA G71a
311-4274100-040
0123
1
2
3
4
5
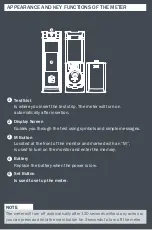
Test Slot
Is where you insert the test strip. The meter will turn on
automatically after insertion.
Display Screen
Guides you through the test using symbols and simple messages.
M Button
Located at the front of the monitor and marked with an “M”,
is used to turn on the monitor and enter the memory.
Battery
Replace the battery when the power is low.
Set Button
Is used to set up the meter.
1
2
3
4
5
NOTE
The meter will turn off automatically after 120 seconds without any action or
you can press and hold the main button for 3 seconds to turn off the meter.
Blood Drop Symbol
Flashes when meter is ready for sample application.
Test Result Area
Test results are displayed here.
Error Warning
Appears with error messages.
Month / Day / Hour / Minute
Memory
Indicates a test result stored in memory.
Measurement Unit
The measurement unit is fixed as mg/dL.
Battery Symbol
Appears when the battery is low.
1
2
3
4
5
6
7
APPEARANCE AND KEY FUNCTIONS OF THE METER
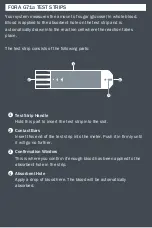
Test Strip Handle
Hold this part to insert the test strip into the slot.
Contact Bars
Insert this end of the test strip into the meter. Push it in firmly until
it will go no further.
Confirmation Window
This is where you confirm if enough blood has been applied to the
absorbent hole in the strip.
Absorbent Hole
Apply a drop of blood here. The blood will be automatically
absorbed.
1
2
3
4
DISPLAY SCREEN
FORA G71a TEST STRIPS
Dimension:
86.9 (L) x 27.0 (W) x 11.3 (H) mm
Weight:
19 g (excluding battery)
Power Source:
One CR2032 3V Lithium battery (for at least 500 measurements)
Display:
LCD
Memory:
20 measurement results with date and time
Automatic detection of electrode insertion
Automatic reaction time count-down
Temperature warning
Operating Conditions:
10°C to 40°C (50°F to 104°F), below 85% R.H.
Storage/Transport Conditions:
-20°C to 60°C (-4°F to 140°F), below 95% R.H.
Measurement Units:
mg/dL
Measurement Range:
20–600 mg/dL (1.1–33.3 mmol/L)
When the battery is low, you can still do up to 50 tests.
The device has been tested to meet the requirements of ISO 15197, and
electrical and safety requirements of:
IEC/EN 61010-1, IEC/EN 61010-2-101, EN 61326-1, EN 61326-2-6.
SPECIFICATIONS
CHECKING THE SYSTEM WITH FORA CONTROL SOLUTIONS
2
1
4
3
5
6
7
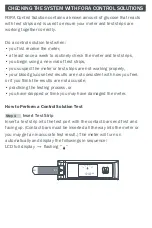
Step 1
Insert Test Strip
Insert a test strip into the test port with the contact bars end first and
facing up. (Contact bars must be inserted all the way into the meter or
you may get an inaccurate test result.) The meter will turn on
automatically and display the followings in sequence:
LCD full display → flashing “ ”
FORA Control Solution contains a known amount of glucose that reacts
with test strips and is used to ensure your meter and test strips are
working together correctly.
Do a control solution test when:
• you first receive the meter,
• at least once a week to routinely check the meter and test strips,
• you begin using a new vial of test strips,
• you suspect the meter or test strips are not working properly,
• your blood glucose test results are not consistent with how you feel,
or if you think the results are not accurate,
• practicing the testing process, or
• you have dropped or think you may have damaged the meter.
How to Perform a Control Solution Test
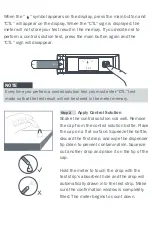
When the “ ” symbol appears on the display, press the main button and
“CTL” will appear on the display. When the “CTL” sign is displayed, the
meter will not store your test result in the memory. If you decide not to
perform a control solution test, press the main button again and the
“CTL” sign will disappear.
Step 2
Apply Control Solution
Shake the control solution vial well. Remove
the cap from the control solution bottle. Place
the cap on a flat surface. Squeeze the bottle,
discard the first drop, and wipe the dispenser
tip clean to prevent contamination. Squeeze
out another drop and place it on the tip of the
cap.
Hold the meter to touch the drop with the
test strip’s absorbent hole and the drop will
automatically drawn into the test strip. Make
sure the confirmation window is completely
filled. The meter begins to count down.
NOTE
Every time you perform a control solution test you must enter “CTL” test
mode so that the test result will not be stored in the meter memory.
Your system measures the amount of sugar (glucose) in whole blood.
Blood is applied to the absorbent hole on the test strip and is
automatically drawn into the reaction cell where the reaction takes
place.
The test strip consists of the following parts:
Owner’s Booklet
ver 5.0 2018/10
Blood Glucose Monitoring System
IMPORTANT SAFETY INSTRUCTIONS
1
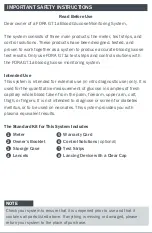
Meter
Owner’s Booklet
Storage Case
Lancets
5
4
8
3
7
2
6
Warranty Card
Control Solutions
(optional)
Test Strips
Lancing Device with a Clear Cap
Read Before Use
Dear owner of a FORA G71a Blood Glucose Monitoring System,
The system consists of three main products: the meter, test strips, and
control solutions. These products have been designed, tested, and
proven to work together as a system to produce accurate blood glucose
test results. Only use FORA G71a test strips and control solutions with
the FORA G71a blood glucose monitoring system.
Intended Use
This system is intended for external use (
in vitro
diagnostic use) only. It is
used for the quantitative measurement of glucose in samples of fresh
capillary whole blood taken from the palm, forearm, upper arm, calf,
thigh, or fingers. It is not intended to diagnose or screen for diabetes
mellitus, or to be used on neonates. This system provides you with
plasma equivalent results.
The Standard Kit for This System Includes
NOTE
Check your system to ensure that it is unopened prior to use and that it
contains all parts listed above. If anything is missing or damaged, please
return your system to the place of purchase.
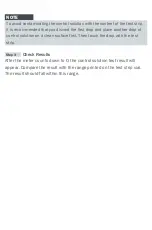
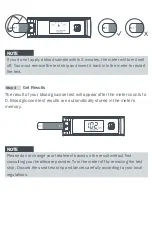
Step 3
Check Results
After the meter counts down to 0, the control solution test result will
appear. Compare the result with the range printed on the test strip vial.
The result should fall within this range.
NOTE
To avoid contaminating the control solution with the content of the test strip,
it is recommended that you discard the first drop and place another drop of
control solution on a clean surface first. Then touch the drop with the test
strip.
ForaCare Suisse AG
Neugasse 55, 9000 St. Gallen, Switzerland
www.foracare.ch
TESTING YOUR BLOOD
Before testing, be sure to read this section and the test strip insert found
in the test strip box carefully. Make sure you have all the items needed
for the test.
Test Steps
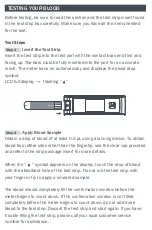
Step 1
Insert the Test Strip
Insert the test strip into the test port with the contact bars end first and
facing up. The bars must be fully inserted into the port for an accurate
result. The meter turns on automatically and displays the blood drop
symbol.
LCD full display → flashing “ ”
Step 2
Apply Blood Sample
Obtain a drop of blood of at least 0.5 µL using a lancing device. To obtain
blood from other sites other than the fingertip, use the clear cap provided
and refer to the strip package insert for more details.
When the “ ” symbol appears on the display, touch the drop of blood
with the absorbent hole of the test strip. Do not rub the test strip with
your finger or try to apply a smeared sample.
The blood should completely fill the confirmation window before the
meter begins to count down. If the confirmation window is not filled
completely before the meter begins to count down, do not add more
blood to the test strip. Discard the test strip and start again. If you have
trouble filling the test strip, please call your local customer service
number for assistance.
2
1
4
3
G71a
REF


