background image

46 

€

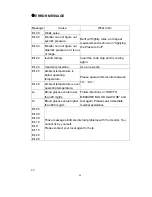
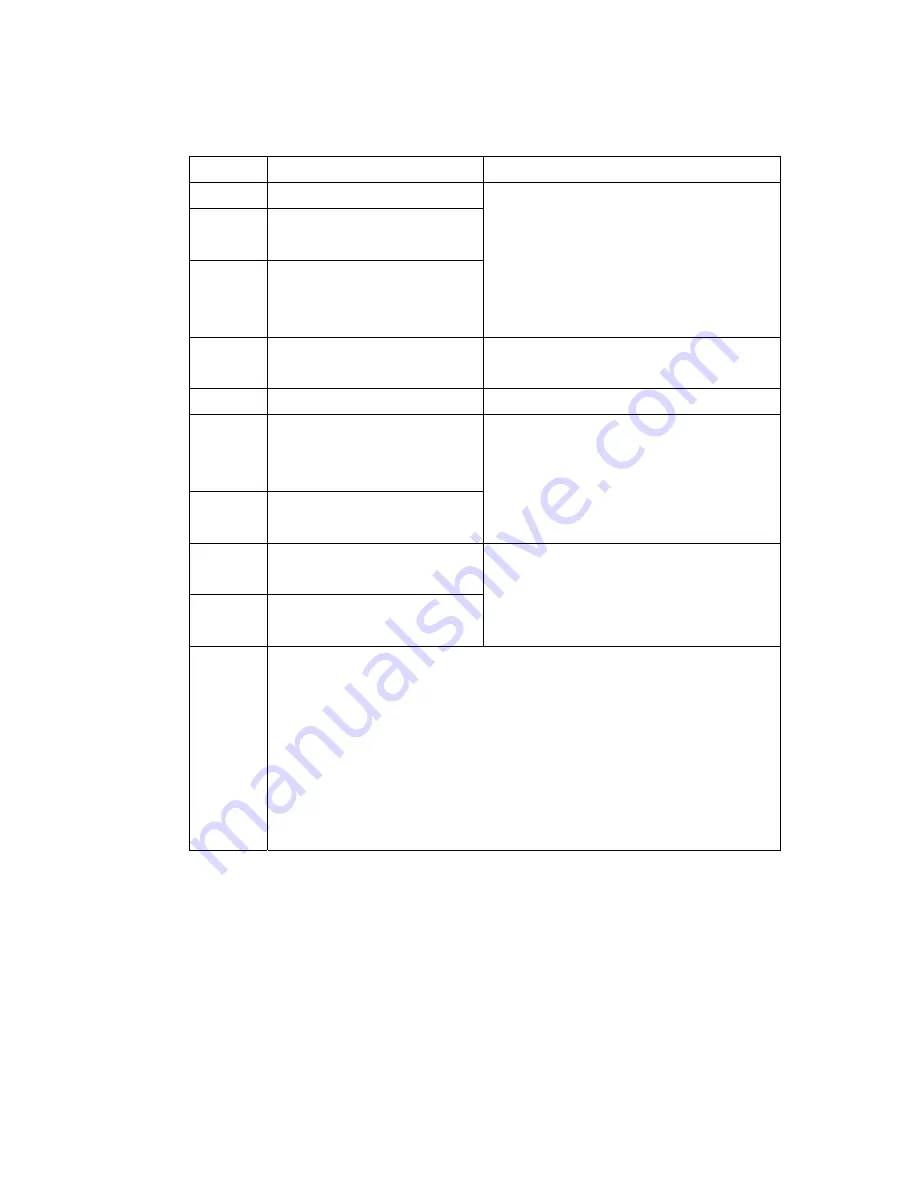
 ERROR MESSAGE   


Message 

Cause 

What to Do 

Err.00 Weak 

pulse. 

Err.02 

Monitor can not figure out 

systolic pressure. 

Err.04 

Monitor can not figure out 

diastolic pressure or it is out 

of range. 

Refit cuff tightly, relax, and repeat 

measurement as shown in "Applying 

the Pressure Cuff". 

Err.22 Invalid 

coding. 

Insert the code strip and try coding 

again. 

Err.24 

Used strip insertion. 

Use a new strip. 

Err.25 

Ambient temperature is 

below operating 

temperature. 

Err.26 

Ambient temperature is over 

operating temperature. 

Please operate this monitor between 

10


~40


Lo 

Blood glucose value lower 

than 20 mg/dL 

Hi 

Blood glucose value higher 

than 600 mg/dL 

Follow directions in “HOW TO 

MEASURE BLOOD GLUCOSE” and 

test again. Please seek immediate 

medical assistance. 

Err.05 

Err.06 

Err.09 

Err.10 

Err.11 

Err.15 

Err.20 

Err.28 

Those messages indicate internal problems with the monitor. You 

cannot fix by yourself.   

Please contact your local agent for help. 

46 

Summary of Contents for TD-3260

Page 1: ...1 Fora Comfort 2 in 1 Blood Glucose plus Blood Pressure Monitoring System Version 1 0 2007 09 03 01 ...

Page 2: ...ly for the intended use described in this manual 3 Do not use strips and control solutions which are not supplied by the manufacturer 4 Do not use the device if it is not working properly or if it has suffered any damage 5 Before using any product to test your blood glucose read all instructions thoroughly and practice the test Do all quality control checks as directed and consult with a diabetes ...

Page 3: ...Battery Installation and Replacement 16 Setting the Monitor 18 HOW TO MEASURE BLOOD GLUCOSE 21 Coding the Monitor 22 Checking the Code 23 Checking the System with Control Solutions 24 Important Control Solution Information 25 Doing a Control Solution Test 26 Testing Your Blood Glucose 28 Special Message 35 Comparing Monitor and Laboratory Results 36 HOW TO MEASURE BLOOD PRESSURE 37 Suggestions bef...

Page 4: ... HOW TO TAKE CARE OF YOUR MONITOR 42 Cleaning 42 Storage 42 Monitor storage 42 Strip storage 43 Control storage 44 PROBLEM SOLVING GUIDE 45 ERROR MESSAGE 46 Problem in Opertation 47 SPECIFICATIONS 49 04 ...

Page 5: ...s NOT serve as a cure of any symptoms or disease The data measured are only for reference Always consult your physician to have the results interpreted This device is NOT able to measure in the presence of common arrhythmia such as arterial or ventricular premature beats or arterial fibrillation It may produce reading error Do NOT use the device for purposes other than measuring blood glucose and ...

Page 6: ...r healthcare professional monitor and adjust your treatment plan to gain better control of your diabetes Time of day Plasma glucose range mg dL for people without diabetes Your target range mg dL Fasting and before meal 1a 70 110 mg dL 3 9 6 1 mmol L 2 hours after meals 1b Less than 140 mg dL 7 8 mmol L 1a Sacks DB in Carbohydrates Burtis CA Ashwood ER ed Tietz Textbook of Clinical Chemistry Phila...

Page 7: ...ing middle age This symptom is a result of continuous aging of the blood vessel Further causes include obesity lack of exercise and cholesterol LDL adhering to the blood vessels Rising of blood pressure accelerates hardening of the arteries and the body becomes more susceptible to apoplexy and coronary infarction The WHO world health organization published the guideline of blood pressure range Sou...

Page 8: ...ple of Measurement Blood glucose is based on the measurement of electrical current generated by the reaction of glucose with the reagent of the strip The monitor measures the current and displays the corresponding blood glucose level The strength of the current produced by the reaction depends on the amount of glucose in the blood sample Blood pressure is measured non invasively at the wrist based...

Page 9: ...re full of nerve endings receptors At other body sites since nerve endings were not so condensed you will not feel as much pain as at the fingertip When to use AST Food medication illness stress and exercise can affect blood glucose levels Capillary blood at fingertip reflects these changes faster than capillary blood at other sites Therefore when testing blood glucose during or immediately after ...

Page 10: ...puncture site prior to blood extraction has a significant influence on the glucose value obtained Blood from the site without rubbing exhibits a measurably different glucose concentration than blood from the finger When the puncture site was rubbed prior to blood extraction the difference was significantly reduced Please follow suggestions below before getting a drop of blood Rub the puncture site...

Page 11: ...is unopened prior to use and that it contains all parts listed above If either of these conditions occurred please return your system to the place of purchase Please note that Fora comfort test strips lancets TaiDoc control solution are optional and are not included in the standard kit Please ask your local agent for help 11 1 Blood glucose and blood pressure monitor x1 6 A clear cap X1 2 Pressure...

Page 12: ...Zigbee Indicator For Feature 5 Wireless Connection Memory Button For Feature 3 Memory Recall Power Button For Feature 2 Blood Pressure Test RF Button For Feature 5 Wireless Connection Set Button For Feature 4 Monitor Setting LCD Display Test result is displayed with symbols and simple messages ...

Page 13: ...13 13 ...

Page 14: ...14 LCD Display 14 ...

Page 15: ... strip and is automatically drawn into the reaction chamber where the reaction takes place See pages 21 36 How to measure blood glucose for complete instructions NOTE We recommend that you should hold the test strip by the Test Strip Handle only when you perform blood glucose test Do not hold the Absorbent Hole in order to avoid contamination 15 ...

Page 16: ...ower Signal The monitor will remind you when the power is getting low by displaying two different messages 1 Battery Symbol appears while you perform tests Fig 1 This means it is about time to change the batteries although still 30 more measurements can be made 2 Battery Symbol flashes by itself and the monitor cannot perform any measurement Fig 2 This means you must change the batteries immediate...

Page 17: ...nd name batteries together Use only new batteries of the required size and type 2 Replacing the batteries does not affect previous test results stored in the monitor But you may need to update the settings 3 Batteries might leak chemicals if not used for a long time Remove the batteries if you are not going to use the device for an extended period i e 3 months or more 4 As with all small batteries...

Page 18: ...P 1 Start with the Monitor Turned Off Press the S button to enter the Setting Mode STEP3 Press the S button to select what you would like to change The selected one will be flashing Press the M button to make the change Fig 7 STEP 2 The year will appear first Fig 6 STEP 4 The date and day will appear automatically Press the M button to select the changes you made and press the S button move on to ...

Page 19: ...ton move on to next step Fig 10 STEP 6 The blood pressure unit will appear automatically Press the M button to select the changes you made and press the S button move on to next step Fig 11 STEP 7 The ambient temperature will appear automatically Press the M button to select the changes you made and press the S button move on to next step Fig 12 STEP 8 You may also press the button any time to tur...

Page 20: ...liter mg dL is the standard unit in the United States The millimole per liter mmol L is the standard unit in Canada Use of the wrong unit of measure may cause you to misinterpret your blood glucose level and may lead to incorrect treatment While the monitor is in the setting mode if no button is pressed for 3 minutes the monitor will turn off automatically You may also press the button any time to...

Page 21: ...nly capillary whole blood sample to test your blood glucose Applying other substances will cause wrong results If you are experiencing symptoms that are not consistent with your blood glucose test results and you have followed all instructions described in this owner s manual call your healthcare professional Inaccurate results may occur in severely hypotensive individuals or patients in shock Ina...

Page 22: ...his tells you that the monitor has finished coding and is ready for blood glucose testing Fig 15 WARNING It is important to make sure that the LCD displayed code is the same as the code on the test strip vial before testing Failure to do so will get wrong results 22 Step 1 Insert the code strip when the monitor is off Wait until the code number appears on the LCD display Fig 14 Make sure the code ...

Page 23: ...1 With the monitor off insert a test strip into the Test Slot Make sure you insert the end with the contact bars first and facing up Contact bars must be inserted all the way into the monitor for an accurate result Fig 16 STEP2 The monitor will display CHK and the strip symbol Fig 17 Then the ambient temperature will be shown Fig 18 STEP3 Then the code number and flashing blood drop appears Check ...

Page 24: ...rst time practice the procedure using control solution When you can do three tests in a row that are within the expected range you are ready to test your blood For routinely check the monitor and test strips perform a single test for each level of control solution at least once a week When the control solution test should be performed When you first get your Monitor When you begin using a new vial...

Page 25: ...pe off the dispenser tip to ensure a good sample and an accurate result Use only for 90 days after first opening Record the discard date date opened plus 90 days on the control solution vial Discard after 90 days Store the control solution tightly closed at temperatures below 86 30 Do not refrigerate NOTE The control solution range printed on the test strip vial is for Taidoc control solution only...

Page 26: ...r memory Failure to do so will confuse the blood glucose test result with the control solution test result in memory 26 Fig 20 STEP1 Insert Test Strip Insert a test strip with contact bars end first and facing up into the test slot The monitor turns on automatically and displays the followings in sequence CHK and Îambient temperatureÎcode number and flashing Fig 20 STEP 2 Press the M button While ...

Page 27: ... Squeeze the vial again to get another drop and place on a clean surface Fig 23 STEP 4 Apply Control Solution Move the monitor to meet the absorbent hole of the test strip and the drop will be automatically drawn into the test strip Fig 24 Remove the monitor until the confirmation window is filled The monitor begins to count down To avoid contamination the control solution with the content of the ...

Page 28: ...re to read carefully this section and the test strip package insert found in the test strip box before testing Make sure you have all items needed to test A Monitor B Test Strips C Lancing Device D Sterile Lancet E Clear Cap A B C D E 28 ...

Page 29: ... Remove the cap of lancing device Insert a lancet into the lancet holder and push down firmly until it is fully seated Fig 26 Remove the protective disk Replace the lancing Device cap Fig 27 Replace the lancet device cap Turn the cap unit it is snug but not too tight Fig 28 Fig 28 The adjustable tip offers 5 levers of skin penetration Twist the adjustable tip in either direction until the number l...

Page 30: ... have been cocked when the lancet was inserted Fig 30 Fig 30 Blood from sites other than the fingertip A clear cap together with the kit makes it easier to get a drop of blood for AST When you want to obtain blood from sites other than the finger replace the lancet device cap with the clear cap Fig 31 Turn the clear cap until it is snug but not too tight Fig 31 ...

Page 31: ... code numbers are different please refer to section of Coding the Monitor for the procedure of coding Fig 33 31 Insert a test strip with contact bars end first and facing up into the test slot Fig 32 The monitor turns on automatically and displays the followings in sequence CHK and Î ambient temperature Î code number and flashing Fig 32 Fig 33 ...

Page 32: ...sult It should be discarded 32 Fingertip Hold the Lancing Device firmly against the side of your finger Press the release button You will hear a click indicating that the puncture is complete Fig 34 Site other than fingertip Please refer to the section of About AST for available punctured sites After penetration discard the first drop of blood with a clean tissue paper or cotton Then gently squeez...

Page 33: ...d to turn the monitor off by removing the test strip 3 The blood should be completely filled the confirmation window before the monitor begins to count down If you find that the confirmation window is not filled with blood when the monitor is counting NEVER try to add more blood to the test strip Discard the test strip and retest with a new one 4 To start a blood pressure test after performing a b...

Page 34: ...used test strip may be potentially biohazard Please discard it carefully according to your local regulations Always use caution when removing the lancet Take the lancet out carefully Place the disk on a hard surface and push the exposed tip into the protective disk Fig 38 ...

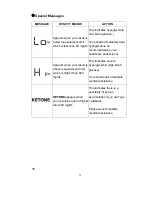
Page 35: ...ecommended by your healthcare professional Appears when your result is above measurement limit which is higher than 600 mg dL This indicates severe hyperglycemia high blood glucose You should seek immediate medical assistance KETONE appears when your result is equal or higher than 240 mg dL This indicates there is a possibility of ketone accumulation if you are Type 1 diabetes Please seek immediat...

Page 36: ...ash your hands before obtaining a blood sample Never use your monitor with blood that has been collected in a gray top test tube Use fresh capillary blood only You may still have a variation from the result because blood glucose levels can change significantly over short periods especially if you have recently eaten exercised taken medication or experienced stress 6 In addition if you have eaten r...

Page 37: ...fore measurement Sit or lie down for at least 10 minutes before measuring Do not measure when feeling anxious or tense Take a 5 10 minute break between measurements This break can be longer if necessary depending on your physical conditions Keep the records for your physician as reference Blood pressure varies from two hands naturally Always measure your blood pressure on the same arm 37 ...

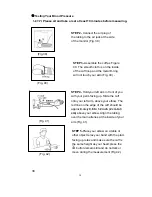
Page 38: ...in Fig 40 STEP 4 Hold your left arm in front of you with your palm facing up Slide the cuff onto your left arm above your elbow The red line on the edge of the cuff should be approximately 0 8 to 1 2 inch 2 cm to 3 cm above your elbow Align the tubing over the main arteries at the inside of your arm Fig 41 STEP 5 Place your elbow on a table or other object relax your hand with the plam facing up r...

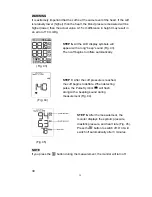
Page 39: ... the measurement the monitor will turn off 39 STEP 6 All the LCD display symbols will appear with a long beep sound Fig 43 Then cuff begins to inflate automatically STEP 7 After the cuff pressure is reached the cuff begins to deflate When detecting pulse the Pulse Symbol will flash along with a beeping sound during measurement Fig 44 STEP 8 After the measurement the monitor displays the systolic p...

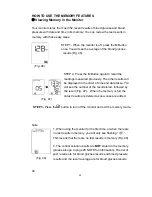
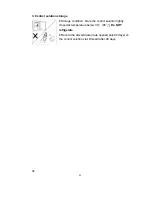
Page 40: ...der of time and date taken You will see the number of the result stored followed by the result Fig 47 When the memory is full the oldest results are deleted as new ones are added Note 1 When using the monitor for the first time or when there are no test results in memory you will only see flashing This means that there are no test results in memory Fig 48 2 The control solution results are NOT sto...

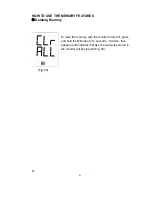
Page 41: ...FEATURES Deleting Memory To clear the memory with the monitor turned off press and hold the M Button for 3 seconds CLr ALL then appears and indicates that ALL the memories stored in the monitor will be cleared Fig 49 41 Fig 49 ...

Page 42: ...ping with a moistened cloth and soap Do not immerse in water Storage 1 Monitor Storage Storage conditions 20 60 10 95 relative humidity Always store or transport the monitor in its original storage case Avoid dropping and strong impact Avoid direct sunlight and humidity Do not disassemble modify or try to repair the monitor or wrist cuff by yourself Do not over wring the cuff and turn the cuff ins...

Page 43: ... immediately replace the vial cap and close it tightly Touch the test strip with clean and dry hands Use each test strip immediately after removing it from the vial Write the discard date the date opened plus 90 days on the vial label when you first open it Discard remaining test strips 90 days after first opening date Do not bend cut or alter a test strip in any way Keep the strip vial away from ...

Page 44: ...ion storage Storage condition Store the control solution tightly closed at temperature below 30 86 Do NOT refrigerate Record the discard date date opened plus 90 days on the control solution vial Discard after 90 days 44 ...

Page 45: ...proper use may cause an inaccurate result without producing an error message In the event of a problem refer to the information under action Never try to disassemble the monitor in any circumstances If you encounter any error messages not listed below or if you have followed the actions recommended below but the problem keeps unsolved please call the customer service for support 45 ...

Page 46: ...sertion Use a new strip Err 25 Ambient temperature is below operating temperature Err 26 Ambient temperature is over operating temperature Please operate this monitor between 10 40 Lo Blood glucose value lower than 20 mg dL Hi Blood glucose value higher than 600 mg dL Follow directions in HOW TO MEASURE BLOOD GLUCOSE and test again Please seek immediate medical assistance Err 05 Err 06 Err 09 Err ...

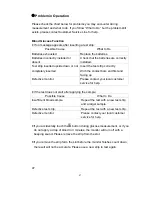
Page 47: ...e contact bars end first and facing up Defective monitor Please contact your local customer service for help If the test does not start after applying the sample Possible Cause What to Do Insufficient blood sample Repeat the test with a new test strip and a larger sample Defective test strip Repeat the test with a new test strip Defective monitor Please contact your local customer service for help...

Page 48: ...st 30 minutes before measurement If a result is higher lower than user s average measurement POSSIBLE CAUSE WHAT TO DO May be not in correct position during measuring Adjust to a correct position to measure Blood pressure naturally varies from time to time Keep in mind for next measurement If the cuff inflates again during measuring POSSIBLE CAUSE WHAT TO DO Cuff is not fastened Fasten the cuff ag...

Page 49: ...ucose 75mg dL 20 when glucose 75mg dL Ketone warning glucose value is over 240 mg dL Blood Pressure Measurement Performance Pressure range 0 300 mmHg Heart rate range 40 199 beat per minute Measurement unit mmHg or KPa Accuracy of pressure 3mmHg or 2 of reading Accuracy of heart rate 4 of reading Maximum inflation pressure 300 mmHg Typ RF Characteristics Receive sensitivity 90dBm Max Transmit powe...

Page 50: ...orient or relocate the receiving antenna Increase the separation between the equipment and receiver Connect the equipment into an outlet on a circuit different from that to which the receiver is connected Consult the dealer or an experienced radio TV technician for help Operation of this equipment is subject to the following two conditions 1 This device may not cause harmful interference 2 This de...

Page 51: ...Kwang Fu Rd 223E Thousand Oaks Blvd Suite 121 San Chung Taipei County Taiwan Thousand Oaks CA 91360 TEL 886 2 66358080 Customer Care Line FAX 886 2 66355959 805 230 3068 Hours of Operation 9 am 4 pm PDT At all other times you should contact your health care professional for assistance 51 ...

Reviews: