background image

FORCE1

14

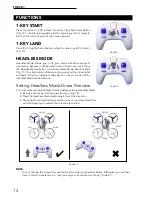
Headless  Mode  allows  you  to  fly  your  drone  without  knowing  its 
orientation, because it will be fixed in the direction you set it. Press 
the Headless Mode button to enter Headless Mode before takeoff 
(Fig. 11). Your transmitter will beep continuously and the drone lights 
will begin to flash to indicate mode selection. You must now set the 
Headless Mode drone direction. 

FUNCTIONS

1-KEY START

1-KEY LAND

HEADLESS MODE

Place the drone on a flat surface. Press the 1-Key Start/Land Button 
(Fig. 10) – the drone propellers will start spinning, and it is ready to 
fly. Push the left stick up to fly the drone upwards. 

Press the 1-Key Start/Land button while the drone is aloft to land it 
(Fig. 10).

Setting Headless Mode Drone Direction

You must verify your drone’s flight direction before entering Headless Mode: 

• 

Be sure your drone is facing away from you (Fig. 12)

• 

Press the Headless Mode button again to set the direction 

• 

Drone lights will stop flashing and then stay on, and the transmitter 
will stop beeping to indicate the direction is verified

FIGURE 10

FIGURE 11

FRONT

REAR

RIGHT

LEFT

FRONT

REAR

RIGHT

LEFT

FIGURE 12

NOTE:

Do not change the transmitter orientation after entering Headless Mode. Otherwise, you will lose 
track of the set orientation (i.e., that you and your transmitter are facing “forward”).

Summary of Contents for halo3000

Page 1: ...Visit us online at force1rc com for product information replacement parts and flight tutorials FOR MORE INFORMATION 2 Speed 1 Key Lift Land LED Lights Headless Mode Altitude Hold 2 4Ghz Transmitter 36...

Page 2: ......

Page 3: ...ATTENTION PLEASE WATCH THIS FLIGHT INSTRUCTION VIDEO BEFORE FLYING YOUR DRONE https youtu be tk3qzsUwoWs...

Page 4: ...ty Precautions 3 LI PO Battery Care 4 Drone Battery Charging 5 Contents Drone Overview 6 Transmitter Overview 7 Drone Assembly 8 Preflight Operation 10 Flight Controls 11 Trim Adjustments 12 Functions...

Page 5: ...his drone is suitable for experienced RC drone operators aged 14 years and older It contains small parts and should be kept out of reach of small children Please follow these safety procedures 1 Fligh...

Page 6: ...temperature If it is sealed the air inside will inflate rapidly causing further heating Charging DO NOT overcharge the battery never charge batteries unattended and stop charging as soon as your batt...

Page 7: ...r LI PO battery recycling center for more info WARNING DO NOT LEAVE BATTERY CHARGING UNSUPERVISED 1 First attach your USB cable to the drone battery then connect it to your preferred charging source 2...

Page 8: ...TER PROPELLERS 4 USB CHARGER DRONE OVERVIEW FRONT PROPELLER B COUNTERCLOCKWISE PROPELLER A CLOCKWISE PROPELLER A CLOCKWISE PROPELLER B COUNTERCLOCKWISE REAR MOTOR FORWARD MOTOR FORWARD MOTOR REVERSE M...

Page 9: ...t mix old and new batteries Don t mix alkaline standard carbon zinc and rechargeable nickel cadmium batteries Remove rechargeable batteries before charging Only charge batteries under adult supervisio...

Page 10: ...e DRONE ASSEMBLY BATTERY INSTALLATION 1 Open the battery cover by sliding the cover over and lifting up Fig 1 2 Connect the wire of the 3 7v lithium battery to the receiver wire in the power port Fig...

Page 11: ...lers matching A and B Fig 5 Purchase extra propellers at force1rc com To remove propeller lift upwards on propeller until in snaps off Fig 3 The replacement propeller should have the same rotational d...

Page 12: ...your battery and motor vibration may cause loosening 6 Make sure the propellers are installed correctly and the motors are working normally after unlocking PREFLIGHT OPERATION PAIRING WITH DRONE 1 Ins...

Page 13: ...ly the drone forward and pull the DIRECTION CONTROL STICK down to fly the drone backward FLY LEFT OR RIGHT Move the DIRECTION CONTROL STICK to the left to fly the drone to the left and move the DIRECT...

Page 14: ...drone drifts in an unwanted direction try adjusting the trim as shown below LEFT RIGHT TRIM Adjust the LEFT RIGHT FLYING TRIMMER to the right if the drone drifts to the left when taking off and adjust...

Page 15: ...t it return to center Fig 9 360 360 FLIP ROLL Front Back Flip Press the Flip Roll button to flip the drone The transmitter will beep indicating the drone is in Flip Roll Mode Next move the right stick...

Page 16: ...is ready to fly Push the left stick up to fly the drone upwards Press the 1 Key Start Land button while the drone is aloft to land it Fig 10 Setting Headless Mode Drone Direction You must verify your...

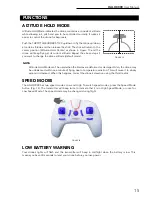
Page 17: ...mode FIGURE 13 NOTE Altitude Hold Mode can t be used when the blades are deformed or damaged Also the drone may be unbalanced within one minute of flying due to temperature variation This will cause...

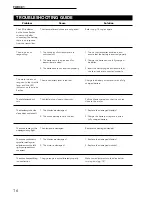
Page 18: ...The blades are damaged The gyroscope is not calibrated properly 2 The drone battery level is too low 2 The motor is damaged 1 The drone and or transmitter are switched off 2 The batteries in the dron...

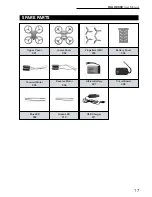
Page 19: ...er Manual 17 SPARE PARTS Upper Cover 001 Forward Motor 005 Lower Cover 002 Propellers A B 003 USB Charger 011 Battery Cover 004 Lithium Battery 007 Blue LED 009 Reverse Motor 006 Circuit Board 008 Gre...

Page 20: ...vice pursuant to part 15 of the FCC Rules These limits are designed to provide residential protection against harmful interference in a residential installation This equipment generates uses and can r...

Reviews: