background image

FORCE1

12

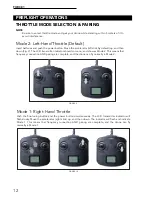
Mode 1: Right-Hand Throttle

Push the fine-tuning button and the power button simultaneously. The LCD transmitter indicator will 
flash slowly. Move the accelerator (right stick) up, and then down. The indicator will flash and indicate 
Mode  1.  This  means  that  frequency  connection  AND  pairing  are  complete,  and  the  drone  can  fly 
normally in Mode 1. 

PREFLIGHT OPERATIONS

THROTTLE MODE SELECTION & PAIRING

Mode 2: Left-Hand Throttle (Default)

Insert batteries and push the power button. Move the accelerator (left stick by default) up, and then 
down (Fig. 9). The LCD transmitter indicator should come on, and show as Mode 2. This means that 
frequency connection AND pairing are complete, and the drone can fly normally in Mode 2. 

NOTE

Be sure to select throttle mode and pair your drone while standing within 5 meters of it to 
avoid interference.

FIGURE 9

FIGURE 10

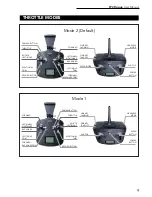
Summary of Contents for rogue F72

Page 1: ...s online at force1rc com for product information replacement parts and flight tutorials FOR MORE INFORMATION Altitude Hold Video Photo Headless Mode 3 Speed Flight Path Mode FPV Mode One Key Lift Land...

Page 2: ......
Page 3: ...ATTENTION PLEASE WATCH THIS FLIGHT INSTRUCTION VIDEO BEFORE FLYING YOUR DRONE https youtu be tk3qzsUwoWs...

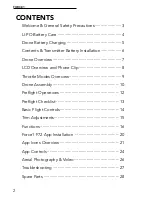
Page 4: ...lation 6 Drone Overview 7 LCD Overview and Phone Clip 8 Throttle Modes Overview 9 Drone Assembly 10 Preflight Operations 12 Preflight Checklist 13 Basic Flight Controls 14 Trim Adjustments 15 Function...

Page 5: ...nal Force1 parts and accessories Please keep the packaging and this user manual for future reference This drone is suitable for experienced RC drone operators aged 14 years and older It contains small...

Page 6: ...temperature If it is sealed the air inside will inflate rapidly causing further heating Charging DO NOT overcharge the battery never charge batteries unattended and stop charging as soon as your batt...

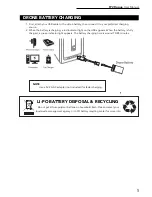
Page 7: ...PO battery recycling center for more info 1 First attach your USB cable to the drone battery then connect it to your preferred charging source 2 When the battery is charging a red indicator light on t...

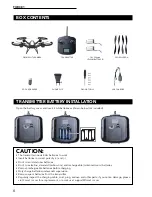
Page 8: ...teries to work Insert batteries in correct polarity and Don t mix old and new batteries Don t mix alkaline standard carbon zinc and rechargeable nickel cadmium batteries Remove rechargeable batteries...

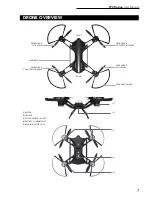
Page 9: ...FRONT PROPELLER B COUNTERCLOCKWISE PROPELLER A CLOCKWISE PROPELLER A CLOCKWISE PROPELLER GUARD PROPELLER B COUNTERCLOCKWISE REAR LANDING GEAR 1 MOTOR 2 CAMERA 3 FRONT INDICATOR LIGHT 4 BATTERY COMPAR...

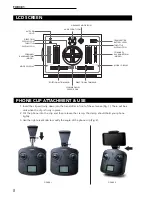
Page 10: ...ne tightly 3 Use the right silver knob to modify the angle of the phone clip Fig 2 PHONE CLIP ATTACHMENT USE FIGURE 1 FIGURE 2 DIRECTIONAL TRIMMING ROTATIONAL TRIMMING LCD SCREEN ALTITUDE HOLD DIRECTI...

Page 11: ...LANDING ONE KEY LANDING THROTTLE CAMERA BUTTON FORWARD THROTTLE BACKWARD LEFT RIGHT TRIM ROTATIONAL TRIM FORWARD BACKWARD TRIM HEADLESS MODE HEADLESS MODE LEFTWARD RIGHTWARD ROTATE LEFT RIGHT 360 FLIP...

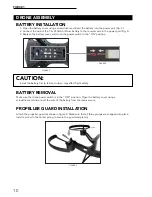
Page 12: ...l three prongs are snapped into place Install a screw to the center prong to secure the guard completely BATTERY INSTALLATION 1 Open the battery cover using a screwdriver and insert the battery into t...

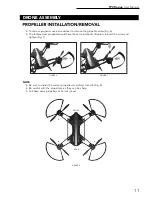
Page 13: ...matching A and B Fig 8 Be careful with the propellers as they can be sharp Purchase extra propellers at Force1rc com To remove propeller use a screwdriver to remove the propeller screw Fig 6 The repl...

Page 14: ...n fly normally in Mode 1 PREFLIGHT OPERATIONS THROTTLE MODE SELECTION PAIRING Mode 2 Left Hand Throttle Default Insert batteries and push the power button Move the accelerator left stick by default up...

Page 15: ...transmitter batteries are fully charged 3 Put the left stick of the transmitter in the middle position 4 Follow the Mode Selection and Calibration instructions closely Always turn ON your transmitter...

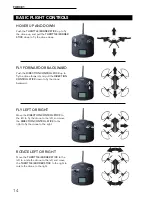
Page 16: ...he drone forward and pull the DIRECTION CONTROL STICK down to fly the drone backward FLY LEFT OR RIGHT Move the DIRECTION CONTROL STICK to the left to fly the drone to the left and move the DIRECTION...

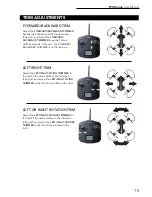
Page 17: ...ARD BACKWARD TRIMMER is on the left side LEFT RIGHT TRIM Adjust the LEFT RIGHT FLYING TRIMMER to the right if the drone drifts to the left when taking off and adjust the LEFT RIGHT FLYING TRIMMER to t...

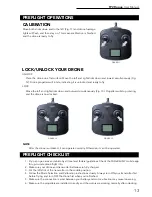
Page 18: ...the left and right sticks down and inward simultaneously to unlock propellers should start rotating Press the top left corner button Fig 14 the drone should lift off and hover at about 1 5 meters Pres...

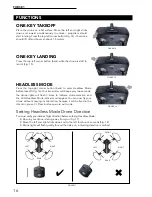
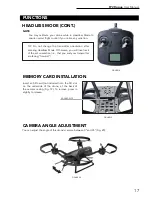
Page 19: ...OTE You may calibrate your drone while in Headless Mode to ensure normal flight control if you notice any variation FUNCTIONS MEMORY CARD INSTALLATION Insert an SD card not included into the SD slot o...

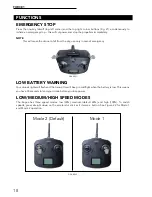
Page 20: ...o land your drone before you lose power The Rogue has three speed modes low 30 medium default 60 and high 100 To switch speeds press straight down on the accelerator stick as if it were a button See F...

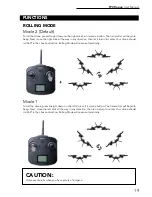
Page 21: ...roll 360 in the chosen direction Rolling Mode will cease automatically Only execute rolls when you have plenty of airspace CAUTION 360 360 ROLLING MODE Mode 2 Default To roll the drone press straight...

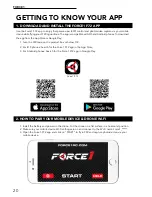
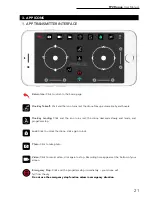
Page 22: ...for the Force1 F72 app in the App Store 3 For Android phones Search for the Force1 F72 app in Google Play 1 DOWNLOAD AND INSTALL THE FORCE1 F72 APP GETTING TO KNOW YOUR APP 1 Install the battery and...

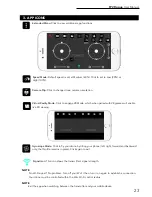
Page 23: ...om of your screen One Key Takeoff Click and the icon turns red the drone flies up automatically and hovers One Key Landing Click and the icon turns red the drone descends slowly and lands and propelle...

Page 24: ...rtion the longer the distance Click again to exit Custom Route Mode NOTE This feature must be used in an open area to avoid the risk of collision Rotate Screen Click to rotate the interface from horiz...

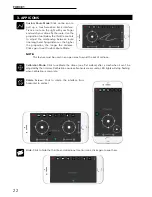
Page 25: ...fly your drone by tilting your phone left right forward and backward only the throttle remains in place Click again to exit Extended Menu Click to view additional app functions 3 APP ICONS Virtual Re...

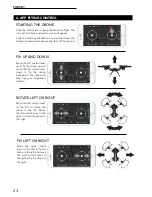
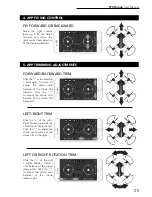
Page 26: ...left control lever up to fly the drone up and move the left control lever down to fly the drone back down The drone will stay flying at appointed altitude ROTATE LEFT OR RIGHT Move the left control l...

Page 27: ...of the drone tilts forward Click the to adjust the drone until balance of the drone tilts backward Click the of the Left Right Trimmer until balance of the drone tilts to the left Click the to adjust...

Page 28: ...h the mobile app avoid operation where interference is high to ensure optimum flight conditions Try a different mobile device or browser if the mobile app fails to download As a safety measure your dr...

Page 29: ...r and drone are not paired Refer to pg 12 to pair again 2 Drone has low battery Charge the battery 1 Drone has low battery Charge the battery 2 The fan is deformed or was installed wrong Replace the f...

Page 30: ...over 002 Blue LED Indicator 014 Motor Cone 018 Transmission Gear 019 Switch with Plug 020 Propellers A B 003 Dash Receiver 011 Hollow Steel Tube 015 Front Rear Light Covers 004 Lens Accessories 007 Wi...

Page 31: ...F72 Rogue User Manual 29 SPARE PARTS Steel Pipe Gear Assembly 021 Fixed Plate 022 3 7v 2 Charger 023 Transmitter 024...

Page 32: ...try to correct the interference using the following measures Reorient or relocate the receiving antenna Increase the separation between the equipment and receiver Connect the equipment into an outlet...

Reviews: