background image

NAVIGATION SYSTEM
CONTROLS

Press the NAV button to enter the
main navigation screen.

If an address has been entered as a
destination, this will appear next to
the flag icon. Your current location is
shown next to the pin icon.

Various ways to enter your
destination are achieved by either
pressing the buttons at the bottom
of the screen or by rotating the
SELECT button to scroll through lists
and pressing the SELECT button to
activate a selection.

Destinations

Select 

Destinat.

 to enter the

destination menu.

Destination input

Select 

Destination input

 to enter

the destination input menu. For
details of operation  See 

Navigation

Quick start

 (page 6).

Last destinations

This allows quick access to a history
of previous destinations entered in
the system. Select the required
repeat destination from the list.

Destination memory A-Z
sorted and destination
memory manually sorted

These features give access to a
detailed set of advanced user
controls. You may customize a
personal destination address book
and assign user defined names to
addresses and locations for example.

Special destinations

This part of the menu allows
navigation with points of interest
(

POI

). These are categorized

locations such as restaurants, railway
stations, etc.

Note:

Some categories are filed as

sub categories within a higher level
description. For example the
category PETROL STATION is a sub
category of AUTOMOTIVE. If you
cannot find the item you require it
may be hidden within another
category.

Near position

This allows searching in relation to
your current position.

Select this button and a category list
will appear. Select the type of place
you are looking for, and a list of the
nearest options to your current
location will appear. Select your
choice from the list to navigate to this
destination.

23

Navigation system

Summary of Contents for CD Navigation system

Page 1: ...Feel the difference Owner s handbook CD Navigation system ...

Page 2: ...ved to change specifications design or equipment at any time without notice and without incurring any obligations This publication or part thereof may not be reproduced nor translated without our approval Errors and omissions excepted Ford Motor Company 2007 All rights reserved Part number 8S7J 19A285 BDA CG3539en 09 2007 20071025164921 ...

Page 3: ...ty code 18 Lost security code 18 Entering a security code 18 Incorrect security code 18 Audio operation Radio operation 19 CD operation 20 Navigation system Navigation system controls 23 Menu structure 24 Route options menu 25 Route displays 26 Traffic Message Channel Principle of operation 28 Using TMC 28 Map updates Map updates 29 Navigation telephone control General information 30 Telephone set...

Page 4: ...2 ...

Page 5: ...will get from driving it Note This handbook describes product features and options available throughout the range sometimes even before they are generally available It may describe options not fitted to your vehicle Note Always use and operate your vehicle in line with all applicable laws and regulations Note Pass on this handbook when selling your vehicle It is an integral part of the vehicle 3 I...

Page 6: ...ook through any openings in the unit CAUTION Do not clean the unit with solvents or aerosol cleaning agents Use only a damp cloth Do not apply excessive force to the front glass Do not insert foreign objects into any of the unit disc drives or media card slots Do not insert more than one disc into the unit disc drive Use only 12 cm 4 7 inches discs or 8 cm 3 1 inches discs with a suitable adaptor ...

Page 7: ...ystem display when driving conditions permit A road safety caution is displayed each time the ignition is switched on and the navigation system is selected To use the system read the caution and select OK Safety information Read and follow all stated safety precautions Failure to do so may increase your risk of collision and personal injury Ford Motor Company shall not be liable for any damages of...

Page 8: ...sented which offer a selection list of available options Select the option you require or if it is not shown on the screen rotate the SELECT button to view the remainder of the selection list Press the SELECT button to activate selection Alphanumeric keypad entry When it is necessary to enter an address a keypad will appear prompting you to enter a postcode city or street Rotate the SELECT button ...

Page 9: ...ct Destinat to enter the destination you wish to navigate to A list with several options is shown Select Destination input Starting from the top select the country followed by either the postcode if available or city and street name Use the alphanumeric keypad and selection lists to select your address details Once sufficient information has been entered select Start to proceed Note If you only ne...

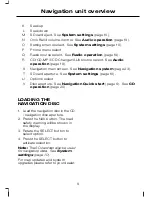
Page 10: ...S R Q P O N V U E97652 CD eject A Channel keycode select B Information C Map display D Home menu select E Traffic TMC menu select See Using TMC page 28 F Sound settings See Radio operation page 19 G Escape H Rotary scroll select I Screen display J 8 Navigation unit overview ...

Page 11: ...SD card aperture See System settings page 10 T Options select U Disc aperture See Navigation Quick start page 6 See CD operation page 20 V LOADING THE NAVIGATION DISC 1 Load the navigation disc in the CD navigation disc aperture 2 Press the NAV button The road safety warning will be shown in the display 3 Rotate the SELECT button to select option 4 Press the SELECT button to activate selection Not...

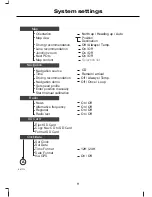
Page 12: ...nit can be accessed via the SET button The following section describes the various options and how to use them Press the SET button to display the settings screen The following diagrams show an overview of the menu structure within the settings screen 10 System settings ...

Page 13: ...Temp Off Always Temp Selection list Navigation source Time Navigation demo Set speed profile Enter position manually Start manual calibration Alternative frequency CD Remain arrival Off Once Loop On Off On Off 12H 24H News Regional Radio text Copy Nav CD to SD Card Eject SD Card Format SD Card Set Date Set Clock Time Format Date Format Via GPS Map Navigation Radio SD Card Clock date On Off On Off ...

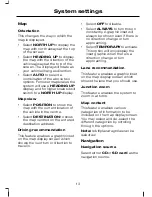
Page 14: ...croll to the required feature in the first column of the menu tree Press the SELECT button to activate the feature Rotate the SELECT button and scroll to the required feature in the second column of the menu tree Press the SELECT button to activate the various functions and options in the feature Press the ESC button at any time to return to the previous feature The following diagram shows an over...

Page 15: ...a graphic inset on the map display screen which shows the next turn or direction to travel in Select OFF to disable Select ALWAYS to turn this on constantly A graphic inset will always be shown even if there is no direction change or turn approaching Select TEMPORARY to activate This option will only display the inset graphic when there is a direction change or turn approaching Lane recommendation...

Page 16: ...does not need to be moving to begin a route Select OFF to deactivate The system will operate normally using the GPS sensor and display the true vehicle position Select ONCE to enable and run through a simulated route guidance plan one time only Select LOOP to enable a continuous demonstration mode The simulated route will keep repeating by returning to the start point once the destination has been...

Page 17: ...t various times of the day this large network may be broken down into a number of smaller regional networks typically centred on major towns or cities When the network is not split into regional variants the whole network carries the same programming Regional mode ON This prevents random AF switches when neighbouring regional networks are not carrying the same programming Regional mode OFF This al...

Page 18: ... be updated if there is suitable reception You may alter the time and date format as previously described Display Display mode The screen can be optimised for day or night time driving or an automatic switch between the two depending on vehicle headlamp activation View Use this feature to switch between different colour themes for the display and menus Brightness Rotate the SELECT button to move t...

Page 19: ...rence Note Move the bar to the far left position to turn AVC off Languages Select your required on screen display language from the selection list Note To change from metric units to imperial units select the appropriate English language option Factory settings CAUTION You will lose your personal settings after using the reset buttons Use these functions to return the unit back to factory default ...

Page 20: ...of of identity Your dealer will then obtain the correct code for you ENTERING A SECURITY CODE If CODE CODE 0000 SAFE or ENTER KEYCODE appears in the display when you switch on the unit you must enter the Keycode using the on screen instructions Use the number buttons to enter the correct code Press the button below OK to confirm the entry INCORRECT SECURITY CODE CAUTION Make sure that you have ent...

Page 21: ...e You can move through the available wavebands by pressing and releasing the RADIO button Selecting an available station Select FM LIST to view the selection list Rotate the SELECT button to scroll through the list Press the SELECT button to activate the selection Tuning Seek tuning To automatically tune press the SEEK up or SEEK down button The next available station will be selected Manual tunin...

Page 22: ...distribution from front to rear The TREBLE and BASS controls adjust the high and low audio frequencies respectively These settings may be customized for each source The LOUDNESS control boosts the lower frequency range at low volumes to achieve a fuller sound The COMPRESSION feature can be turned on or off With the feature on quieter music is boosted and louder music lowered to minimise repeated v...

Page 23: ...ack or a folder in the case of a CD disc with MP3 audio Repeat button presses toggle between these different modes Scan This feature will play a short introduction of each track before advancing to the next track Turn the feature off once the desired track is reached Press the SCAN button to turn this on and off The button stays highlighted when this feature is on Note The icon within the button s...

Page 24: ...il the CD changer screen is displayed This will activate the CD changer as the currently selected audio source Filled slots in the CD changer magazine are displayed on the screen Press the CD button to access the CD s Rotate the SELECT button to required selection Press the SELECT button to activate selection The controls for a disc playing via the CD changer are the same as for a disc in the inte...

Page 25: ...e list Destination memory A Z sorted and destination memory manually sorted These features give access to a detailed set of advanced user controls You may customize a personal destination address book and assign user defined names to addresses and locations for example Special destinations This part of the menu allows navigation with points of interest POI These are categorized locations such as r...

Page 26: ... this destination Waymarks By selecting Waymarks a list of personalised locations may be accessed These can be off road locations or any other such unmapped areas which may not match a road network on the map database Waymarks may be stored from a current position by selecting Add Once Waymarks have been stored they may be accessed and used as programmable destination points Tour list This feature...

Page 27: ...E OPTIONS MENU You can set a number of options which alter the way a route is planned Using the OPTIONS button in the navigation screen the following preferences can be set Dynamic guidance This feature can be turned on and off When switched on and if the unit is receiving a valid traffic message channel TMC signal the route will be automatically updated to take into account real time traffic inci...

Page 28: ...s A long press on the information I button will mute the navigation voice prompts A second long press on the information I button will resume the navigation voice prompts ROUTE DISPLAYS Map display Press the MAP button adjacent to the screen display for a map view This view will show your current location with your vehicle in the centre shown as an arrow surrounded by a circle The arrow will face ...

Page 29: ...on screen when you are navigating a route Slightly more detailed information on your route may be available via the main navigation screen if required WARNING Do not rely on the screen prompts when navigating Always listen to the navigation voice and take care not be distracted from the road ahead The navigation inset screen will display the distance to the next turn and the direction of travel to...

Page 30: ...nd interrupt music playback After the announcement has ended music playback will resume Ending traffic announcements The unit will return to normal operation at the end of each traffic announcement To end the announcement prematurely press the TRAFFIC button during the announcement Using TMC messages To review TMC messages you may either select a view which shows messages only affecting your progr...

Page 31: ...he map data in the system to the current road network Map information is regularly updated but all areas are not necessarily covered to the same level of detail Some roads in particular private roads may not be included on the database To help with accuracy always use the latest version navigation disc Your dealer will be able to provide this 29 Map updates ...

Page 32: ...ctive phone 4 Press the SELECT button to activate selection 5 Rotate the SELECT button and scroll to the required phone 6 Press the SELECT button to activate selection USING THE TELEPHONE This describes the phone functions of the navigation unit An active phone must be present and connected Even if connected to the navigation unit your phone can still be used in the usual way Note You can exit the...

Page 33: ...ng the alphanumeric keypad 5 Press the SELECT button 6 A list of phonebook entries starting with the letter selected will appear 7 Rotate the SELECT button to scroll through these entries to find the required contact and select it 8 A detailed screen will appear showing the contact details and number Select DIAL to proceed Ending a call Calls can be ended by selecting End or by pressing one of the...

Page 34: ...system before they can be made active 1 Press the PHONE button 2 Select Settings 3 Select active phone 4 Rotate the SELECT button and select the new phone to become bonded from the list 5 Press the SELECT button to activate selection Note After bonding a Bluetooth phone to the system this becomes the active phone Deleting a bonded phone A bonded phone can be deleted from the system at any time unl...

Page 35: ...coming phone calls will be diverted to voicemail or to whatever default is set up in your phone Whilst this button is highlighted in the phone screen the feature will be active 33 Navigation telephone control ...

Page 36: ...ouncil Directive 1999 5 EC A copy of the Declaration of Conformity can be found at www nokia com phones declaration_of_conformity The Bluetooth word mark and logos are owned by the Bluetooth SIG Inc and any use of such marks by Ford Motor Company is under license Other trademarks and trade names are those of their respective owners Nokia Corporation Keilalahdentie 4 02150 Espoo Finland TYPE APPROV...

Page 37: ...igation system controls 23 Destinations 23 Navigation system 23 Navigation system security 18 Navigation telephone control 30 General information 30 Navigation unit overview 8 R Radio operation 19 Advanced radio settings 20 Radio functions 19 Sound settings 20 Station preset memory 20 Tuning 19 Volume power control 19 Road Safety 5 Safety information 5 Route displays 26 Map display 26 Navigation d...

Page 38: ...phone 30 Changing the active phone 32 Deleting a bonded phone 32 Handling a second incoming call 32 Making a call 31 Phone menu 30 Receiving an incoming call 31 Reject all incoming calls 32 Using TMC 28 Ending traffic announcements 28 Traffic announcement 28 Using TMC messages 28 36 Index ...

Page 39: ......

Page 40: ...Feel the difference 8S7J 19A285 BDA CG3539en ...

Reviews: