


5mm (3/16
″
) distance from
end of Collet to Lock Screw
Collet
Collet Lock Screw
Fig. 4
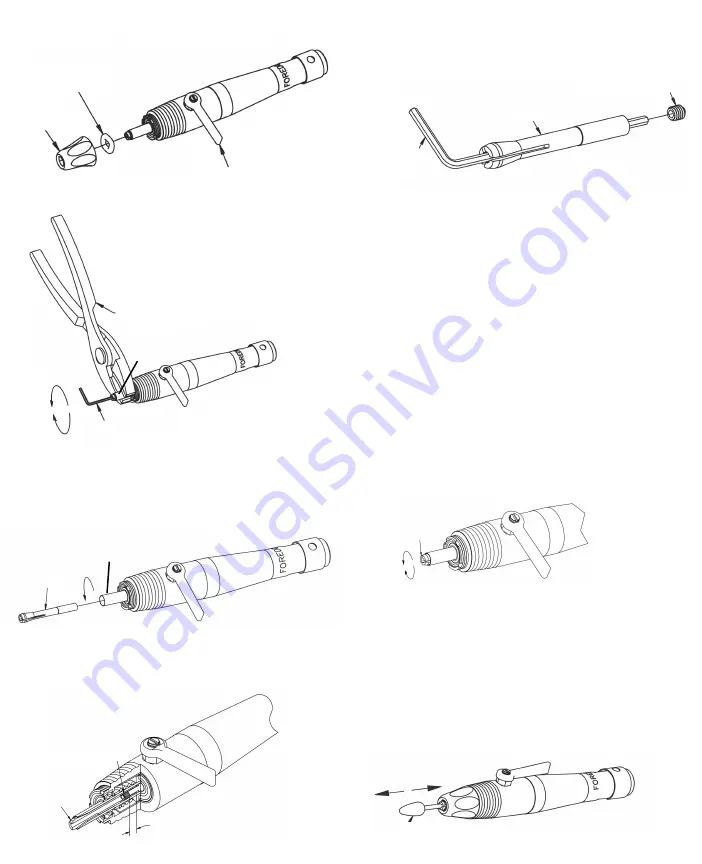
1. Un-screw and remove nose-cone and felt washer - Fig 1.
2.Open the collet completely, with lever
perpendicular (at a 90° angle) to
the handpiece - Fig. 1.
3. Insert a 1.5mm Allen wrench (supplied with new handpiece
collet) into the collet lock screw, and grip the exposed spindle
using soft-jaw pliers. Turn the Allen wrench counter-clockwise
1/4 turn to loosen the collet lock screw - Fig. 2.
4. For collet adjustment procedure, proceed to Step 7. To
replace the collet, or to remove it for cleaning, un-thread
the collet completely by turning it counter-clockwise - Fig. 3.
Lever
Soft Jaw Pliers
Spindle
Spindle
1.5mm Allen Wrench
1.5mm
Allen
Wrench
Loosen
Tighten
Tighten
NO Slip
Bur
Collet
Collet
Collet
Collet Lock Screw
Felt Washer
Fig. 1
Fig. 2
Fig. 5
Fig. 3
Fig. 6
Nose-Cone
5. When re-installing a collet or installing a new collet, the
collet lock screw must be in the collet before you screw the
collet into the spindle - Fig. 5. The collet lock screw must be
threaded into the collet to a depth of approximately 5mm,
(3/16
″
) from the back-end of the collet - Fig. 4.
6. Check to insure that the collet release lever is in the fully
opened position - Fig. 1. Screw the collet into the spindle
while gripping the exposed spindle with your fingers. Do not
screw the collet in too far. (Do not close the three slots in
the collet.)
7.
Collet Adjustment Procedure:
Insert a bur with a 2.35mm shank into the collet. If the bur
does not enter the collet, un-screw the collet counter-clock
wise until the bur fits in freely, and re-insert the bur. The
collet tension is adjusted by rotating the collet clockwise to
tighten, and counter-clock-wise to loosen - Fig. 6. The collet
is adjusted properly when a SLIGHT resistance is felt when
moving the bur in and out with the collet release lever in
the fully opened position. Next, grip the spindle with the
soft-jaw pliers, and tighten the collet lock screw securely
with the Allen Wrench - Fig. 2.
8. Insert a 2.35mm shank bur into the collet, and close the
collet release lever. Using a cloth to protect your fingers, try
to pull the bur out to test the collet’s holding strength - Fig. 7.
If you can remove the bur by hand, the collet is too loose. If
the collet is too loose, loosen the collet lock screw, refer to
Collet Adjustment Procedure
above and re-adjust the collet
until the bur cannot be removed with the collet closed.
9. Re-install the felt washer, and the nose-cone.
Loosen
Fig. 7
H.20 Handpiece Collet
(
P/N HP3-1008
)
Replacement and Adjustment
Summary of Contents for Handpiece H.20
Page 3: ......


