background image

STEP 5: 

SOFTWARE SETUP

ASSEMBLY INSTRUCTIONS    BIRDIE PACKAGE

VERSION 2.0

PAGE 43

2

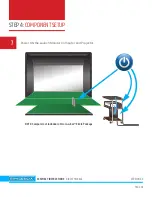
Launch the Foresight Sports Software. 

PLEASE NOTE: This software requires internet access to validate.  
Internet access will also allow your software to communicate to the Foresight cloud  
for additional FSX LIVE features.


If you do not have regular internet access, you may setup your software to utilize  
offline hours using these instructions:  

https://www.foresightsports.com/fsx-2020-offline-hours-activation

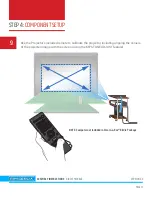
Connect the Launch Monitor.
Upon launching the software, you may now connect to the Launch Monitor  
by following these steps:
 

1)  Locate the setting icon (Usually a Gear Icon). 


2)  Open the "Devices" tab (Be sure you device is powered on  


and connected to the computer using the USB Cable). 


3)  Select your launch monitor's Serial Number and select "CONNECT".  


If your launch monitor's Serial Number does not appear, select "FILTERS"  


then select "USB". The launch monitor should now appear. 


 4)  If you have any issues, a detailed Connection Guide can be found at: 


 https://www.foresightsports.com/fsx-2020-connection-guide

3

Summary of Contents for SIM IN A BOX BIRDIE PACKAGE

Page 1: ...ASSEMBLY INSTRUCTIONS VERSION 2 0 BIRDIE PACKAGE...

Page 2: ...ith years of enjoyment Before getting started with assembly please confirm the following to insure your safety and those using your simulator Measure and confirm you have enough space to safely instal...

Page 3: ...sure you get the most out of your purchase the safest way possible Make sure you have an assistant during the assembly process The frame assembly requires TWO PEOPLE to safely complete Make sure you h...

Page 4: ...tting Screen 1 Back Screen 2 Inner Walls 2 Outer Wall Covers 1 Lid Panel 1 Above Screen Panel 1 Rolling Computer Cart 2 Rolls of Turf 1 Hitting Mat and Tray System 1 Projector with Power and HDMI Cabl...

Page 5: ...EMBLY INSTRUCTIONS BIRDIE PACKAGE VERSION 2 0 PAGE 5 REQUIRED TOOLS NOT INCLUDED 2 6 8 Ladders RECOMMENDED TOOLS NOT INCLUDED Impact Drill with 3 8 Impact Adapter Snips for cutting Zip Ties Work Glove...

Page 6: ...NTENTS ASSEMBLY INSTRUCTIONS BIRDIE PACKAGE VERSION 2 0 PAGE 6 STEP 1 FRAME ASSEMBLY STEP 2 TURF SCREEN STEP 3 EXTERIOR PANELS STEP 4 COMPONENT SETUP STEP 5 SOFTWARE SETUP Page 7 Page 15 Page 25 Page...

Page 7: ...aped Left Base and the Center Base components Insert the Center Base into the Left Base as shown Secure with 1 frame assemby screw Locate the L Shaped Right Base component Attach to the Base Assembly...

Page 8: ...BIRDIE PACKAGE VERSION 2 0 PAGE 8 With the Base Assembly completed locate the Left Wall Bottom and Left Wall Top components Connect the components as shown Secure with 2 frame assemby screws 2 Left W...

Page 9: ...E PACKAGE VERSION 2 0 PAGE 9 Orient the Left Wall Assembly vertically as shown with the top assembly trays facing INWARD 3A 3B Left Wall Assembly Base Assembly Top Assembly Trays Connect the two assem...

Page 10: ...ASSEMBLY INSTRUCTIONS BIRDIE PACKAGE VERSION 2 0 PAGE 10 Locate the Right Wall Bottom and Right Wall Top components Repeat Steps 3A 3B to assemble and connect the Right Wall Assembly 4 Right Wall Bott...

Page 11: ...BIRDIE PACKAGE VERSION 2 0 PAGE 11 Locate the two 2 Top BACK Corner Span components and one 1 Top BACK Center Span components Connect the components as shown Secure with 2 frame assemby screws 5 Top...

Page 12: ...DIE PACKAGE VERSION 2 0 PAGE 12 Using a ladder and with the help of an asssitant carefully lower the Top Span assembly onto the BACK Assembly Trays of the Main assembly Secure with 2 frame assemby scr...

Page 13: ...ONS BIRDIE PACKAGE VERSION 2 0 PAGE 13 Locate the two 2 Top FRONT Corner Span components and one 1 Top FRONT Center Span Repeat Steps 5 6 to assemble and place the FRONT Top Span to the Main Assembly...

Page 14: ...EMBLY INSTRUCTIONS BIRDIE PACKAGE VERSION 2 0 PAGE 14 Great job The frame assembly is now complete DOUBLE CHECK With the frame now assembled please re check that all assembly bolts are tight and the f...

Page 15: ...ASSEMBLY INSTRUCTIONS BIRDIE PACKAGE VERSION 2 0 PAGE 15 Locate the Interior Turf roll and place it inside the assembled frame NOTE Make sure the assembled frame and interior turf are in their final...

Page 16: ...VERSION 2 0 PAGE 16 Locate the Mesh Screen Backing and the Top Attachment Cord Attach the Top Attachment Cord to the frame by placing the hook into the steel eye hook located on the inside top of the...

Page 17: ...holes STARTING WITH THE SECOND HOLE as shown Thread the Top Attachment Cord through all grommet holes BUT NOT the final grommet hole With the Top Attachment Cord threaded locate the separate attachme...

Page 18: ...the frame by placing the hook into the steel eye hook located on the inside top of the rear RIGHT support as shown Tighten the Top Attachment Cord by pulling on the loose end located on the left side...

Page 19: ...and the Mesh Screen Backing spread out evenly locate the two 2 provided Zip Ties and secure the OUTER grommet holes of the Mesh Screen Backing to the steel eye hooks holding the Top Attachment Cord on...

Page 20: ...the long Zip Tie provided and place it around both the center of the Rear Top Frame Support and the Top Attachment Cord as illustrated below 6A 6B REQUIRED FOR THIS STEP X 1 Use to Zip Tie to raise t...

Page 21: ...RSION 2 0 PAGE 21 Secure the Mesh Screen Backing to the Frame Assembly by attaching the vertical velcro edges on each side of the Mesh Screen Backing to the vertical velcro edges on the back of the bo...

Page 22: ...PAGE 22 7 5 ASSEMBLY INSTRUCTIONS BIRDIE PACKAGE VERSION 2 0 PAGE 22...

Page 23: ...achment Cord through the bottom edge sleeve of the Mesh Screen Backing as illustrated Tie the Bottom Attachment Cord securely to the lower LEFT steel eye hook then pull the cord on the RIGHT until the...

Page 24: ...hand corner of the Mesh Screen Backing and press firmly Continue by attaching the velcro outward along the horizontal and vertical strips being careful to maintain a straight alignment without wrinkl...

Page 25: ...attach to the outside top of the Frame Assembly using the velcro strips on each end Align flush with the SIDES and BACK of the Frame Assembly Once the Lid Panel is properly aligned and secure remove t...

Page 26: ...S BIRDIE PACKAGE VERSION 2 0 PAGE 26 Pull the front edge of the Outer Lid Panel over and around the front bar of the Frame Assembly with even pressure and secure it to the underside surface using the...

Page 27: ...e Frame Assembly using the velcro strip Align the lid panel flush with the BACK edge of the Frame Assembly Approximately six 6 inches of the Left Side Panel should stick out beyond the front of the fr...

Page 28: ...0 PAGE 28 Pull the front edge of the Inner Side Panel over and around the side bar of the Frame Assembly with even pressure and secure it to the outside surface using the velcro strip REPEAT Steps 2A...

Page 29: ...of the Hitting Screen using the velcro strip aligning flush with the top edge of the hitting screen as illustrated below Once the Above Screen Panel is properly aligned and secured to the top edge of...

Page 30: ...ting in the center attach the Above Screen Panel to the Lid Panel using the velcro strip being careful to keep the edge straight and smooth as you move to each corner Secure the side strips of velcro...

Page 31: ...e LEFT Outer Side Panel to the outside top left of the Frame Assembly using the velcro strip Align the panel flush with all edges before attaching the panel down the front and back edges being careful...

Page 32: ...STEP4 COMPONENTSETUP ASSEMBLY INSTRUCTIONS BIRDIE PACKAGE VERSION 2 0 PAGE 33 Locate the second outer Turf Roll and unroll position it in front of the 1...

Page 33: ...ow the separately included instructions for the assembly of the Hitting Mat Follow the separately included instructions for the assembly of the Rolling Computer Cart 2 3 NOTE Do NOT attach the provide...

Page 34: ...SSEMBLY INSTRUCTIONS BIRDIE PACKAGE VERSION 2 0 PAGE 35 Place the Rolling Computer Cart in the correct position based on player handedness RIGHT HANDED Player Position most common LEFT HANDED Player P...

Page 35: ...nnect the projector to the Computer using the provided HDMI cable Connect the Wireless Mouse Keyboard to the Computer via BlueTooth Connect the Computer to the internet via Ethernet or connect via WiF...

Page 36: ...EMBLY INSTRUCTIONS BIRDIE PACKAGE VERSION 2 0 PAGE 37 Place the Launch Monitor on the Hitting Mat Using a measuring tape find the center line of the Turf Hitting Mat Placement of the launch monitors s...

Page 37: ...vided USB Cord Connect the Launch Monitor to a power source using the provided Power Cord 6 GCQuad GC2 If your package comes with the GC3 you may also connect to the computer via Ethernet or WiFi Plea...

Page 38: ...STEP4 COMPONENTSETUP ASSEMBLY INSTRUCTIONS BIRDIE PACKAGE VERSION 2 0 PAGE 39 Power ON the Launch Monitor Computer and Projector 7 NOTE Computer not included in Sim in a Box Birdie Package...

Page 39: ...IE PACKAGE VERSION 2 0 PAGE 40 With the Projector on and projecting an image move the Rolling Computer Cart toward the Hitting Screen until the image covers ALL FOUR CORNERS of the screen 8 NOTE Compu...

Page 40: ...CKAGE VERSION 2 0 PAGE 41 Use the Projector s included remote to calibrate the projector including aligning the corners of the projected image with the screen using the KEYSTONE ADJUST feature 9 NOTE...

Page 41: ...lled to get started you must rst complete your user registration by visiting FSX Live at performance foresightsports com then open your FSX 2018 software All that s left is to activate the courses wit...

Page 42: ...ghtsports com fsx 2020 offline hours activation Connect the Launch Monitor Upon launching the software you may now connect to the Launch Monitor by following these steps 1 Locate the setting icon Usua...

Page 43: ...0 PAGE 44 Navigating the Software With the Launch Monitor now connected you may begin navigating and using the software For detailed information on the FSX software please use the resources below FSX...

Page 44: ......

Reviews:

Related manuals for SIM IN A BOX BIRDIE PACKAGE