1
2
35mm
4
3
C
B
A
Q
N
V
U
T
T
B
A
C
C
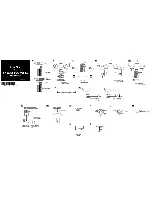
Fix two hinges to each of the doors using the smaller plate of the hinge as shown and
(4.0 x 30mm) screws. Place the doors into the entrance and secure the other half of the
hinge to the entrance framework.
Make sure there is enough clearance around the doors so that they can move freely.
TOP VIEW
Fix a corner brace to each end of the 1508 batten (N) on the 28mm side. Make sure that it is positioned as
shown and is 35mm from the end. Fix in place using
2 x (3.5 x 30mm)
screws for each.
Place the batten at the apex so that it sits on the blocks on the front and back panel. Use
2 x (3.5 x 30mm)
screws to secure each of the corner braces to the blocks.
Place the panels on to the floor (D) as shown making sure that they are tight and flush. Fix the
panels to each other using
4x50mm
screws for each join.
Make sure that all four sides are square and fix them to the floor using 50mm screws. Use
4x50mm
screws for the door end (A) and Plain end (B). Use
3x50mm
screws for the sides (C)
Place each of the 1710mm strips (Q) against the corners of the
building. Fix each in place using
4 x (3.5 x 30mm)
screws.
Position the veranda (E)
against the front of the
building,
the cladded only
.
From inside the building fix the two 1785mm
strips (T) to the sides of the door, lining
them up so that they are flush on one side
and overhang the entrance slightly.
Fix each using
3 x (3.5 x 30mm)
screws.
Place the strips (U) and (V) above the
entrance as shown, again lining these up
with the top of the framework. There should
be a 46mm gap between the two strips.
Fix each in place using
2 x (3.5 x 30mm)
screws.
E
Place a handrail section
(H) on the floor so that
it is tight against the
door end and flush with
the outside. Fix this to
the door end using 2 x
60mm screws. Further
secure this by fastening
it to the veranda using
2 x 50mm screws
H
F


