5
EN
– Do not throw the batteries into fire. Protect the batteries against overheating.
– Protect the batteries against mechanical damage.
– Hand over used batteries to batteries collection points. Do not dispose of batteries and elec-
tronics with municipal solid waste.
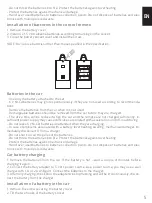
Installation of batteries in the control remote
1. Remove the battery cover.
2. Install 4 x 1.5 V AA alkaline batteries according to markings in the socket.
3. Close the battery socket cover and install the screw.
NOTE: Do not use batteries other than those specified in the specification.
Batteries in the car
– Use only the battery attached to the set.
– 6 V NI-Cd batteries may ignite spontaneously if they are not used according to recommenda-
tions.
– Remove the batteries from the car when it is not used.
– Rechargeable batteries should be removed from the car before they are charged.
– The drive time will be reduced when the car and the remote are not charged sufficiently. In
-
sufficient power supply may cause difficulties associated with acceleration and off-road driving.
– Do not leave 6 V Ni-CD batteries unattended when they are charging.
– In case of problems associated with a battery (overheating, swelling, mechanical damage), im-
mediately disconnect it from a charger.
– Do not short-circuit the poles of the batteries.
– Do not throw the batteries into fire. Protect the batteries against overheating.
– Protect the batteries against mechanical damage.
– Hand over used batteries to batteries collection points. Do not dispose of batteries and elec-
tronics with municipal solid waste.
Car battery charging
1. Remove the batteries from the car. If the battery is hot – wait a couple of minutes before
charging it again.
2. Connect the battery adapter to 5 V DC power source. As a power source, you may use a wall
charger with 1 A or 2 A USB port. Connect the batteries to the charger.
3. After fully charging, the LED on the adapter will stop flashing and will be lit continuously, discon
-
nect the battery from the charger.
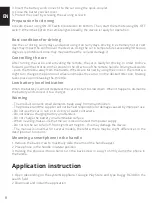
Installation of a battery in the car
1. Remove the screw securing the battery cover.
2. Tilt the two hooks of the battery socket.
Summary of Contents for Buggy RC-300
Page 1: ...MANUAL FPV OFF ROAD VEHICLE...
Page 3: ...11 2 13 1 14 12...
Page 39: ...39 RU 10 11 12 13 14 4 x 1 5 AA 1 2 4 x 1 5 3 6 V NI Cd 6 V Ni CD...
Page 40: ...40 RU 1 2 5 DC USB 1 2 3 1 2 3 4 5 ON OFF ON OFF 30...
Page 41: ...41 1 2 3 1 AppStore Sklep Play Buggy RC 300 2 1 2 WI Fi 3 WI Fi Buggy RC 300 RU...
Page 42: ...42 1 2 1 2 3 4 5 VR 6 7 8 9 10 11 12 13 14 1 2 START 3 VR MODE VR VR VR RU...
Page 48: ...www forever eu...


