background image


Page   3


Safety


Thank you for choosing Formech.  

Please read and follow the below safety instructions before attempting to install or operate your 

machine. 

!


Do not operate the machine until you have been trained and are fully conversant with it.          


Read and understand all of this user manual. 


Check your supply voltage and frequency. Make sure it is compatible with your machine. Your 
machine's electrical specification is on the plate on the right hand side.  


You must ensure that the machine is properly earthed and fused. 


If your machine is not equipped with a moulded mains connector then note that: 


The 

earth wire

 is GREEN with a YELLOW stripe. 


The 

live wire

 is BROWN


The 

neutral wire

 is BLUE 


Only suitably qualified personnel should make electrical connections  


Turn off the machine and disconnect the power supply when the machine is not in use. 


The heater and pump on this model are not intended to be left running indefinitely. 


Never remove any panels unless the electrical supply has been isolated.   


Note the safety warning labels situated on the front and rear panels.   Never remove any warning 
labels from the machine. 


Only use the machine for vacuum forming plastic. It is not intended for any other purpose.  


This is a ‘single person operating’ machine. 


Ensure that the area you are working in is properly ventilated and that you are aware of the 
potential hazards from the plastics you are forming.  It is the responsibility of the owner or 
designated responsible person to assess the risks associated with any dangerous fumes given off 
and to determine any necessary precautions required such as fume extraction.  Contact your 
plastics supplier to gain information regarding hazardous fumes. 


Always let the machine cool down before attempting to work on it. Some parts of the heater and 
heat shield become extremely hot during operation. 


Note the ‘HOT SURFACES’ safety labelling on the heater & heater guard.  These areas can become 
VERY HOT. 


There is a risk of being burnt when handling heated plastics.  Always wear suitable personal 
protective equipment such as gloves. 


Ensure that the area surrounding the machine is clean and frequently cleared of finished product 
and any scrap. 


This machine is fitted with a dry running vacuum pump. Do not lubricate. Do not allow any liquid to 
enter the vacuum system. Ensure that moulds are properly sealed to prevent ingress of dust into 
the vacuum circuit.  Severe damage may be caused if the above is not observed. 


Daily repetitive use of this or any other machine may lead to a) fatigue and loss of concentration 
b) possible strains. Operators should be trained in the use of correct lifting techniques in order to 
minimise these effects. 


Users of this machine should complete regular competence tests. 


Summary of Contents for 508DT

Page 1: ...Page 1 Formech International Limited Installation Operating and Service Manual MODEL Formech 508DT Manual Vacuum Forming Machine...

Page 2: ...roduction and initial assembly 4 Optional extras 6 General Arrangement 508FS 7 General Arrangement 508DT 8 Operating procedures 10 F A Q 22 Warranty 22 Service Repair 23 REPLACING SEALS 23 Schematics...

Page 3: ...area you are working in is properly ventilated and that you are aware of the potential hazards from the plastics you are forming It is the responsibility of the owner or designated responsible person...

Page 4: ...ons Repair Manual 1x EC Certificate of conformity Heater shed 1x Table mesh ENSURE THAT THE TABLE LEVER IS TIGHTLY SCREWED INTO THE CRANK MECHANISM ON THE RIGHT HANDSIDE OF THE MACHINE IF OPERATED WIT...

Page 5: ...Page 5 Initial assembly Heater shed 1 2 3 4...

Page 6: ...o the rear of the main body of the machine The triangular supports are interchangeable between the left and right hand side The white crossbar needs to be bolted to the supports from the underneath an...

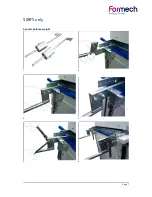
Page 7: ...Page 7 508FS only Counter balance weight 1 2 3 4 5 6...

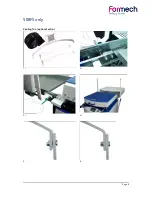
Page 8: ...Page 8 508FS only Cooling fan optional extra 1 2 3 4 5 6...

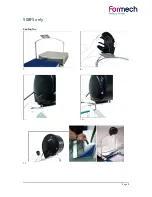
Page 9: ...Page 9 508FS only Cooling fan 7 8 9 10 11...

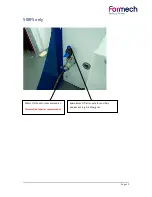
Page 10: ...Page 10 508FS only 10mm OD hose for compressed air This machine requires compressed air Spare 8mm OD air supply for ancillary equipment eg Air blow gun...

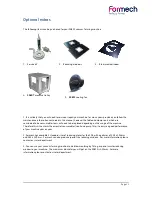
Page 11: ...replaced depending on the usage of the machine Therefore this kit contains the essential consumables seals and pump filter to ensure a good performance of your machine year on year 2 Formech has avail...

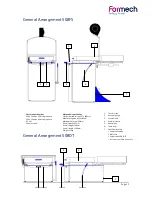
Page 12: ...wer connection Main fuse Power switch ON OFF Air input ancillary air output Electrical specifications 240V 13 amps 50Hz single phase 220V 13 amps 60Hz single phase 3 5 kW 20 amp supply Mechanical spec...

Page 13: ...outlet lets you power other equipment that require air pressure and this is created by the exhaust from the vacuum pump Do not connect compressed air to this outlet 508DT only 7 Specification Plate T...

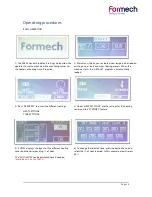
Page 14: ...en the machine starts the DEFAULT program is automatically loaded 3 Press NEW EDIT to access the different settings HEAT SETTINGS TIME SETTINGS 4 Under HEAT SETTINGS are the settings for the heating z...

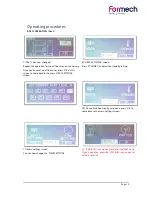
Page 15: ...reen to come back to the main HEAT SETTINGS screen 8 HEAT SETTINGS screen Press STANDBY to adjust the standby setting 10 Once all the heat settings are done press OK to come back to the main settings...

Page 16: ...Page 16 Operating procedures BASIC OPERATION Cont 18 Once you have been through all the different settings press SAVE to memorise these settings as a recipe...

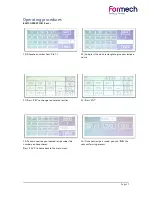
Page 17: ...d press the white rectangle to give your recipe a name 21 Press KEY to change to numerical entries 22 Press ENT 23 You can now see your named recipe under the number you have chosen Press SAVE to come...

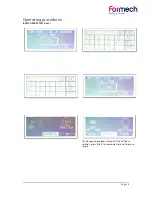
Page 18: ...k your material The timer will then stop and restart once you bring the heaters forward again providing the heater is pushed fully back The PRE STRETCH feature can be used at this stage if needed 508F...

Page 19: ...TTINGS screen 33 TIME SETTINGS screen If the material was ready before the end of the heating cycle the PLC will record the new heating time allowing you to save it 34 You can at this stage change the...

Page 20: ...Page 20 Operating procedures BASIC OPERATION Cont...

Page 21: ...hot Insufficient vacuum Excess of material Use reducing windows Poor mould design Why can t I achieve good definition on the finished part Material too cold Mould too cold Insufficient vacuum Insuffi...

Page 22: ...INCLUDING THE VACUUM PUMP WILL NOT BE COVERED BY OUR WARRANTY IF THEY ARE FOUND TO BE BLOCKED WITH FOREIGN MATTER OR CORRODED BY THE INGRESS OF LIQUID NOTE THE USE OF TALC AS A MOULD RELEASING AGENT...

Page 23: ...and grease 2 Apply a generous bead of high modulus silicone sealant to the masked area and smooth down to give a consistent layer 3 Cut the silicone strip in lengths long enough to overlap the corner...

Page 24: ...flexible like rubber push the heaters back and carefully check if you can spot a cold area on the plastic with your hand by gently tapping the sheet with your fingers or use a stick to make sure that...

Page 25: ...Page 25 Service Repair How to change a heating element...

Page 26: ...Page 26 How to change a heating element...

Page 27: ...Page 27 Schematics 5O8FS Schematics 5O8DT...

Page 28: ...Page 28...

Page 29: ...ender this declaration null and void Machine Description Vacuum Forming Machine Machine Function Thermoforming of Plastic Sheet Model Type 508DT 508FS Serial Number Date of Manufacture Is in conformit...

Page 30: ...Page 30 Revised date 23 11 2012...

Reviews: