2
A.
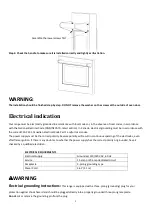
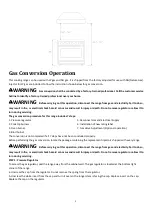
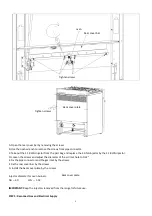
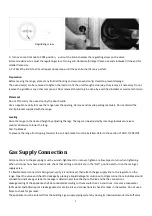
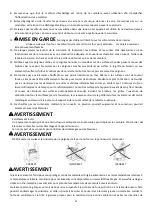
Turn oven control knob to 500F position, pull out the knob to access the regulating screw on the valve.
B.
Use screwdriver to adjust the regulating screw. Turning anti-clockwise for larger flame size and clockwise till the end for
smaller flame size.
C.
Put back the knob. Test it and repeat above steps until the oven burner flame is perfect.
Preparation
Before moving the range, protect any finished flooring and secure oven door(s) closed to prevent damage.
The oven door(s) can be removed to lighten the load or to fit the unit through a doorway. Only remove if necessary. Do not
remove the griddle or any other component. Door removal should only be done by a certified installer or service technician.
Placement
Do not lift or carry the oven door by the door handle.
Use an appliance dolly to move the range near the opening. Remove and recycle packing materials. Do not discard the
anti-tip bracket supplied with the range.
Leveling
Raise the range to the desired height by adjusting the legs. The legs can be adjusted by rotating clockwise to raise or
counter clockwise to lower the rang.
Anti-Tip Bracket
To prevent the range from tipping forward, the anti-tip bracket must be installed. Refer to the section of ANTI-TIP DEVICE.
Gas Supply Connection
All connections to the gas piping must be wrench-tightened. Do not over-tighten or allow pipes to turn when tightening.
When all connections have been made, check that all range controls are in the “OFF” position and turn on the main gas
supply valve.
If a flexible metal connector is being used, verify it is not kinked, then attach the gas supply line to the regulator on the
range. Open the valve and check for leakage by placing a liquid detergent solution onto all gas connections. Bubbles around
connections indicate a gas leak. If a leakage is determined, close the shut-off valve and fix the connections.
Leakage testing of the appliance shall be conducted according to the manufacture’s instructions . Use some soap water
(50% water and 50% soap) or a leakage detector at all joints and connections to check for leaks in the system. Do not use a
flame to check for gas leaks.
The appliance must be isolated from the building’s gas supply piping system by closing its individual manual shut-off valve
Regulating screw

