background image


January 11, 2017


20170111


© 2017  Fortinet, Inc. All rights reserved. Fortinet®,  FortiGate®, 

FortiCare®  and FortiGuard®,  and certain other marks are registered 

trademarks  of Fortinet, Inc., in the U.S. and other jurisdictions,  and


other Fortinet names herein may also be registered  and/or  common 

law trademarks  of Fortinet. All other product  or company  names may 

be trademarks  of their respective owners.  Performance  and other 

metrics  contained  herein were attained in internal lab tests under ideal


conditions,  and actual performance  and other results may vary. Network 

variables, different network  environments  and other conditions  may affect 

performance  results. Nothing  herein represents  any binding  commitment  by 

Fortinet, and Fortinet disclaims all warranties,  whether  express or implied, 

except  to the extent Fortinet enters a binding  written  contract,  signed by 

Fortinet’s  General Counsel, with a purchaser  that expressly warrants  that


the identified product  will perform  according  to certain expressly-identified 

performance  metrics  and, in such event, only the specific  performance 

metrics  expressly identified in such binding  written  contract  shall be 

binding on Fortinet. For absolute  clarity, any such warranty will be limited 

to performance  in the same ideal conditions  as in Fortinet’s  internal lab 

tests. In no event does Fortinet make any commitment  related to future 

deliverables, features or development,  and circumstances  may change


such that any forward-looking  statements  herein are not accurate.   Fortinet 

disclaims in full any covenants,  representations,  and guarantees  pursuant 

hereto,  whether  express or implied.  Fortinet reserves the right to change, 

modify,  transfer, or otherwise  revise this publication  without  notice,  and the 

most  current  version of the publication  shall be applicable.


Summary of Contents for FortiTester 3000E

Page 1: ...FortiTester 3000E QuickStart Guide...

Page 2: ...nt Fortinet enters a binding written contract signed by Fortinet s General Counsel with a purchaser that expressly warrants that the identified product will perform according to certain expressly iden...

Page 3: ...ionnalit es du produit Protection contre de nouvelles menaces La reistrazione ti permette di usufruire di Supporto Tecnico Nuove funzionalita Proteezione dalle ultime minaccce Debe registrar el produc...

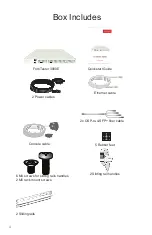
Page 4: ...r Tester 3000E Quickstart Guide Quickstart Guide 2 Power cables Ethernet cable Console cable 2x QSP to 4 SFP fiber cable 5 Rubber feet 6 M4 screws for sliding rails handles 2 M6 rack mount screws 2 Sl...

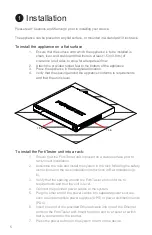
Page 5: ...ortiTester unit into a rack 1 Ensure that the FortiTester unit is placed on a stable surface prior to rack mount installation 2 Assemble the rails and install the system in the rack following the safe...

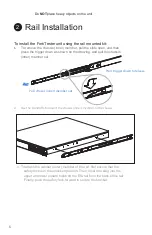
Page 6: ...d pull the chassis inner member out 2 Use the stando s to mount the chassis inner member to the chassis 3 To attach the cabinet outer member of the rail first ensure that the safety lock is in the unl...

Page 7: ...rt the chassis inner member into the cabinet member When you push the chassis back into the cabinet press the trigger down to release the slide from the locked position Release safety lock before moun...

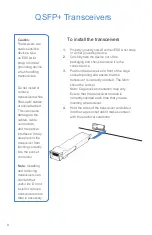
Page 8: ...ot install or remove transceivers more than is necessary 8 To install the transceivers 1 Properly ground yourself with an ESD wrist strap or similar grounding device 2 Carefully take the device out of...

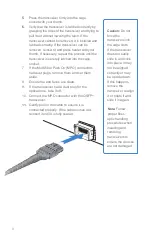
Page 9: ...ust plugs remove them and set them aside 8 Ensure the end faces are clean 9 If the transceiver had a dust plug for the optical bore take it off 10 Connect the MPO connector with the QSFP transceiver 1...

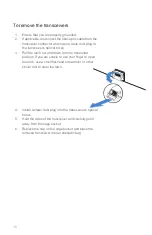
Page 10: ...he latch out and down into the horizontal position If you are unable to use your finger to open the latch use a small flat head screwdriver or other similar tool to open the latch 4 Install a clean du...

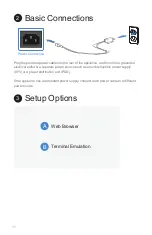
Page 11: ...e and then into a grounded electrical outlet or a separate power source such as an uninterruptible power supply UPS or a power distribution unit PDU If the appliance has a redundant power supply conne...

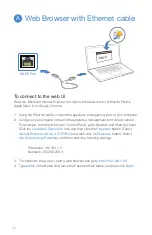
Page 12: ...t port default subnet For example from the Windows 7 Control Panel go to Network and Sharing Center Click the Local Area Connection link and then click the Properties button Select Internet Protocol V...

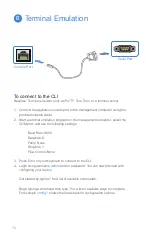
Page 13: ...management computer select the COM port and use the following settings Baud Rate 9600 Data bits 8 Parity None Stop bits 1 Flow Control None 3 Press Enter on your keyboard to connect to the CLI 4 Logi...

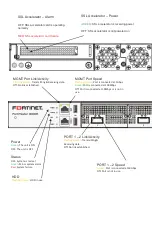
Page 14: ...m is normal Green Minor system alarm Red System failure HDD Flashing Amber HDD in use MGMT Port Link Activity Flashing Amber Transmi ng Receiving data O No link established MGMT Port Speed Flashing Am...

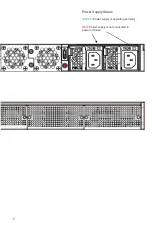
Page 15: ...15 D e vice Guide Power Supply Status GREEN Power supply is operating normally RED Power supply is not connected to power or failure...

Page 16: ...ion of equipment nameplate ratings should be used when addressing this concern Surtension Il convient de prendre l ensemble des pr cautions n cessaires lors du branchement de l quipement au circuit d...

Page 17: ...required to correct the interference at his own expense WARNING Any changes or modifications to this product not expressly approved by the party responsible for compliance could void the user s author...

Page 18: ...hedules and location of training programs in your area http www fortinet com support training html Technical Discussion Forums Communicate with other customers and Fortinet partners about Fortinet pro...

Reviews: