Using the Computer
Step 1: Turn on the computer.
•
Connect to the adaptor to a power outlet and turn on the power supply.
•
The computer will beep and enter the initial mode.
Step 2: Select a program and set a value.
•
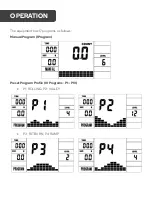
Manual Program and Preset Programs P1 - P10
o
Press UP, DOWN button to select the program.
o
Press ENTER button to confirm the selected program and enter time
setting window.
o
The time will flash, and then press UP, DOWN button to set up your
desired time. Press ENTER to confirm the value.
o
The distance will flash, and then press UP, DOWN button to set up the
desired distance value. Press ENTER to confirm the value.
o
The calories will flash, and then press UP, DOWN to set up the desired
calories. Press ENTER to confirm the value.
o
Press START to begin exercise.
•
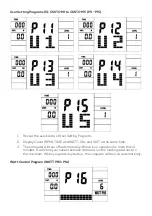
Watt Control Program (WATT PRO: P16)
o
Press UP, DOWN to select the watt control program.
o
Press ENTER to confirm the selected watt control program and enter the
time setting window.
o
The time will flash, and then press UP, DOWN button to set up the desired
time. Press ENTER to confirm the value.
o
The distance will flash, and then press UP, DOWN button to set up the
desired distance value. Press ENTER to confirm the value.
o
The calories will flash, and then press UP, DOWN button to set up the
desired calories to be consumed. Press ENTER to confirm the value.
o
The watt display will flash, and then press UP, DOWN button to set up the
watt to do the exercise. Press ENTER to confirm the value.
o
Press START to begin exercise.
Notes:
The WATT value is decided by the TORQUE and RPM. In this program, the WATT
value will be at constant value. If you peddle quickly, the load resistance will decrease
and if you peddle slowly, the load resistance will increase to ensure the same watt value.
Summary of Contents for FSAEMR500AA
Page 1: ...AUTOMATIC VARIABLE RESISTANCE MAGNETIC FLYWHEEL FULL MOTION ROWING MACHINE MR 500A FSAEMR500AA...
Page 2: ......
Page 6: ...OVERVIEW...
Page 7: ......
Page 12: ...Step 2 Attach the Foot Pad 19 to the Front Stabilizer 11 and Rear Stabilizer 74...
Page 22: ...P5 MOUNTAIN P6 INTERVAL P7 CARDIO P8 ENDURANCE P9 SLOPE P10 RALLY...
Page 27: ...Adaptor Input Voltage AC 100 240V Output Power DC 9V 1A SPECIFICATIONS...


