Image 2
Image 1
800•722•6075
Warranty/Tech Support
Service, Installation
& Care Manual
14
2.8 Flue Riser Assembly
02. EQUIPMENT INSTALLATION
To assemble the flue riser and shelf on the range it is necessary to follow the
following steps:
1) Fit the flue riser on the back
(1)
to the range
(2)
.
2) Use four screws with four flat washers to fix the internal part of the flue riser on
the side of the equipment (two screws and two washers on each side), as shown
in
image 1
. For 60" models, you must also perform the fixation in the central part
of the flue riser with 2 screws
(6)
, according to the
image 2
.
3) Finally, fit the shelf
(5)
to the flue riser.
2.7 Gas Leak Check
Before lighting the equipment and putting it into operation, check all gaskets on the
gas supply line for leaks. For this, do not use any type of wrench to check for leaks, use
a sudsy soap and water solution.
Follow the steps below for the correct procedure to power on:
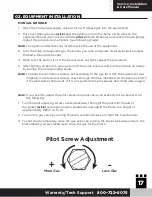
1. Turn pilot valves to OFF position by turning adjusting screws clockwise.
2. Turn on the manual gas valve on the inlet side of the gas supply line.
3. Check for gas leaks at the flexible coupling or gas connector connection using a
soap solution.
4. In moderation, spray or scrub the solution with soap on gas connections - active
bubbling indicates the location of the gas leak.
5. If a gas leak is detected, turn off the manual gas valve at the inlet side of the gas
line. Call your certified and licensed service technician.
6. If the equipment has no gas leak, continue with the equipment operating instruction.


