background image

Note.


The condenser probe is no longer fitted as in previous model.  
The ‘Condenser Clean’ and ‘Service Due’ warnings will not be displayed as the parameters are set to ‘0’ and 
therefore switched off. 
The diagnostics is no longer incorporated as in previous models so functions SF010, SF020 and SF030 will not be 
displayed. 
 

Service Adjustments


The controller has three ‘Service’ modes – the Output Relay Test function, the Model Selection Function and the 
individual Parameter adjustments. These features are accessible only from the ‘Service Main Menu’. 
 

Service Main Menu.  
 

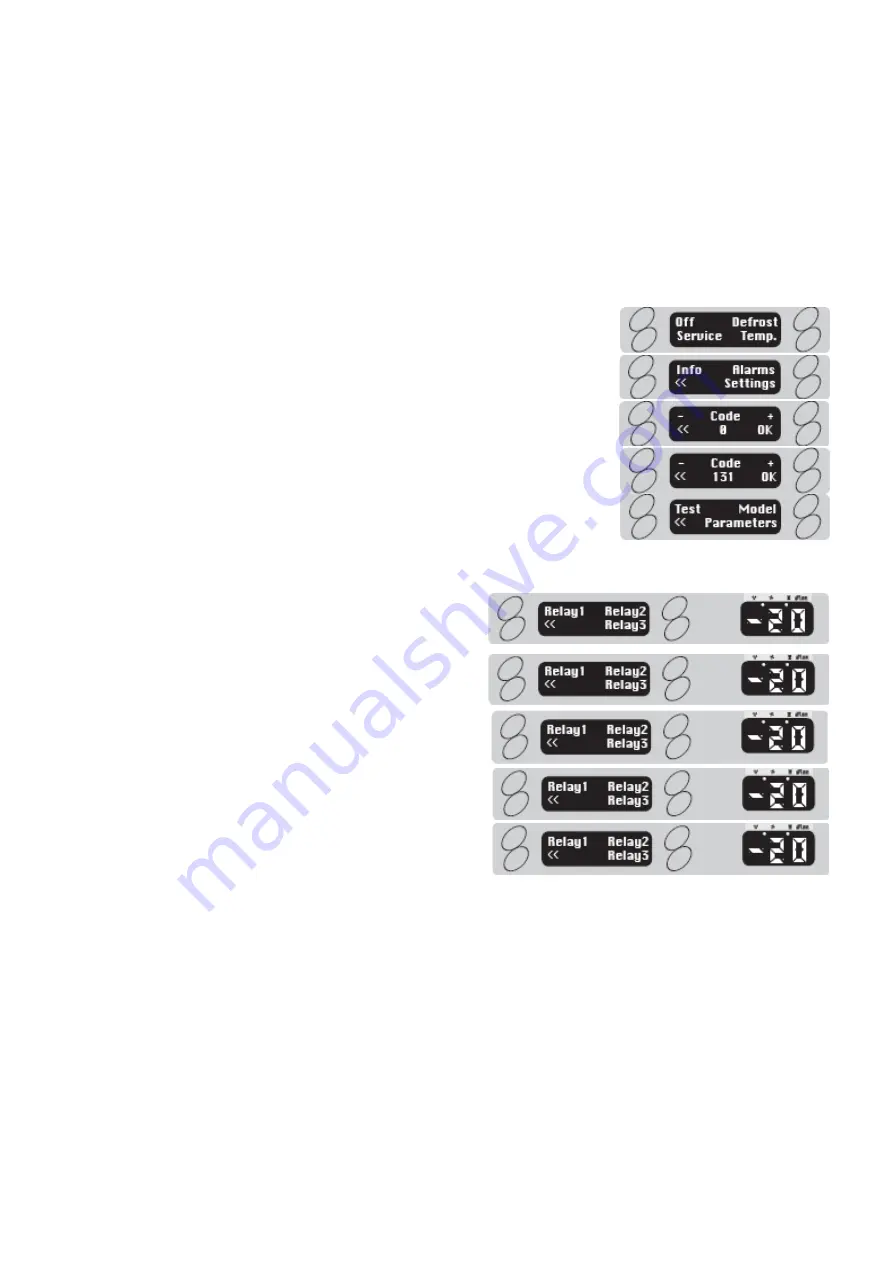
Press any button (1, 2, 3 or 4)  
 

Press button 4 ‘Service’ for the ‘Service Menu’. 


Press button 3 ‘Settings’ for the ‘Settings Menu’. 
 
 
Press button 2 ‘+’ to advance the code number to ‘131’ if you go beyond 
the number press button 1 ‘-‘ to lower to the correct number. 
 
Press button 3 ‘OK’ to enter the ‘Service Main Menu’. 
 
To exit the ‘Service Main Menu’ and return to the ‘User Main Menu’ press 
button 4 ‘<<’. If no further buttons are pressed for one minute the 
controller will revert to the normal operating mode.  
 

Out-Put Relay Test 
 

Whilst in the ‘Service Main Menu’ press button 1 ‘Test’ all 
relays will de-energise and the screen opposite will be 
displayed.  


To test relay 1 ‘Condensing Unit Relay’ press button 1. 
Relay 1 will energise. 

 
To test relay 2 ‘Evaporator Fan Relay’ press button 2. 
Relay 2 will energise.  


To test relay 3 ‘Defrost System Relay’ press button 3. 
Relay 3 will energise. 
 
To test all three relay outputs press buttons 1, 2 and 3 
together. All three relays will energise. 
 
To exit the ‘Output Relay Test Menu’ and return to the ‘User Main Menu’ press button 4 ‘<<’. If no further buttons 
are pressed for one minute the controller will revert to the normal operating mode.  
 

Model Selection Function


The ‘Model Selection Function’ allows the controller to be set during manufacturing, or replacement, to the most 
appropriate model range with the accompanying default setting values. There are eleven temperature default 
models which are:- HIGH TEMP-D (High Temperature with Door Switch), HIGH TEMP (High Temperature without 
Door Switch), LOW TEMP-GD (Low Temperature with Hot Gas Defrost and Door Switch), LOW TEMP-G (Low 
Temperature with Hot Gas Defrost without Door Switch), LOW TEMP-ED (Low Temperature with Electric Defrost 
and Door Switch), LOW TEMP-E (Low Temperature with Electric Defrost without Door Switch), MEAT TEMP-GD 
(Meat Temperature with Hot Gas Defrost and Door Switch), MEAT TEMP-G (Meat Temperature with Hot Gas 
Defrost without Door Switch), FISH TEMP. (Fish Temperature without door switch), WINE TEMP. (Wine 
Temperature with door switch), HEATED CAB. (Heated Temperature without door switch). 


All controllers arrive from the manufacturer with the HIGH TEMP-D settings if any other setting is required the 
following procedure should be followed. 


7  

Summary of Contents for EPREM 1/2H

Page 1: ...EPREM CABINET COUNTER ISO 14001 ISO 9001 ...

Page 2: ...tore and dispose of it in such a way as to prevent its escape into the environment harm to human health and to ensure the compliance with the environmental law Guidance is available from the Environment Agency on how to comply with the waste management duty of care 3 The following waste must be stored of separately from other wastes as they are hazardous to the environment refrigerants polyurethan...

Page 3: ...n and exceed the Montreal protocol using zero ODP refrigerants and insulation with Hydrocarbon refrigerant as an option There are 3 temperature options exceeding Climate Class 5 operation up to 43 c ambient Temperature is controlled by a LAE microprocessor control with digital temperature display The standard refrigeration system is integral with an air cooled condensing unit with the refrigerant ...

Page 4: ...s 1 and 2 to view temperatures Text Air Evaporator Condenser Food Tlo Thi Text Tlo indicates the lowest temperature the machine has achieved Thi indicates the highest temperature the machine has achieved This information is useful when checking on the possible cause of iced up evaporators If the relevant probe is not fitted display shows Press button 4 to exit to User Main Menu Basic User Adjustme...

Page 5: ...will then extinguish and the LED display will show the temperature measured by Probe 1 T1 the internal air temperature probe The function LED s will also illuminate to show which output relays are energised Therefore if the measured temperature is not within the pre set temperature range the controller will activate the condensing or heating system All timings i e defrost intervals will be taken f...

Page 6: ...FR 24H defrost frequency 24 H determines how many defrost in a 24 hour period The cabinet will perform at least 1 defrost per day and if the setting is 3 it has the potential to initiate up to 2 additional defrost whilst in the economy mode Should the cabinet experience constant usage the controller will switch automatically to the second parameter settings which could under circumstances of heavy...

Page 7: ...lay will continue to flash throughout this alarm The LED display will show the internal air temperature and the function icons If the temperature has not returned to within the operating limits after one hour the alarm will resound for one minute This process will continue until automatically cancelled by the system returning to its normal operating temperatures Low Temperature Alarm This alarm oc...

Page 8: ...porator Fan Relay press button 2 Relay 2 will energise To test relay 3 Defrost System Relay press button 3 Relay 3 will energise To test all three relay outputs press buttons 1 2 and 3 together All three relays will energise To exit the Output Relay Test Menu and return to the User Main Menu press button 4 If no further buttons are pressed for one minute the controller will revert to the normal op...

Page 9: ...uirement or to overcome an operating problem If any parameters require adjusting for example if the standard number of defrosts in the economy or heavy duty settings 2 requires to be increased the following procedure should be followed From Service Main Menu depress button 2 Model Use button 2 to scroll through to the required parameter heading If the require parameter is missed use button 1 to sc...

Page 10: ... 20 20 20 20 20 20 Defr End Tm Maximum defrost duration 1 120 20 min 20 20 20 20 20 20 20 20 20 20 20 Defr Type Defrost type OFF ELE GAS OFF flag OFF OFF GAS GAS ELE ELE GAS GAS OFF OFF OFF Drain Time Drain down time 0 30 2 min 2 2 2 2 2 2 2 2 2 2 2 Def Display Defrost display control 0 60 10 min 10 10 10 10 10 10 10 10 10 10 10 Fan in Def Fan activity during defrost No Yes Yes flag Yes Yes No No ...

Page 11: ... Defrost Day 2 Defrost Frequency 24h in mode 2 0 24 4 1 24h 4 4 4 4 4 4 4 4 4 4 4 Door Switch Door switch enabling NO YES YES flag YES NO YES NO YES NO YES NO YES YES YES Door Stop Compressor stop delay from door opening 0 30 1 min 1 1 1 1 1 1 1 1 1 1 1 Door Alarm Door alarm delay 0 30 8 min 8 8 8 8 8 8 8 8 8 8 8 Air o s T1 air probe offset 12 12 0 ºC 0 0 0 0 0 0 0 0 0 0 0 Evap Probe T2 evap probe...

Page 12: ... 0 042 Timed Off Cycle 230 1 50 10 0 indicative 13 Amp EPREM S 450L R404A 300 grms SC15CLX 3 0m x 0 042 Electric 230 1 50 6 2 indicative 13 Amp EPREM G 550H R134A 350 grms FR7 5GX 3 0m x 0 042 Timed Off Cycle 230 1 50 4 1 indicative 13 Amp EPREM G 550L R404A 325grms SC21CLX 3 0m x 0 054 Electric 230 1 50 6 8 indicative 13 amp EPREM S 1000H R134A 450grms GP16TB 3 0m x 0 054 Timed Off Cycle 230 1 50...

Page 13: ...Amp EPREM B 600H R290 160 grms TL5CNX 2 8m x 0 042 Timed Off Cycle 230 1 50 3 8 tested 13 Amp EPREM B 600L R290 150 grms SC15CNX 3 0m x 0 047 Hot Gas 230 1 50 13 4 tested 13 Amp Technical Data Pro R290 Counter Power Consumption Model Gas Gas Charge Compressor Capillary Defrost Type Voltage kW 48hrs Fuse Rating EPREM 1 2H R290 160 grms TL5CNX 3m X 0 042 Timed Off Cycle 230 50 1 3 2 tested 13 Amp EP...

Page 14: ...unit and condenser fan The reason it is fitted is to reduce the power consumption each time the compressor starts This is achieved by reducing the refrigerant migration into the evaporator therefore reducing the amperage when the compressor starts The ECM evaporator fan motor has a low heat output motor and it should be noted that when the power is switched off stops rotating straight away Single ...

Page 15: ...Wiring Diagrams 14 ...

Page 16: ...15 ...

Page 17: ...16 ...

Page 18: ...17 ...

Page 19: ...18 ...

Page 20: ...cial fosterfrance com Germany Foster Refrigerator Gmbh Tel 49 781 990 7840 Fax 49 781 990 7844 Email info foster gmbh de Foster Refrigerator Oldmedow Road Kings Lynn Norfolk PE30 4JU Tel 01553 691122 Fax 01553 691447 Website www fosterrefrigerator co uk Email sales foster uk com a Division of ITW UK Ltd EPREM SM 11 08 19 ...

Reviews: