- 20 -
- 21 -
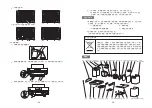
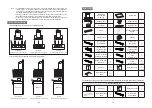
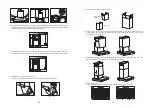
6. Installation of the exhaust duct: if the common flue interface or wall hole is larger than the diameter of
the aluminum foil exhaust duct, the aluminum foil exhaust duct can be directly connected. If the common
flue interface or wall hole is smaller than the diameter of the aluminum foil exhaust duct, the exhaust
duct adapter shall be fitted on the end of the aluminum foil exhaust duct without plastic fixing ring, and
shall be glued and sealed with adhesive tape. The small end of the exhaust duct adapter has two outer
diameter specifications of 150mm and 125mm. Please cut off the excess part smaller than the common
flue interface or wall hole according to the actual situation;
Φ
178
Φ
140
Φ
115
For the adhesive tape and
exhaust duct adapter
The end with a diameter smaller
than the wall hole shall be cut off
Foil tape
Notes: a. The joint between the exhaust duct and the common flue or the wall hole must be tightly
sealed to prevent smoke leakage, and the exhaust duct should not be squeezed,
deformed or turned at a small angle. The number of bending should no more than one,
and the extraction hose should be straight;
b. The diameter of the common flue interface or wall hole should be basically the same as the
diameter of the exhaust duct and should not be too small, otherwise it will cause poor
smoke exhaust, increased noise and reduced air volume.
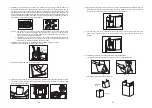
7. Installation of the exhaust hood: fix the exhaust hood and sealing ring at the air outlet
of the main body with 8 exhaust hood screws (M4 × 18 mm);
The bevel
should towards
the electrical box
8. Remove the protective film from the top plate surface;
9. Lift the main body, let the fan frame pass through the cupboard bottom plate, hang the back hook hole
onto the hook, confirm the level of the main body with a level bar, and fix the fan frame and the hook with
the fan frame screw (M4 × 6mm);
10. Connect and fix the exhaust duct: according to the actual installation position of the main body, cut
off the redundant exhaust duct with wire pliers, then fix the exhaust duct on the exhaust hood with
two exhaust duct screws (ST3.9x9.5), and wrap and seal with foil tape;
11. Insert the power plug of the main body into the power socket, start the range hood, and check
whether the connection between the exhaust duct and the exhaust hood is sealed in good
condition;
12. Installation of the fan cover and decorative hood (only for EMS6008-C);
1) Remove the protective film from the surface of fan cover and decorative hood;
2) Put the decorative hood into the fan cover;
;
Fan cover
Decorative
cover
Summary of Contents for EMS6008
Page 1: ...EMS6008 EMS6008 C 吸油烟机 使用安装说明书 请在开始安装和使用前请仔细阅读此产品说明书 请保留此产品说明书 以供今后使用或后续用户使用 ...
Page 17: ......
Page 34: ...110100092508A ...


