background image

19

20

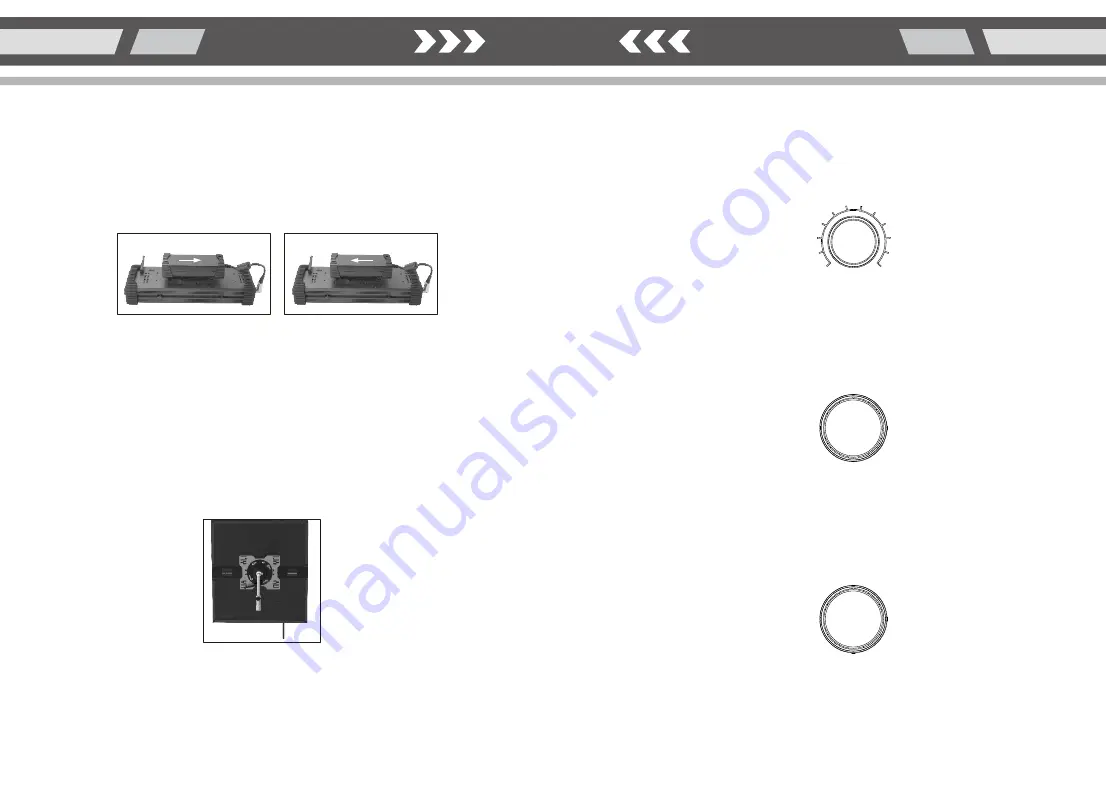
 SAT  0-100%

2.Saturation Knob:

3.Intensity knob:

Functions of the control knobs: 

1.Selector Knob:

Rotate the selector knob to select the desired mode in the menu, press once to select.
In certain modes, parameters such as CCT, CMB, SPD, and Frq may be adjusted using this knob.
In HSI, CCT, RGBWT mode, press the knob for several seconds to save the current settings.

Selector Knob

In the HSI mode, SAT can be adjusted 0-100%. In other modes, 
parameters such as SAT, CMB, Col, may be adjusted using this knob.

Adjusts brightness 0-100% in any mode.

Brightness 0-100%

(
(2) Use the power cord to connect the power control box to external AC power (AC100-240V).

1) Use the DC power cable to connect the light unit to the power control box.

Do not use battery while the light is running on AC power, doing so may cause damage to the battery or light.
Do not store the light with the battery attached, doing so may reduce battery life.

Warnings: 

(1) The V-lock holder is already mounted on the adapter when it is shipped from the factory.
(2) Install the power adapter with V-lock plate on the back of the light.It is successfully installed when you hear
      the lock mechanism click.

2.How to Install the AC power adapter

(3) To remove the adapter, press down on the V-lock release button and push the adapter out of the V-lock plate.

Attaching the adapter

Removing the adapter

LED FOLDABLE LIGHT

LED FOLDABLE LIGHT


4. Connecting the power supply

 -

+

 -

+

Summary of Contents for SkyFiller Wings SFW-150LS

Page 1: ... RGB 1100 Lakeside Dr Gurnee IL60031 United States Toll Free 866 812 1107 Local International 847 201 4623 Fax 847 261 0295 Http www fotodioxpro com Fotodiox Inc w w w f o t o d i o x p r o c o m R R USER MANUAL SkyFiller Wings ...

Page 2: ...r AC adapter with wet hands doing so may cause electric shock 6 Do not damage disassemble tweak or twist the power cord as it may cause a fire or electric shock 7 Do not place the light under heavy objects 8 Keep the light clean with a soft dry cloth 9 ONLY use the provided power control box Using other power control boxes may result in damage to your light Please contact techsupport fotodiox com ...

Page 3: ...tional accessory Remote control Parts diagram Front diffuser panel Ball head locking screw DC input cable Stand mount locking screw Metal mounting plate ball head bracket detachable Mounting plate lock pin A B C D E F SFW 150ss Grid SFW 150LS Grid SFW 150ss SFW 150Ls R ...

Page 4: ...ox MODEL SIZE LED784pcs of ultra bright chip LED784pcs of ultra bright chip 2800 150K 6500 200K Ra 96 98 120 96 Softbox Power control box Ball head bracket DC power cable AC power cable Carrying case Remote control Grid Optional accessories Accessories Weight for power control box Weight for light body Dimension for power control box Dimension for folded light body Dimension for unfolded light bod...

Page 5: ...0K and 6500K 8 Power ON OFF button Press the button once to turn the light on press again to turn it off 9 Special effects Press and hold the Sound button for more than 3 seconds to enter the special effect mode At this time one of the F1 F5 modes will be displayed below the LCD display Press the Brightness Increase or Decrease buttons to shift between the five modes Press and hold the Sound butto...

Page 6: ...ting plate and the screw is securely fastened 2 Loosen the stand mount locking screw by turning counterclockwise Place the mount on the light stand and and turn the ball head locking screw clockwise to secure in position 3 Turn the ball head locking screw counterclockwise to loosen the ball head Adjust to the desired position 1 Set up instructions 1 Align the four holes A B C D on the back of meta...

Page 7: ...or volatile liquids as this may increase the risk of explosion or fire 4 Do not operate in enclosed spaces where heat buildup can be extreme such as in a car on a sunny day The increased heat may cause premature failure of the lighting unit 5 Do not touch the plug or AC adapter with wet hands doing so may cause electric shock 6 Do not damage disassemble tweak or twist the power cord as it may caus...

Page 8: ...l accessory Remote control SFW 150ssRGB SFW 150LsRGB SFW 150ssRGB Grid SFW 150LsRGB Grid Front diffuser panel Ball head locking screw DC input cable Stand mount locking screw Metal mounting plate ball head bracket detachable Mounting plate lock pin A B C D E F Parts diagram R ...

Page 9: ...x to light unit Power cable DMX cable Carry bag NO Name A B C D E F H I G J K A B E F G H I K D C J 15 16 LED FOLDABLE LIGHT LED FOLDABLE LIGHT SFW 150ssRGB illuminance 2800K 10000Lux 2960Lux 800Lux 170Lux 3200K 9280Lux 1070Lux 890Lux 175Lux 5600K 11000Lux 3600Lux 1000Lux 210Lux 10000K 10400Lux 3430Lux 1030Lux 200Lux 0 5m 1m 2m 5m Red 2180Lux 680Lux 200Lux 6000Lux 1920Lux 560Lux 900Lux 290Lux 80Lu...

Page 10: ... Ball head bracket DC power cable control box to light unit Power cable DMX cable Carrying case NO Name SFW 150LsRGB illuminance Distance Color illuminance Distance Color illuminance Operating instructions secure the screw by turning clockwise Please ensure the light stand stud is fully inserted into the mounting plate and the screw is securely fastened 2 Loosen the stand mount locking screw by tu...

Page 11: ...box to external AC power AC100 240V 1 Use the DC power cable to connect the light unit to the power control box Do not use battery while the light is running on AC power doing so may cause damage to the battery or light Do not store the light with the battery attached doing so may reduce battery life Warnings 1 The V lock holder is already mounted on the adapter when it is shipped from the factory...

Page 12: ...ator light flashes the V lock battery is running low When the battery indicator light is off the AC power adapter is being used to power the light Note when the battery is used to power the light the max output power is reduced to 80 2 Data indicator When the data indicator is on the DMX512 remote control function is being used When the data indicator flashes the USB port is being used for data up...

Page 13: ... CTS GREEN 1 2 GREEN 1 4 GREEN 1 8 GREEN MAGENTA 3 4 MAGENTA 1 2 MAGENTA 07 CYAN 15 CYAN 30 CYAN 60 CYAN 90 CYAN 15 RED 30 RED 60 RED 90 RED 15 GREEN 30 GREEN 60 GREEN 90 GREEN 15 YELLOW 30 YELLOW 60 YELLOW 90 YELLOW 15 MAGENTA 30 MAGENTA 60 MAGENTA 90 MAGENTA 15 PINK 30 PINK 60 PINK 430 431 433 436 439 441 443 446 449 451 453 456 459 461 463 466 469 471 473 476 479 481 483 486 7 5 0 0 0 5 0 0 0 5...

Page 14: ...the selector saturation and intensity knobs to adjust the parameters CCT mode CCT 2800 10000 K INT 0 100 Mode TWO G B R G B R G R B HSI mode HUE 0 360 SAT 0 100 INT 0 100 Mode THREE RGBWT mode Red 0 100 Green 0 100 Blu 0 100 W 0 100 T 0 100 GN 1 1 7 Lang language Use the selector knob to highlight the desired language Push the knob once to select English Chinese 8 DMX settings Adjust the DMX addre...

Reviews: