background image

18 


7-2 AUX  

The AUX button is used to operate an external device that is connected to the auxiliary device 

jack of the Scorpion X1A. It is also used to turn on the Scorpion X1A from the TX200 transmitter. 

7-3 Mute 

The mute button enables you to mute or un-mute the sound being played. When mute is 

activated, the letter “M” appears in the mute status indicator. Mute is an alternating function. 

The first button press activates mute and the second press deactivates mute. Mute also serves 

as a pause function. When you mute the current sound being played and then un-mute, the 

sound will begin playing at the point it was muted. If you prefer to restart the sound from the 

beginning, simply push down on the selector knob before you un-mute. While muted, you can 

also change your sound so that when you un-mute, the new sound will play.  

7-4 Volume Up and Down 

These buttons provide you with the ability to make volume level adjustments. When the TX200 

is initially turned on, the volume level will always be 00. To increase the volume, simply push 

and hold the volume up button. To decrease the volume level, push and hold the volume down 

button.  

7-5 Large Text Mode 

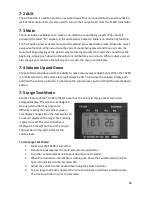
Another feature of the TX-200 is that the user has the ability to change the screen to an 

enlarged display. This screen was designed 

for any person that may have some 

difficulty reading the normal text screen. 

This display changes from the text display to 

a numeric display with a larger font, making 

it easier to read. The sound number is 

displayed on the left portion of the screen. 

The number on the right indicates the 

volume level

To Use Large Text Mode:


1.


Make sure the TX200 is turned on. 

2.


Simultaneously depress the mute and volume up buttons. 

3.


Turn the sound selector knob to your desired sound number. 

4.


When the desired sound number is visible, push down the sound selector knob to 

have it transmitted to the Scorpion X1A.  

5.


Adjust the volume to the desired level using the volume buttons. 

6.


To quit large text mode, depress the mute and volume up buttons simultaneously. 

The screen will return to its normal state. 


Summary of Contents for Scorpion X1A

Page 1: ......

Page 2: ...s of Operation Monday Friday 8AM 5PM EST Contact Us Customer Service 717 248 2507 Toll Free Orders Only 866 463 6977 General Inquiry E mail sales gofoxpro com Stay up to date with the latest sounds by...

Page 3: ...ng Presets 9 3 Auxiliary Jack Function 9 4 Using External Speakers 10 4 1 Connecting an External Speaker 10 4 2 Connecting two External Speakers 11 4 3 External Speaker Control 11 5 Scorpion X1A Confi...

Page 4: ...rted Display Night Mode 19 7 10 Presets 19 8 Programming the Scorpion X1A 19 8 1 Getting New Sounds 20 8 2 Programming the Scorpion X1A Windows PC s 20 8 3 Transferring a New Playlist to the TX200 21...

Page 5: ...digital copy of this file can be downloaded from http www gofoxpro com resources manuals FOXPRO_Scorpion X1A pdf 1 1 What s in the Box Included in the box you should find the following items 1 Scorpio...

Page 6: ...hes unlocked lift the top of the housing to fully open Locate the black plastic battery holder 3 Lift the battery holder out from its current position and disconnect the red and black power wire 4 The...

Page 7: ...p 1 5 TX200 Remote Requirements The TX200 transmitter operates on a single 9V battery It is recommended that you use a high quality alkaline battery Installing the Battery in the TX200 Remote 1 Access...

Page 8: ...own the AUX button on the TX200 for about 3 4 seconds Observe the green LED on the Scorpion illuminate indicating that the power is on 3 Use the selector knob on the TX200 to cycle through the sound l...

Page 9: ...el 4 Press and release the P1 button This will store the selected sound and volume level in the P1 position and the sound number will appear in the P1 position indicator on the top status line 5 Repea...

Page 10: ...Jacks which allows you to connect up to two additional speakers The internal Mylar cone speaker performs admirably however you may encounter situations that require higher sound levels By connecting a...

Page 11: ...to turn the external speakers ON and OFF as you wish 4 3External Speaker Control The Scorpion X1A has the ability to control the external speakers with the TX200 transmitter With the remote you are a...

Page 12: ...element 5 1 Mono Stereo Selector The factory default mono mode is best for most situations This mode combines both right A and left B audio channels and delivers the combined sounds to the internal sp...

Page 13: ...ote on the left channel By connecting an external speaker to the Scorpion you could have the sheep sound coming from the internal speaker and the coyote sound coming from the external speaker This wou...

Page 14: ...al speaker 5 4 Radio Channel The default radio channel for the Scorpion is B Channel C is also available for operation of the Scorpion if both the Scorpion and TX200 transmitter are configured to that...

Page 15: ...in order to prevent damage to the card It takes only a few moments to change the entire playlist by using the provided USB port and this procedure is totally safe and foolproof If you feel that you h...

Page 16: ...link during operation it is alerting you that the batteries need replaced or recharged If the batteries drop too low to power the Scorpion X1A it will shut itself off Battery run time is directly rela...

Page 17: ...t 1 per day Do not leave charging batteries unattended Remove batteries from battery holder when caller will not be used for prolonged periods to help prevent deep discharge Recharge your batteries pe...

Page 18: ...X200 is initially turned on the volume level will always be 00 To increase the volume simply push and hold the volume up button To decrease the volume level push and hold the volume down button 7 5 La...

Page 19: ...operates on a standard 9 volt battery Please use a high quality alkaline battery Battery life can approach 175 hours Watch the battery monitor and replace the battery before it becomes completely depl...

Page 20: ...me by visiting the following web address http www gofoxpro com programmer When the page is loaded locate the Product Information box This box displays current version number publication date and MD5 a...

Page 21: ...is a fresh install with no previous versions your default sound library storage point is located under your Documents or My Documents folder FOXPRO Sounds By clicking on the Browse Library button you...

Page 22: ...se are considered proactive or preventative Avoid exposure to all precipitation and moisture Whether you are storing your FOXPRO game call or decoy away for the summer or just having some down time fr...

Page 23: ...cks leaves dirt or anything else that shouldn t be there If dirt or foreign objects make their way into the machine it can cause problems down the road Store in a dry location If you are planning on s...

Page 24: ...es can be found there 11 Maximizing Remote Range Remote range can be affected by many factors Some of these factors can be controlled while others cannot In order to achieve the best possible remote r...

Page 25: ...eption which can be determined by turning the equipment off and on the user is encouraged to correct the interference by one or more of the following measures Reorient or relocate the receiving antenn...

Page 26: ...arranty is void if the unit is physically damaged used in a manner contrary to intended use or otherwise abused either intentionally or unintentionally Also specifically excluded are batteries and dam...

Reviews:

Related manuals for Scorpion X1A