NAGA PRO User Manual
38
Before installing the firmware, select the corresponding device and baud rate (the same
configuration as when connecting the device). Don’t hit Connect just yet.
On the Mission Planner’s "Initial Setup > Install Firmware"" screen select the appropriate icon
that matches your frame (i.e. Quad, Hexa). Follow the instruction and messages to install
firmware.
4. Basic Hardware Calibration and Parameter Setting
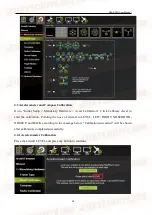
4.1 Frame Type Configuration
Open the Mission Planner ground station, and connect to the flight controller, Connect to
Mission Planner. On the "Initial Setup > Mandatory Hardware > Frame Type" screen select the
corresponding frame type such as Plus frame or X frame.
Summary of Contents for NAGA PRO
Page 1: ...NAGA PRO User Manual NAGA PRO User Manual Herelink Version...
Page 6: ...NAGA PRO User Manual 2...
Page 9: ...NAGA PRO User Manual 5...
Page 10: ...NAGA PRO User Manual 6...
Page 11: ...NAGA PRO User Manual 7...
Page 12: ...NAGA PRO User Manual 8...
Page 14: ...NAGA PRO User Manual 10...
Page 15: ...NAGA PRO User Manual 11...
Page 16: ...NAGA PRO User Manual 12...
Page 23: ...NAGA PRO User Manual 19 the LED2 indicator flashes...
Page 67: ...NAGA PRO User Manual 63 3 Photo Taking Test...
Page 68: ...NAGA PRO User Manual 64...

