background image

22

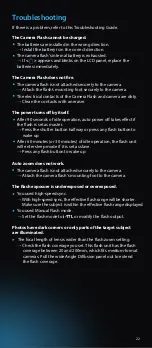
Troubleshooting

If there is a problem, refer to this Troubleshooting Guide.

The batteries are installed in the wrong direction.


Install the battery is in the correct direction.

The camera flash’s internal battery is exhausted.

 If 

<      >

 appears and blinks on the LCD panel, replace the 

batteries immediately.

The Camera Flash cannot be charged.

Auto zoom does not work.

The camera flash is not attached securely to the camera.

Attach the camera flash’s mounting foot to the camera.

The power turns off by itself.

After 90 seconds of idle operation, auto power off takes effect if 

the flash is set as master.

 Press the shutter button halfway or press any flash button to 

wake up.

After 60 minutes (or 30 minutes) of idle operation, the flash unit 

will enter sleep mode if it is set as slave.

 Press any flash button to wake up.

The Camera Flash does not fire.

The camera flash is not attached securely to the camera.

 Attach the flash’s mounting foot securely to the camera.

The electrical contacts of the Camera Flash and camera are dirty.

 Clean the contacts with an eraser.

The flash exposure is underexposed or overexposed.

You used high-speed sync.

 With high-speed sync, the effective flash range will be shorter.

Make sure the subject is within the effective flash range displayed.

You used Manual Flash mode.

 Set the flash mode to 

i-TTL

 or modify the flash output.

 The focal length of lens is wider than the flash zoom setting.

 Check the flash coverage you set. This flash unit has the flash 

coverage between 20 and 200mm, which fits medium-format 

cameras. Pull the wide Angle Diffusion panel out to extend 

the flash coverage.

Photos have dark corners or only parts of the target subject 

are illuminated.

Summary of Contents for Zoom TTL

Page 1: ...FPLFSMZNK Zoom TTL Flash for Nikon ...

Page 2: ... as a Master or Slave Manual Control of Three Different Wireless Groups by Using the Nikon CLS Optical System Remote ITTL and Manual Power Control with the Integrated R2 Radio System s Built In Transmitter and Receiver Industry benchmark range and interference avoidance with the new INTEGRATED 2 4 gHz R2 Radio System Zooming Head for Even Coverage with automatic zoom or manual control HSS for Shut...

Page 3: ...it in the presence of flammable gases chemicalsandothersimilarmaterials Incertaincircumstances these materials may be sensitive to the strong light emitting from this flash unit and fire may result A whole new meaning to Flashpoint Donotleaveorstoretheflashunitiftheambient temperature reads over 50 C e g in automobile in the sun Otherwise the electronic parts may be damaged Do not use any power su...

Page 4: ...ing 11 Battery Compartment 12 USB Port for Firmware Upgrades 13 Slave Flash Ready Indicator 14 External Power Supply Socket Body Name of Parts 06 07 12 08 04 05 13 14 03 01 09 11 10 02 Control Panel 15 MODE Mode Selection Button Lock Button 16 Wireless Selection Button 17 Select Dial 18 SET Set Button 19 ON OFF Power Switch 20 Test Button Flash Ready Indicator 21 Function Button 1 22 Function Butt...

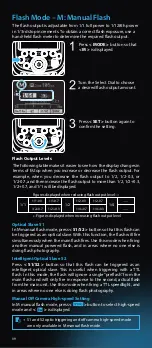
Page 5: ...ed the LCD panel is illuminated LCD Panel 1 i TTL Autoflash Zoom display Focus length Automatic High speed sync Second curtain sync Aperture Manual i TTL autoflash Effective flash range Flash exposure compensation Flash exposure compensation amount Number of flashes Flash frequency Hz Flashes per Second 3 Multi Flash Stroboscopic flash 2 M Manual Flash Manual flash Manual flash output ...

Page 6: ...oup Master Unit Slave Unit Slave icon Slave Assigned group Included Accessories 1 Flash Unit 2 Mini Stand 3 Protective Case 4 Instruction Manual Hexapop Parapop rapid deployment Softboxes R2 Radios R1 Radios Flashpoint Flash Diffuser FAFD60 Flashpoint Speedlight Reflector FPLFSMX01 Accessories Flashpoint Blast Power Pack BP 960 with Canon Cord FPPPBP960CA Flashpoint Grid for Speedlight FPLFSMX02 ...

Page 7: ... extended period of time Set as a master flash it will turn the power off automatically after approx 90 seconds of idle use Pressing the camera shutter halfway or pressing any flash button will wake up the flash unit Set as a slave flash it will enter sleep mode after a certain period adjustable 60 minutes by default of idle use Pressing any flash button will wake it up Disabling Auto Power Off fu...

Page 8: ... flash range will be displayed in the viewfinder When the shutter button is fully pressed the flash will fire a pre flash that the camera will use to calculate exposure and flash output the instant before the photo is taken With FEC function this flash can bias the flash output from 3 to 3 in 1 3rd stops It is useful in situations where minor adjusting of the TTL system is needed based on the envi...

Page 9: ...splay panel High Speed Sync FP flash enables the flash to synchronize with all camera shutter speeds This is convenient when you want to use aperture priority for fill flash portraits Select the high speed sync icon High Speed Sync If you set a shutter speed as 1 320s Auto FP or 1 250s Auto FP in the Nikon camera setting will be displayed in the flash screen regardless of practical shutter speed W...

Page 10: ... 1 1 0 3 1 1 0 7 1 2 0 7 1 2 0 3 1 2 0 3 1 2 0 7 1 4 0 7 1 4 0 3 In M manual flash mode press S1 S2 button so that this flash can be triggered as an optical slave With this function the flash will fire simultaneously when the main flash fires Use this mode when firing another manual powered flash and in areas where no one else is doing flash photography Press S1 S2 button so that this flash can be...

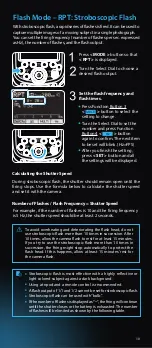
Page 11: ...tops Use the formula below to calculate the shutter speed and set it with the camera For example if the number of flashes is 10 and the firing frequency is 5 Hz the shutter speed should be at least 2 seconds Stroboscopic flash is most effective with a highly reflective or light colored subject against a dark background Using a tripod and a remote control is recommended A flash output of 1 1 and 1 ...

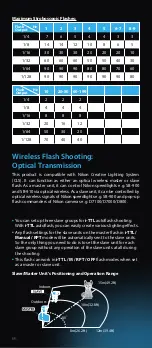
Page 12: ...50 80 90 5 4 8 20 50 80 90 6 7 3 6 20 40 70 90 8 9 3 5 10 30 60 80 Flash Output Hz 1 4 1 8 1 16 1 32 1 64 1 128 10 2 4 8 20 50 70 20 50 2 4 8 16 30 40 60 199 2 4 8 12 20 40 You can set up three slave groups for i TTL autoflash shooting With i TTL autoflash you can easily create various lighting effects Any flash settings for the slave units on the master flash in i TTL Manual RPT mode will be auto...

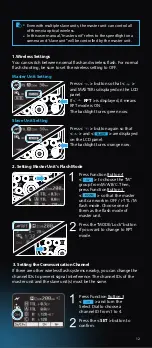
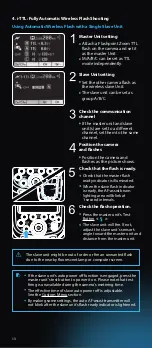
Page 13: ...Button 3 so that the master unit can work in OFF i TTL M flash mode Choose one of them as the flash mode of master unit Press the MODE Lock button if you want to change to RPT mode 3 Setting the Communication Channel If there are other wireless flash systems nearby you can change the channel IDs to prevent signal interference The channel IDs of the master unit and the slave unit s must be the same...

Page 14: ...When the slave flash indicator is ready the AF assist beam lighting area will blink at 1 second intervals Check that the flash is ready Press the master unit s Test Button The slave unit will fire If not adjust the slave unit s sensor s angle toward the master unit and distance from the master unit Check the flash operation The slave unit might be out of order or fire an unwanted flash due to the ...

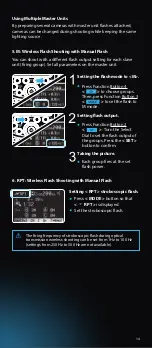
Page 15: ...u can shoot with a different flash output setting for each slave unit firing group Set all parameters on the master unit 6 RPT Wireless Flash Shooting with Manual Flash Taking the picture Each group fires at the set flash power Setting the flash mode to M Press Function Button 4 to choose groups Then press Function Button 3 to set the flash to M mode Setting flash output Press Function Button 2 Tu...

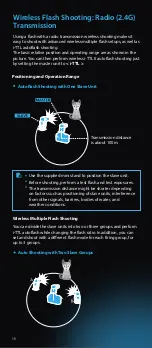
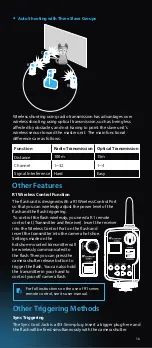
Page 16: ...es it easy to shoot with advanced wireless multiple flash setups as well as i TTL autoflash shooting The basic relative position and operating range are as shown in the picture You can then perform wireless i TTL II autoflash shooting just by setting the master unit to i TTL You can divide the slave units into two or three groups and perform i TTL autoflash while changing the flash ratio In additi...

Page 17: ...ash triggering To control the flash wirelessly you need a R1 remote control set Transmitter and Receiver Insert the receiver into the Wireless Control Port on the flash and insert the transmitter into the camera hot shoe Settings made on the hotshoe mounted transmitter will be wirelessly communicated to the flash Then you can press the camera shutter release button to trigger the flash You can als...

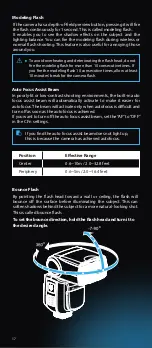
Page 18: ...to turn off the auto focus assist beam set the AF to OFF in the C Fn settings Auto Focus Assist Beam Position Center Periphery Effective Range 0 6 10m 2 0 32 8 feet 0 6 5m 2 0 16 4 feet If you find the auto focus assist beam does not light up this is because the camera has achieved autofocus To avoid overheating and deteriorating the flash head do not fire the modeling flash for more than 10 conse...

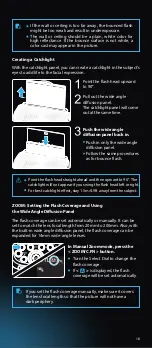
Page 19: ...e a catchlight in the subject s eyes to add life to the facial expression Creating a Catchlight Pull out the wide angle diffusion panel The catchlight panel will come out at the same time Point the flash head upward to 90 Push the wide angle diffusion panel back in Push in only the wide angle diffusion panel Follow the same procedures as for bounce flash ZOOM Setting the Flash Coverage and Using t...

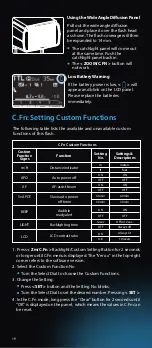
Page 20: ...e top right corner refers to the software version 2 Select the Custom Function No Turn the Select Dial to choose the Custom Functions 3 Change the Setting Press SET button and the Setting No blinks Turn the Select Dial to set the desired number Pressing SET 4 In the C Fn mode long press the Clear button for 2 seconds until OK is displayed on the panel which means the values in C Fn can be reset C ...

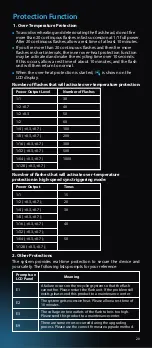
Page 21: ...oblem still exists please send this product to a maintenance center The system gets excessive heat Please allow a rest time of 10 minutes The voltage on two outlets of the flash tube is too high Please send this product to a maintenance center There are some errors occurred during the upgrading process Please use the correct firmware upgrade method Protection Function 1 Over Temperature Protection...

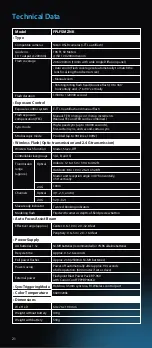
Page 22: ...ck BP 960 with Canon Cord FPPPBP960CA External power Hotshoe 3 5mm sync line R1 Wireless control port 5600 200k Optical Optical 2 4G 2 4G 3 A B and C Indoors 12 to 15 m 39 4 to 49 2 ft 100m 4 1 2 3 and 4 32 1 32 Two red blinking indicators Fired with camera s depth of field preview button Outdoors 8 to 10 m 26 2 to 32 8 ft Master unit reception angle 40 horizontally 30 vertically Master Slave Off ...

Page 23: ...er sleep mode if it is set as slave Press any flash button to wake up The Camera Flash does not fire The camera flash is not attached securely to the camera Attach the flash s mounting foot securely to the camera The electrical contacts of the Camera Flash and camera are dirty Clean the contacts with an eraser The flash exposure is underexposed or overexposed You used high speed sync With high spe...

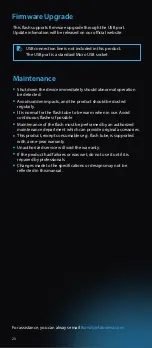
Page 24: ...larly It is normal for the flash tube to be warm when in use Avoid continuous flashes if possible Maintenance of the flash must be performed by an authorized maintenance department which can provide original accessories This product except consumables e g flash tube is supported with a one year warranty Unauthorized service will void the warranty If the product had failures or was wet do not use i...

Page 25: ......

Page 26: ......

Reviews: