background image


IN 

– VA10 

- 23 - 

© Future Products Group 


ON


Time


Refrigeration Equipment 

cont.


VISAIR  CABINETS    -  SERVICING 


Temperature 
Regulator 
XR40CX   


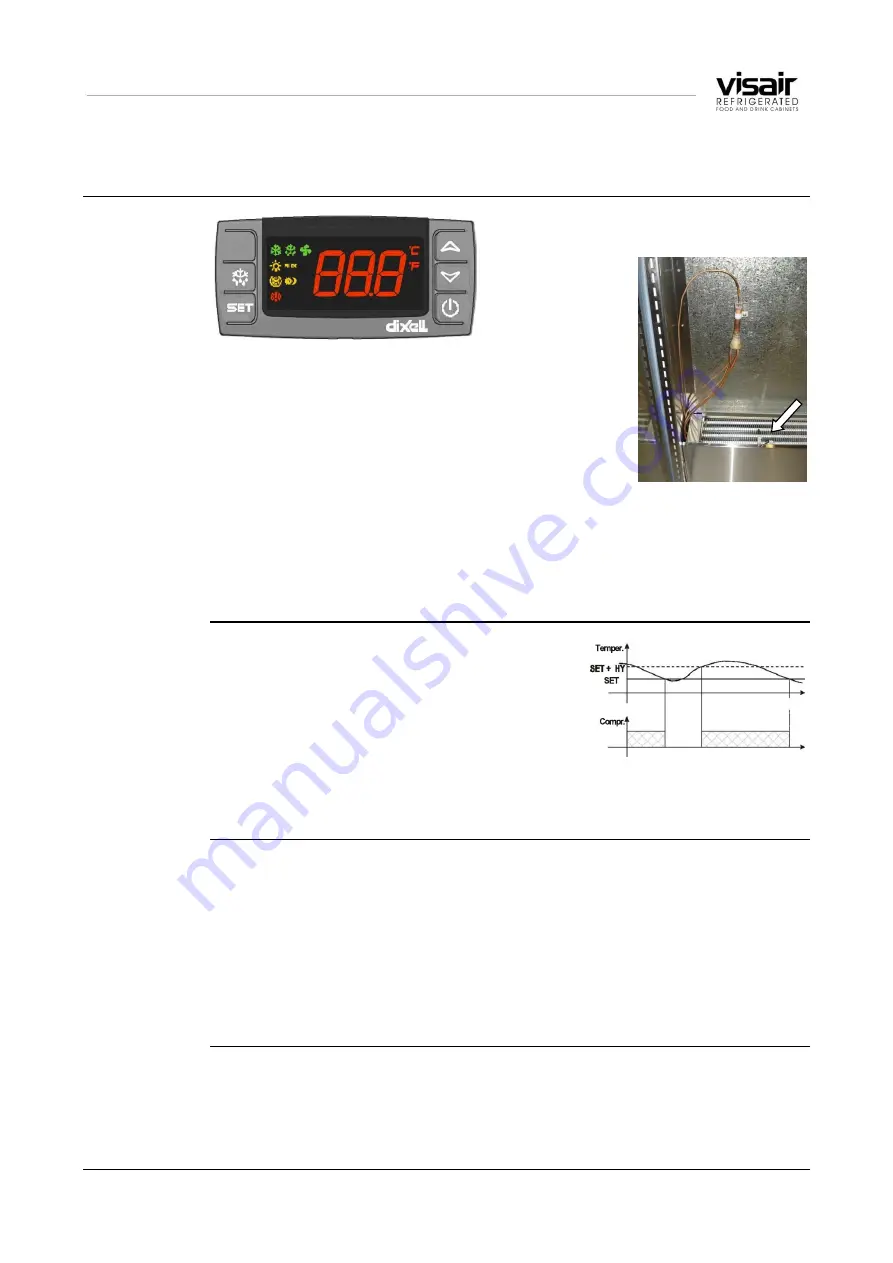
Model XR40CX is a microprocessor based 
controller.  
It is provided with 
three NTC probes. 
The first one for 
temperature 
control (air off), 

the second one, located on the evaporator coil, to 
control the defrost termination, the third one, connected 
to the HOT KEY terminals indicates the cabinet 
temperature (air on).  

The indicated set-point temperature will be lower than 
the air temperature inside the cabinet, because the 
refrigeration compressor is controlled in response to the 
exit air (air off) temperature from the evaporator cooling coils. 

After unplugging Pr4, from the HOT KEY terminals, one can programme the 
controller by means of a HOT KEY. 

The instrument is fully configurable through special parameters that can be 
easily programmed through the keyboard. 


XR40CX 
Compressor 
Control 

The regulation is performed according to the 
temperature measured by the thermostat probe 
with a positive differential from the set point: if the 
temperature increases and reaches set point plus 
differential the compressor is started and then 
turned off when the temperature reaches the set 
point value again. 

In case of a fault in the thermostat probe the start and stop of the compressor 
are timed through parameters 

COn

 and 

COF


XR40CX 
Defrost Control


Parameters are used to control the interval between defrost cycles (IdF), its 
maximum length (MdF) and two defrost modes: timed or controlled by the 
evaporator’s probe (P2P). 

In this cabinet, the start of the defrost cycle is timed, but the cycle will be 
terminated as soon as the defrost probe reaches the pre-determined 
temperature.  

At the end of defrost dripping time is started, its length is set in the FSt 
parameter. With FSt =0 the dripping time is disabled 

Continued on next page 


Probes 

Summary of Contents for Visair IN-VA10-A004

Page 1: ...Open Front Food Drinks Cabinet AS NZS ...

Page 2: ...Future Products Group Limited All rights reserved No part of this publication may be reproduced stored in a retrieval system or transmitted in any form or by any means electronic mechanical photocopying recording or otherwise without the prior written permission of Future Products Group Ltd ...

Page 3: ...guration 8 Controls 8 Power Switch and Refrigeration Controller 8 Preparation 9 Shelf Location and Ticketing 9 Shelf Adjustment 9 Two piece Shelf Loading Position 9 Shelf Load Restrictions 10 Switch Power On 10 Load Cabinet 10 Loading Restrictions 10 Defrost Cycle 10 Routines 11 After Hours 11 Cleaning 11 De frost Cycle 11 Temperature Checks 11 Warning Flammable Products 11 Equipment Disposal 11 S...

Page 4: ...als 15 Cooling Coil and Probes 15 Mandatory Cleaning Routines 16 Warning 16 Air Vents 16 Condenser Radiator 16 Inspection and Rectification 16 INSTALLATION 17 Regulations 17 Compliance with Local Requirements 17 Setting Up 17 Unpacking 17 Cabinet Preparation 17 Positioning the Cabinet 17 Power Supply and Earthing 17 Isolation 18 Location 18 Ventilation 18 Draughts 18 SERVICING 19 Electrical Protec...

Page 5: ...ell Default Settings 27 XR40CX Alarm Signals 29 XR40CX Connections 29 SPECIFICATIONS 30 Mechanical 30 Electrical 30 Cabinet Performance 31 Refrigerated Section Performance 31 Controller Settings 31 Dixell XR40CX Settings 31 Mains Lead 31 Lead Replacement 31 Compliance 32 Safety Aspects 32 Hazardous Substances 32 Operational Safety 32 Improvements 32 Ongoing Development 32 ELECTRICAL CIRCUIT DIAGRA...

Page 6: ...nd follow its recommendations The time taken will be well spent These instructions both general and technical tell you how to operate and look after your Inline Visair food service cabinet so that you can receive the full benefits that this cabinet has to offer These instructions cannot however cover all eventualities If you are unsure of any aspect of the installation instructions or performance ...

Page 7: ... compressor failure Any damage or malfunction resulting from the use of non FPG supplied spare parts Specific Exclusions The following are specifically excluded from warranty Breakage of glass or plastic components or the replacement of LED lighting strips or gaskets Maladjustment of the electronic refrigeration controller by an unqualified person Failure resulting from a lack of routine compresso...

Page 8: ...ts from slots on the cabinet top Vaporised condensate mixes with this air flow and also exhausts from the top of the cabinet Controls VISAIR CABINETS OPERATION Power Switch and Refrigeration Controller The main power switch is located on the front base panel on the right hand side This is the only operator control and it switches both the lighting and refrigeration on and off The refrigeration con...

Page 9: ...ion and push them down firmly The brackets can be inserted in two positions allowing the shelves to be either horizontal or sloping downwards Make sure shelf brackets are pushed down as far as they can go Failure to do this may result in shelf collapse when loaded with product Two piece Shelf Loading Position Each two piece shelf is fitted with runners enabling it to be pulled forward for easy loa...

Page 10: ...re chilled products If warm product is introduced there could be a delay before the temperature falls to the normal operating level Loading Restrictions It is important to leave adequate free space for the refrigerated air to circulate within the cabinet A minimum space of 40mm must be maintained above canned drinks or other cylindrical containers The air grills at the front of the cabinet must no...

Page 11: ... attempt to adjust the refrigeration controller Temperature Checks Cabinet temperatures should be routinely checked to confirm satisfactory operation The refrigeration controller shows the temperature of the circulating air as it enters the cooling coil This will be slightly higher than the air temperature in the display area so a temperature probe should be used to check product temperatures To a...

Page 12: ...replace controller if found faulty Condenser radiator blocked Remove dust and debris Refrigeration controller faulty Replace controller Temperature probe damaged Replace temperature probe Fans not operating Have fans checked replaced HP pressure switch triggered Manually reset switch LP pressure switch triggered Allow switch to auto reset If it doesn t reset check for leaks Clear the alarm indicat...

Page 13: ...ouvers on the front and top of the cabinet This will maintain the refrigeration efficiency and prevent overheating Painted and Metal Surfaces Painted galvanised steel or aluminium surfaces should be cleaned with hot soapy water then dried off with paper towel or dry cloth DO NOT clean surfaces with abrasive pads or cleaners as paint galvanised steel and aluminium surfaces will be damaged Glass All...

Page 14: ...module can be removed by lifting it vertically to disengage the support brackets from the back panel Base Tray The base tray is mounted on runners and can be pulled forward for cleaning Back Plates Once the shelves have been removed and the base drawer slightly opened the back plates can be removed Lift the plate vertically to disengage it from the bottom location slot pull it forward then lower i...

Page 15: ...l off container has a capacity of five litres When cleaning DO NOT fill the well with liquid or attempt to hose it out as the condensate tray will overflow and leak onto the floor Cleaning Materials Steel trays shelves grills etc should be cleaned with hot soapy water then dried off with paper towel or dry cloth DO NOT use abrasive pads or cleaners as these may damage surfaces Warning Dishwasher d...

Page 16: ... all air vents The top air vents must be kept free of blockages at all times Condenser Radiator Pull off the louver panel and vacuum away any dust and fluff from the condenser radiator to maintain good refrigeration efficiency Be careful not to bend or distort the radiator fins In locations with elevated levels of air born dust or fluff the radiator should be checked frequently and an appropriate ...

Page 17: ...allocated working position and remove the front louvered panel With the feet raised rollers at front and rear enable easy manoeuvrability Using a spirit level adjust each front foot to ensure the cabinet is level from front to back and side to side If the floor is not level place packing under one of the castors Power Supply and Earthing The cabinet is fitted with a four metre mains lead located o...

Page 18: ...net may overheat and cause an electrical malfunction If the cabinet is installed in an alcove or under any structure a minimum clearance space of 200mm must exist above the cabinet top Before use operate the cabinet for 1 2 hours to remove any fumes or odours which may be present Draughts The door less cabinet features an air curtain to retain the cold air within the cabinet A curtain of cold air ...

Page 19: ...thout isolating the cabinet at the main switch or unplugging it from the electricity supply LED Lighting Strips Light is provided by an LED strip under the top of the cabinet The LED modules have a very long life but if they fail the complete strip should be replaced The LED strips are self adhesive with soldered connections Ensure correct polarity when reconnecting Be sure to replace this plastic...

Page 20: ...he lower back panel to gain access Compressor The scroll type compressor is hermetically sealed It is fitted with a dryer an auto reset Low Pressure and a manual reset High Pressure switch Two access ports are provided for pressure monitoring and charging with refrigerant Condensate Disposal The condensate disposal system consists of a water tray a water level detector and a boil off element with ...

Page 21: ...t heat even though condensate water is present and touching the water level probe Test First check the ACR unit has a 230V power supply Next check the Finder Level Control unit water sensing circuit by short circuiting the level sensor terminals B1 B3 Turn the cabinet power on and wait 10 seconds and then check if the ACR element heats If the element heats check for an open circuit in the water se...

Page 22: ...h a plug and socket and can be withdrawn to replace a faulty fan after removing the fixing screws The fan speeds are electronically programmed so the correct spare must be used Evaporator Coil The evaporator coil and temperature probes are accessed by removing the inside back panels of the cabinet Take care not to disturb the location of the two probes One is in the air flow the other in the coil ...

Page 23: ...ameters that can be easily programmed through the keyboard XR40CX Compressor Control The regulation is performed according to the temperature measured by the thermostat probe with a positive differential from the set point if the temperature increases and reaches set point plus differential the compressor is started and then turned off when the temperature reaches the set point value again In case...

Page 24: ...d value DOWN To see the min stored temperature in programming mode it browses the parameter codes or decreases the displayed value To switch the instrument off if onF oFF Not enabled To lock unlock the keyboard To enter into programming mode To return to the temperature display mode XR40CX LED Functions LED MODE FUNCTION ON Compressor enabled Flashing Anti short cycle delay enabled ON Defrost enab...

Page 25: ...d immediately release the SET key or wait for 5 seconds to display the probe temperature again XR40CX Change the Set point To change the set point value press the SET key for more than 2 seconds The value of the set point will be displayed and the C or F LED starts blinking To change the set value push the or arrows within 10s To memorise the new set point value push the SET key again or wait 10s ...

Page 26: ...a key NOTE 1 If no parameter is present in Pr1 after 3s the noP message is displayed Keep the keys pushed till the Pr2 message is displayed NOTE 2 The set value is stored even when the procedure is exited by waiting for the time out period to expire TO MOVE A PARAMETER FROM THE HIDDEN MENU TO THE FIRST LEVEL AND VICEVERSA Each parameter present in the HIDDEN MENU can be removed or put into THE FIR...

Page 27: ...le duration 0 0 24 0h 0 0 CCS Set point for continuous cycle 55 0 150 0 C 67 302 F 5 COn Compressor ON time with faulty probe 0 255 min 15 COF Compressor OFF time with faulty probe 0 255 min 30 CF Temperature measurement unit C F C rES Resolution in integer dE dec point dE Lod Probe displayed P1 P2 P1 rEd2 X REP display P1 P2 P3 P4 SEt dtr P1 dLy Display temperature delay 0 20 0 min 10 sec 0 dtr P...

Page 28: ...rm delay 0 255min 5 Nps Number of activation of pressure switch 0 15 15 odc Compress status when open door no Fan CPr F_C no rrd Regulation restart with door open alarm n Y y HES Differential for Energy Saving 30 C 30 C 54 F 54 F 0 Adr Serial address 0 247 1 PbC Kind of probe Ptc ntc ntc onF on off key enabling nu oFF ES nu dP1 Room probe display dP2 Evaporator probe display dP3 Third probe displa...

Page 29: ...ernal alarm i1 F bAL All outputs OFF CA Pressure switch alarm i1 F PAL All outputs OFF XR40CX Alarm Recovery Probe alarms P1 P2 P3 and P4 start some seconds after the fault in the related probe they automatically stop some seconds after the probe restarts normal operation Check connections before replacing the probe Temperature alarms HA LA HA2 and LA2 automatically stop as soon as the temperature...

Page 30: ... 36 base 0 99 shelves 0 35 base Refrigerant R404A R404A Refrigerant Charge Refer to cabinet Serial No Rating label Condensate capacity 5 litres 5 litres Climatic Class IP Rating All cabinets are suitable for class N climates and have an IP X0 rating Electrical VISAIR CABINETS SPECIFICATIONS CABINET MODEL IN VA10 A004 IN VA10 A005 Voltage 220 240 V 50 Hz 1 Power 2 1 kW 2 1 kW Energy Consumption 1 2...

Page 31: ...n Comp Off Time Faulty Probe CoF 6 Min Probe Displayed Lod P4 P1 P2 P3 P4 Defrost Terminate Temp dtE 3 degC Interval Between Defrosts IdF 2 Hrs Display During Defrost dFd DEF rt it Set DEF Probe For High Discharge Temp Alarm AP2 nP nP P1 P2 P3 P4 Digital Input Polarity i1P oP cL oP Digital Input Configuration i1F bAL EAL bAL PAL dor dEF AUS Htr ES Digital Input Alarm Delay did 1 Min Number Of Acti...

Page 32: ...icular requirements for commercial refrigerating appliances with an incorporated or remote refrigerant condensing unit or compressor Hazardous Substances The cabinet does not contain any of the following in its construction Asbestos PCBs Oils containing polychlorinated biphenyl Mercury Operational Safety This appliance is not intended for use by young children or infirm persons unless they have be...

Page 33: ...IN VA10 33 Future Products Group ELECTRICAL CIRCUIT DIAGRAMS Model IN VA10 A004 5 Visair Refrigerated Cabinets ...

Page 34: ...37 Mains EMI Line Filter 21370 Anti surge thermistor 10 Ohm 3A 22354 LED lighting strip cold 22337 Dixell XR40cx Refrigeration Controller 21219 NTC temperature probe 3 metre 15870 Pressure switch HP manual reset 17225 Pressure switch LP auto reset 17226 Fan Unada 200 dia evaporator fan 1300rpm 72912 Fan Unada 200 dia condenser fan 2000rpm 72914 MCB 6A 10522 1000 watt 230V condensate element 18051 ...

Page 35: ...IN VA10 35 Future Products Group MECHANICAL DRAWINGS Inline Visair IN VA10 A004 ...

Page 36: ...Part No 25553 Rev J November 2017 36 Visair Refrigerated Cabinets Inline Visair IN VA10 A005 ...

Page 37: ...IN VA10 37 Future Products Group ...

Page 38: ...Part No 25553 Rev J November 2017 38 Visair Refrigerated Cabinets ...

Page 39: ...IN VA10 39 Future Products Group ...

Page 40: ...Part No 25553 Rev J November 2017 ...

Reviews: