


2
MONTAGE
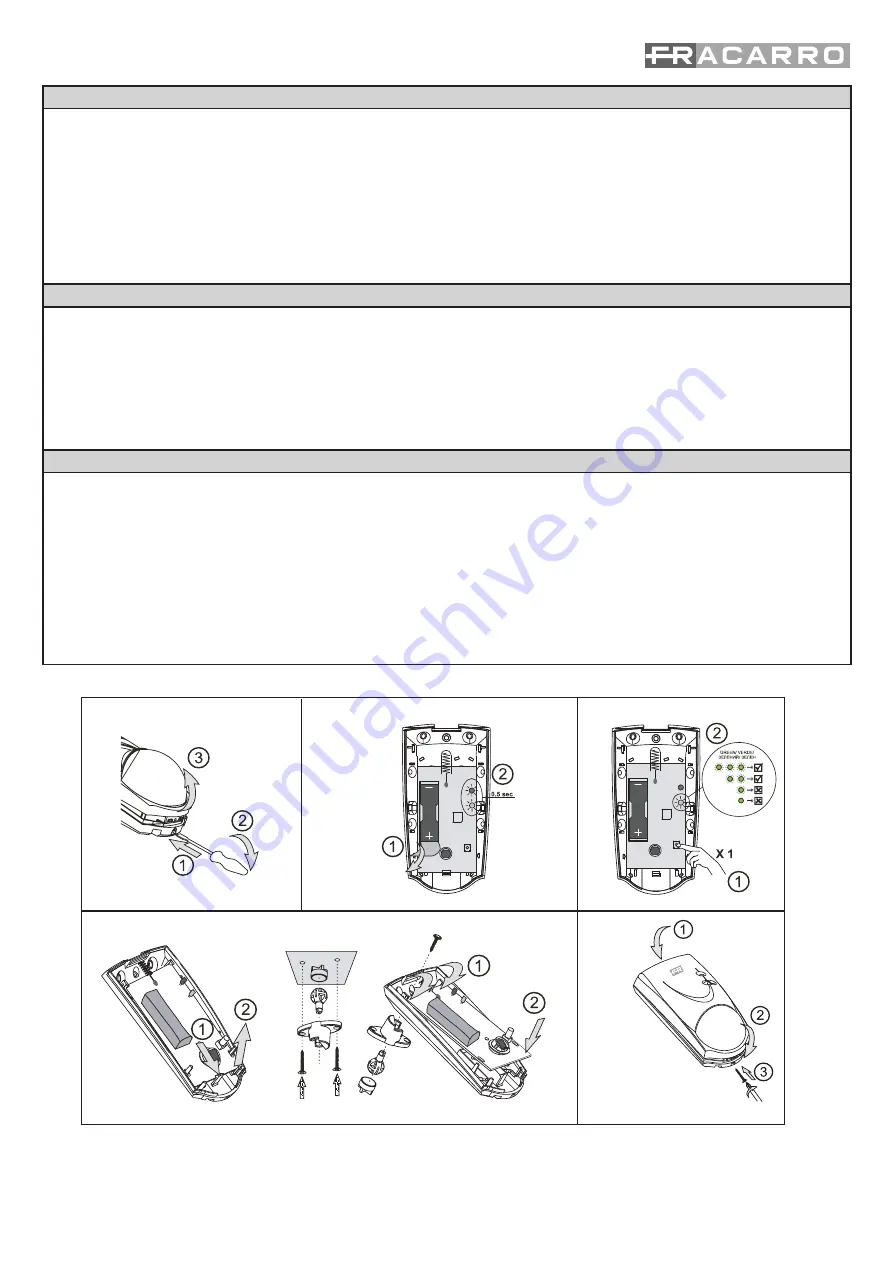
1. A l’aide d’un tournevis, enlevez les bases du capteur.
2. Retirez la feuille de protection la batterie. Après avoir rétabli la centrale en mode “Ajouter dispositifs”, appuyer une fois sur le
microswitch anti-ouverture du détecteur. Sur l’écran de la centrale on verra le dispositif acquéri. Sinon, appuyéz encore sur le
microswitch anti-ouverture du détecteur.
3. Identifiez le point optimal d’installation et démarrez le radio test en appuyant une fois sur le microswitch anti-ouverture. La LED
verte clignote 3 fois si le signal radio est fort; 2 s’il est bon; 1 ou pas de temps quand la communication radio est faible: en ce cas
on doit modifier le point d’installation. Pour sortir de la procédure de test, appuyer sur la touche tamper pendant 5 secondes (le
symbole “R” disparaît de l’écran de la station de tête).
4. Montez le détecteur au moins à 2 mètres au-dessous du sol. S’il est necessaire utiliser le joint WL04-SND (optionnel). Fermez les
couvercles du détecteur.
INSTALLATION
1. Using a screwdriver, open the container of the sensor.
2. Remove the protecting sheet of the battery. After you set the panel as “Add device” press once the button tamper of the device.
On the display of the panel you will see the device acquired. Otherwise press again the tamper button on the device.
3. After you select the place where the sensor must be installed, start the radio test pressing once the button tamper. The GREEN
LED blinks 3 times if the signal received is strong; 2 times if it’s medium. If the GREEN LED blinks 1 or no time, the radio com-
munication is weak and you must change the place of installation. To exit the Test procedure, keep the Tamper key pressed for
about 5 seconds (the “R” symbol displayed by the headend unit disappears).
4. Mount the sensor at height 2 metres min. If needed, use the joint WL04-SND (optional). Close the lid of the sensor.
SECUENCIA PARA LA INSTALACIÓN Y ADQUISICIÓN DEL DISPOSITIVO
1. Utilizando un destornillador, abrir el contenedor del sensor.
2. Retirar el papel de protección de la batería. Después de haber ajustado la central como “Agrega dispositivo” pulsar una vez el
botón tamper del dispositivo. Sobre el display de la central aparece el dispositivo adquirido. En el caso contrario volver a pulsar
el botón tamper del dispositivo.
3. Colocarse con el sensor sobre el lugar donde debe ser instalado y ejecutado el test radio pulsando una vez el botón tamper. Si
el led VERDE parpadea 2 o 3 veces, la recepción es perfecta. Si el led VERDE parpadea 3 veces, la recepción es perfecta; si
parpadea 2 veces es buena. Si el led VERDE parpadea 1 o ninguna vez, la comunicación radio es baja y el lugar de instalación
debe ser cambiado. Para salir del procedimiento de test mantenga pulsado el botón de sabotaje (tamper) unos 5 segundos (en
la pantalla de la central desaparece el símbolo “R”).
4. Instalar el sensor a una altura al menos de 2 metros. Si es necesario utilizar lo snodo WL04SND (opcionales) Cerrar la tapa del
sensor.
1
4
5
3
2


