70001025-MD250, 70002025-MD550, 71001025-MD750
71002025-MD1000, 71002025-EC1200, 72001025-MD1000
72001025-EC1200, 72002025-MD1250, 72002025-EC1200
73001025-MD1250, 73001025-EC1200, 73002025-MD1500
73002025-EC1900, 73002025-EP2000
Water Garden
Round
Customer Service: 1800-914-9835 |
© Frame It All. All Rights Reserved.
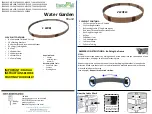
1 LEVEL KIT CONTAINS:
•
8 x Composite Timbers 4’ Curved
•
16 x Stacking Brackets
•
8 x Anchor/Ground Level Serrated Stakes
•
32 x Plugs/Locking Nubs
•
8 x Caps
•
1 x Rubber Liner
•
1 x Underlayment
•
1 x Water Pump
•
1 x Pump Tubing
ASSEMBLY INSTRUCTIONS
–
Building the Frame
STEP 1:
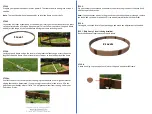
Assemble the curved timbers by sliding one end of the timber into the channel end of one
of the brackets. Use plugs to lock the bracket in place.
Repeat this process on the other end of the timber flipping the bracket in the opposite
direction. Make sure that all your curved timbers have brackets connected in the same
way with relation to the curve.
(see example).
Repeat for all curved timbers.
How the Joints Work
Use plugs (included)
to cover the holes on
both side of timbers
1 LEVEL
2 LEVELS
Use plugs to
cover the holes
–
two plugs are
required per
bracket (1 on
each side)
Use a Cap to
complete the
top level.
Use anchor
stakes for
ground level
frames and
stacking stakes
for additional
levels.
IMPORTANT: READ ALL
INSTRUCTIONS BEFORE
STARTING YOUR BUILD!
Required Tools:
•
Shovel
•
Levelling tool
•
Hammer
Recommended Tools:
•
Pond Safe Foam
Sealant
•
Grading Rake
2 LEVEL KIT CONTAINS:
•
16 x Composite Timbers 4’ Curved
•
32 x Stacking Brackets
•
8 x Stacking Stakes (**See Note Below)
•
8 x Anchor/Ground Level Serrated Stakes
•
64 x Plugs/Locking Nubs
•
8 x Caps
•
1 x Rubber Liner
•
1 x Underlayment
•
1 x Water Pump
•
1 x Pump Tubing
**NOTE
Stacking stakes should only be used
when stacking boards for water
garden application.
ONLY
Stacking Stakes can stack!
Use stacking
stake when
creating a multi-
level


