Customer Service: 1800-914-9835 |
© Frame It All. All Rights Reserved.
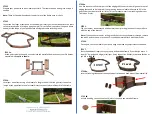
STEP 5.
Flip your anchor stakes around and hammer them into the ground until they are flush
with the top of the bracket.
Note:
If you encounter a point in the ground that you cannot hammer through, remove
the stake, and cut it down to size until it can be hammered flush with the bracket.
STEP 2.
Prepare your pond area to be as level as possible. The frame can also be dug into a slope if
need be.
Note
: There will be additional opportunities to level the frame once it is built.
STEP 3.
Layout the first layer of your pond as shown below. Insert your anchor stakes into the joints
so the serrated spike is facing up (see example). This will allow you to level the pond frame
and adjust the shape of your pond before driving the stakes into the ground.
STEP 3a.
At the points where the pond connects into the waterfall frame, connect your 2ft boards
assembled in
Step 1b
as
shown
:
STEP 4.
Level your pond frame using a line level or a long level tool that can go across the entire
length of the pond frame. Level at several cross sections to level all boards of the frame
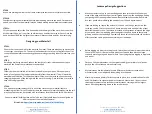
STEP 6.
Once again, check the level of your pond edge and make any adjustments as needed.
STEP 7.
Stack the additional layers onto your pond and waterfall frame. If your design uses a 2-
layer (11” height) pond edge, install your 3
-way connection boards in the same fashion as
you did in
Step 3a.
2 Level
STEP 8a.
Insert a finishing sleeve over the exposed part of stake on each side of the waterfall lip.
STEP 8b.
Attach finishing caps on top of each joint of the pond and waterfall frame.
STEP 4a.
Use flat stones or soil to shim parts of the edging that needs to rise or dig under areas of
edging that need to be lowered. If you are using stones to level make sure to fill in the
gaps under your boards with soil later. This will prevent water from running under your
liner when it rains.


