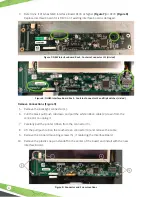
Figure 9: Connector and Screw Locations
4
4. Determine if ATG has NEW Interface Board REV4 or higher
(Figure 7)
or REV3
(Figure 8)
.
Replace interface board if it is REV3 or if existing interface board is damaged.
Figure 7: NEW Interface Board Rev 4. Contains Connector J11 (circled)
Figure 8: OLDER Interface Board Rev 3. Contains Connector J3 and Dip Switches (circled)
5. Remove the backlight connector (1).
6. Pull the black pull/push tab down and pull the white ribbon cable (2) down from the
connector to unplug it.
7. Carefully pull the printer ribbon from the connector (3).
8. Lift the pull/push tab on the touchscreen connector (4) and remove the cable.
9. Remove the 4 board mounting screws (5) , if replacing the Interface Board.
10. Remove the plastic snap-on standoff in the center of the board and install with the new
Interface Board.
Remove Connections (Figure 9).


