background image

26

27

MAINTENANCE & CARE

CLEANING:  

Wipe down the bike using a damp cloth.

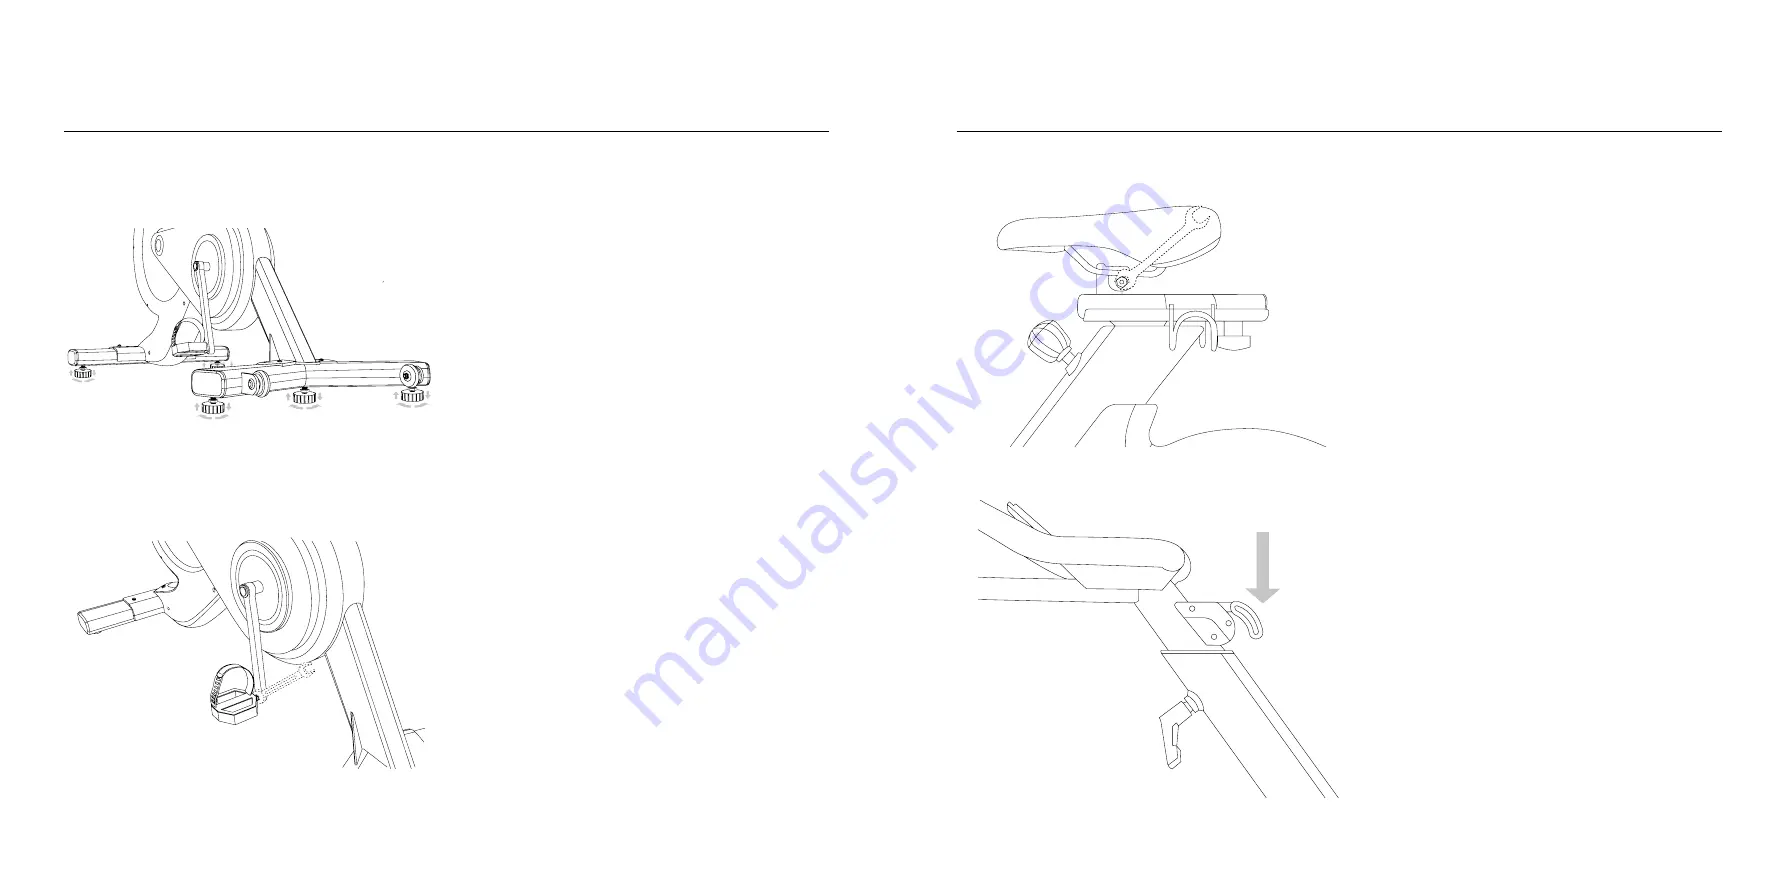
LEVELING FEET: 

 If the bike rocks back and forth, turn 

each leveling foot clockwise (when viewed from above) 

until it rests firmly on the ground.

EVERY 3 TO 5 RIDES

CLEANING:  

Clean the bike thoroughly using a damp 

cloth and a mild household cleaner diluted in water. 

Clean the touchscreen using an electronics wipe.

PEDALS:

  Tighten any loose pedal with the included 15 

mm wrench. Pedals should be tightened to 25 lb-ft of 

torque. Turn clockwise to tighten the right pedal and 

counterclockwise to tighten the left pedal.

MAINTENANCE & CARE

EVERY 3 TO 5 RIDES CONTINUED

CLEATS: 

Use a 4mm Allen wrench to tighten any loose 

screws attaching your cleats to your cycling shoes.

SADDLE: 

Make sure the saddle is parallel to the ground. 

Then use the included 13mm wrench to tighten the 

seat-fixing nuts on both sides.

EVERY 15 TO 20 RIDES

CAUTION: 

Service other than the procedures described 

here must be performed by an authorized technician.

EMERGENCY BRAKE: 

Press down on the resistance 

knob while pedaling slowly. The flywheel should come 

to a complete stop immediately. If it does not, stop 

using the bike immediately and contact freebeat 

Support.

FRAME: 

Check the entire frame for signs of wear and 

damage, and tighten any loose bolts.

AFTER  RIDES

To ensure safe operation and optimal performance, 

check for wear and damage and perform maintenance 

on a regular basis. Replace any damaged or defective 

parts immediately. Do not use the bike until the 

repair is performed. Only use original parts from the 

manufacturer. Changes or modifications to this unit not 

expressly approved by freebeat could void the warranty.

Summary of Contents for xbike

Page 1: ...01 xbike Instruction Manual...

Page 2: ...ve to any dull fitness routine that burdens us We built a fun interactive game to bring studio cycling and strength training experience home Our tech crew designs distinct computer generated special e...

Page 3: ...ral modifications e g removal or replacement of original parts mayendanger the safety of the user Damaged components may endanger your safety or reduce the lifetime of the equipment For this reason wr...

Page 4: ...d Always wear suitable shoes and clothes when using the equipment Don t wear loose clothes in case to be engulfed into the exercise bike Barefoot wearing high heel shoes wearing shoe leather are not a...

Page 5: ...UCHSCREEN POWER BUTTON HANDLEBAR SEAT EMERGENCY BRAKE DUMBBELL RACK SEAT HEIGHT ADJUSTMENT PIN HANDLEBAR ADJUSTMENT PIN SEAT DEPTH ADJUSTMENT PIN FLYWHEEL PEDAL LEVELING FEET TRANSPORT WHEELS SPECIFIC...

Page 6: ...port included Bluetooth 5 0 connectivity MEASUREMENTS Dimensions 39 37L 11 81W 32 48H inches Screen 21 5 diagonal Flywheel 18 7 lbs 8 5kg Weight 89 lbs SPECIFICATIONS SET UP Assembly Instructions 10 1...

Page 7: ...zer foot until it rests firmly and steadily on the floor ASSEMBLY INSTRUCTIONS STABILIZER FEET ADJUSTMENT The bike has adjustable stabilizer feet on each corner for a steady wobble free installation T...

Page 8: ...dumbbell stand welding Front pedestal assembly 1x 1x Rear pedestal assembly Handrail assembly Cushion Down Handrail cover Up Handrail cover Pedal left Pedal right 1x 1x 1x 1x 1x 1x 1x Console assembl...

Page 9: ...d head Allen screw round head Philips screw round head Washer 1x 1x 4x 4x ST4 2X19 M8X10 ST3 5X9 5 6 ASSEMBLY INSTRUCTIONS ASSEMBLY INSTRUCTIONS STEP 1 a Place the front bottom tube with wheels close...

Page 10: ...right cranks respectively on mainframe b R is marked on the axle core of the pedal on the right side and R is also marked on the crank Please double check and lock it clockwise to install c L is marke...

Page 11: ...Align on the back of L bracket and insert a piece of damping pads on both sides Use washer locknut and Allen screw to lock in STEP 7 a Insert the power plug into the socket with a lightning mark Inser...

Page 12: ...22 23 START App Connection APP CONNECTION TIME REMAINING LEADERBOARD LEADERBOARD ON BEAT RESISTANCE SINGLE BEAT CADENCE DOUBLE BEAT SCORE COMBO QUALITY 22...

Page 13: ...the tip of your extended fingers and the handlebar knob with your other hand Turn the knob on the seat depth adjustment pin counterclockwise to loosen Adjust the seat forward or backward until there i...

Page 14: ...s SADDLE Make sure the saddle is parallel to the ground Then use the included 13mm wrench to tighten the seat fixing nuts on both sides EVERY 15 TO 20 RIDES CAUTION Service other than the procedures d...

Page 15: ...ON Stochastic Process Technology Group Limited provides a limited warranty for your in home indoor non commercial use of the xbike A complete description of the terms and conditions of the limited war...

Page 16: ...tic Process Technology Group Limited customerservice freebeatfit com Manufacture WNQ Shanghai Body building Equipment Co Ltd Add No 388 Beiying Road Qingpu Area Shanghai China https freebeat afterserv...

Reviews: