background image

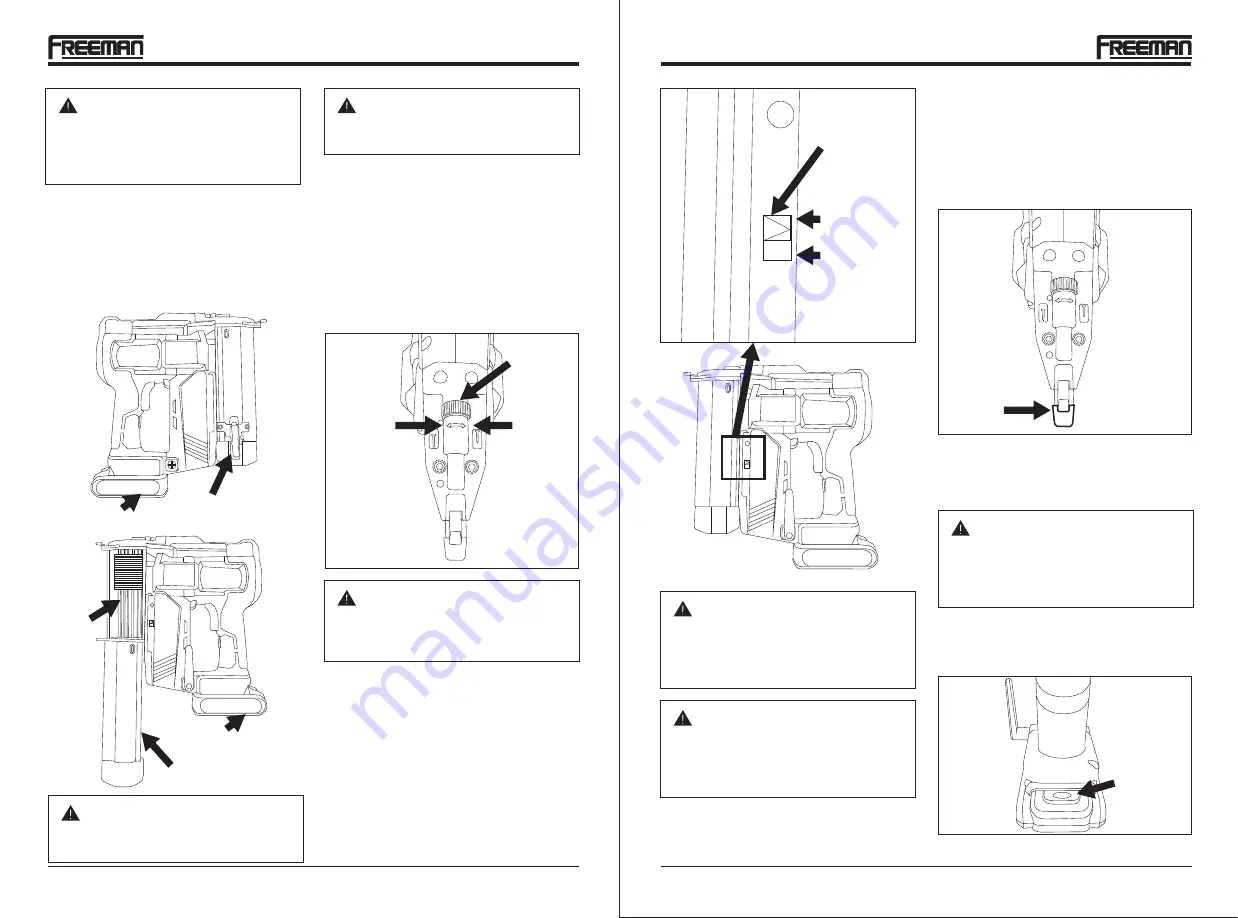
SETTING TOOL FIRING SETTINGS

1.

2.

Fire Selection

Switch

Single Sequential

Firing Position
Bump Fire

Position

DEPTH OF DRIVE

1.

2.

Depth 

Adjustment

Wheel (G)

Increase

Depth of

Drive

Decrease

Depth of

Drive

CAUTION:

It is advisable to test the depth of drive 

on a scrap workpiece to determine the 

required depth for the application.

WARNING:

Always unload all fasteners before 

removing the tool from service.

Push the fire selection switch up to select single 

sequential fire. This mode requires the trigger to 

be pulled each time a fastener is driven. The tool 

can be actuated by depressing the work contact 

element against the work surface after pulling the 

trigger.

Push the fire selection switch down to select bump 

fire. This will enable you to fire a shot by holding 

down the trigger and pressing the nose of the gun 

down on the work piece as many times as is 

necessary.

The driving depth of the fasteners is adjustable. To 

adjust the depth, use the drive depth adjustment 

wheel(G) on the top of the tools nose.

Rotate the depth adjustment wheel in a clockwise 

direction when the nose of the tool is pointed away 

from you to increase the fastener depth of drive.

Rotate the depth adjustment wheel in a counter-

clockwise direction when the nose of the tool is 

pointed away from you to decrease the depth of 

drive.

UNLOADING FASTENERS 

Remove Battery.

Push down on the latch button(A). Pull back on the 

magazine cover(B).

Remove all fasteners from the magazine rail(C). 

Push the magazine cover(B) forward until the latch 

button pops up.

1.

2.

3.

4.

Latch Button(A)

Magazine Cover(B)

Magazine Rail(C)

Battery

Battery

MODEL: PE2118G

HTTP://WWW.FREEMANTOOLS.COM

1-888-669-5672

09

MODEL: PE2118G

HTTP://WWW.FREEMANTOOLS.COM

1-888-669-5672

08

REMOVING BATTERY

1.

2.

Press battery release button.

Pull battery free of the nailer/stapler body.

Battery

Release

Button

WARNING:

Always know the operational mode of 

the tool before use. Failure to know the 

operational mode could result in death 

or serious personal injury. 

WARNING:

An improperly functioning tool must not

be used. Do not actuate the tool unless 

the tool is placed firmly against the work

place.

WORK CONTACT ELEMENT

Check the operation of the work contact element trip 

mechanism before each use. The WCE must move 

freely without binding through its entire travel 

distance. The WCE spring must return the WCE to its 

fully extended position after being depressed. Do not 

operate the tool if the WCE trip mechanism is not 

operating properly. Personal injury may occur. 

Work

Contact

Element

The no-mar pad attached to the nose of the tool helps 

to prevent marring and denting when working with 

softer woods.  

NO-MAR PAD

WARNING:

Disconnect the tool from the battery 

before removing or replacing the no-mar 

pad. Failure to do so could result in 

serious personal injury.

WARNING:

Always disconnect the power source 

before unloading.

WARNING:

Never load fasteners with the workpiece 

contact or trigger activated. Doing so 

could result in possible serious personal 

injury.

Summary of Contents for PE2118G

Page 1: ...MODEL PE2118G HTTP WWW FREEMANTOOLS COM 1 888 669 5672 PRIME GLOBAL PRODUCTS INC Failure to follow warnings could result in DEATH OR SERIOUS INJURY WARNING PE2118G V1 01 17...

Page 2: ...pproved hearing protection when using the tool Prolonged exposure to high intensity noise may cause hearing loss Dress properly Do not wear loose clothing or jewelry Keep your hair clothing and gloves...

Page 3: ...injury Do not use the tool as a hammer Never press the trigger of the tool when it is not intended to be used Do not drop or throw the tool Dropping or throwing the tool can result in damage that wil...

Page 4: ...ns leading to possible serious personal injury WARNING If any parts are missing do not operate this tool until the missing parts are replaced Failure to do so could result in serious personal injury T...

Page 5: ...he magazine cover B Remove all fasteners from the magazine rail C Push the magazine cover B forward until the latch button pops up 1 2 3 4 Latch Button A Magazine Cover B Magazine Rail C Battery Batte...

Page 6: ...ll traces of glue are removed Reinstall nails in the magazine and close the magazine cover 1 2 To charge the battery line up the slot of the battery with the slot of the charger and slide into place T...

Page 7: ...QG FOHDU WKH MDP IURP WKH JXQ 7KHQ SXVK WKH GULYH EODGH EDFN DQG UHLQVHUW WKH EDWWHU RDG PRUH IDVWHQHUV LQ WKH PDJD LQH QVHUW WKH IDVWHQHUV UHFRPPHQGHG E WKH PDQXIDFWXUHU OHDQ WKH QRVH SLHFH ZLWK SQHX...

Page 8: ...Repairs are required due to normal wear and tear The Nail Gun has been abused misused improperly maintained or operated including the failure to use clean dry regulated compressed air at the recommen...

Page 9: ...e un mejor control de la herramienta en situaciones imprevistas Usa siempre protecci n para los ojos El operador y las otras personas en el rea de trabajo deben usar siempre gafas de seguridad con pro...

Page 10: ...a bloquear las ranuras de ventilaci n y provocar un calor interno excesivo No utilice el cargador si ha recibido un golpe duro se ha ca do o se ha da ado de otro modo Lleve el cargador a un centro de...

Page 11: ...narse accidental mente y posiblemente causar lesiones REPARACI N DE LA HERRAMIENTA Usa nicamente accesorios identificados por el fabricante para ese modelo espec fico de herramienta La utilizaci n de...

Page 12: ...O PE2118G HTTP WWW FREEMANTOOLS COM 1 888 669 5672 22 ADVERTENCIA Siempre conozca el modo de funciona miento de la herramienta antes de usarla de lo contrario podr a ocasionar lesiones personales grav...

Page 13: ...se ha vuelto verde la bater a debe estar completamente cargada 1 2 3 CARGA DE LA BATER A Bater a Del Cargador Ranura Del Cargador Luces De Indicaci n EXTRACCI N DE LA BATER A 1 2 Presione el bot n de...

Page 14: ...aceite de la herramienta neum tica y un pa o limpio Limpie el polvor n de la nariz con aceite de la herramienta neum tica y un pa o limpio Vea el centro de servicio autorizado SOLUCI N DE PROBLEMAS AD...

Page 15: ...inadecuadamente la pistola para clavos o no se haya operado en forma apropiada o no se le haya dado el mantenimiento que correspond a incluyendo no usar aire comprimido regulado seco y limpio a la pre...

Page 16: ...inattendues Portez toujours des lunettes de s curit L op rateur et les autres personnes se trouvant dans la zone de travail doivent toujours porter des lunettes de s curit avec des crans de protection...

Page 17: ...ectrocution pourrait en d couler VVXUH YRXV TX LO Q D SDV GH FkEOHV pOHFWULTXHV GH WX DX GH JD RX G DXWUHV pOpPHQWV FDFKpV TXDQG YRXV WUDYDLOOH VXU XQH SLqFH H EULV GH FHV GHUQLHUV SRXUUDLW EOHVVHU O...

Page 18: ...HULH IDLEOH HW G XQ PDJDVLQ YLGH 03 75 9 DLGDQW j pFODLUHU OD VXUIDFH GH WUDYDLO 6 9 17 SRXU OD FRPSHQVDWLRQ GH MDPH 02 77 867 0 17 352 21 85 SRXU FRQWU OHU OD SURIRQGHXU G HQIRQFHPHQW GX GLVSRVLWLI G...

Page 19: ...LS COM 1 888 669 5672 36 AVERTISSEMENT Toujours conna tre le mode de fonctionnement de l outil avant utilisa tion Le d faut de conna tre le mode de fonctionnement peut entra ner la mort ou des blessur...

Page 20: ...er en place RUVTXH OD EDWWHULH VH FKDUJH OH YR DQW LQGLFDWHXU de la batterie devrait passer du vert au rouge RUVTXH OH YR DQW LQGLFDWHXU SDVVH DX YHUW OD EDWWHULH GHYUDLW rWUH HQWLqUHPHQW FKDUJpH 1 2...

Page 21: ...O HW pOLPLQH OH FRLQFHPHQW GH O RXWLO QVXLWH SRXVVH OD ODPH G HQWUDvQHPHQW YHUV O DUULqUH HW LQVpUH j QRXYHDX OD EDWWHULH MRXWH GHV GLVSRVLWLIV GH IL DWLRQ GDQV OH PDJDVLQ QVpUH OHV GLVSRVLWLIV GH IL...

Page 22: ...non autoris s ou non conformes a eu lieu Des r parations sont n cessaires en raison de l usure normale La cloueuse pneumatique a fail l objet d abus a t utilis e de fa on non appropri e incorrectement...

Page 23: ...HTTP WWW FREEMANTOOLS COM 1 888 669 5672 PRIME GLOBAL PRODUCTS INC...

Reviews: