background image

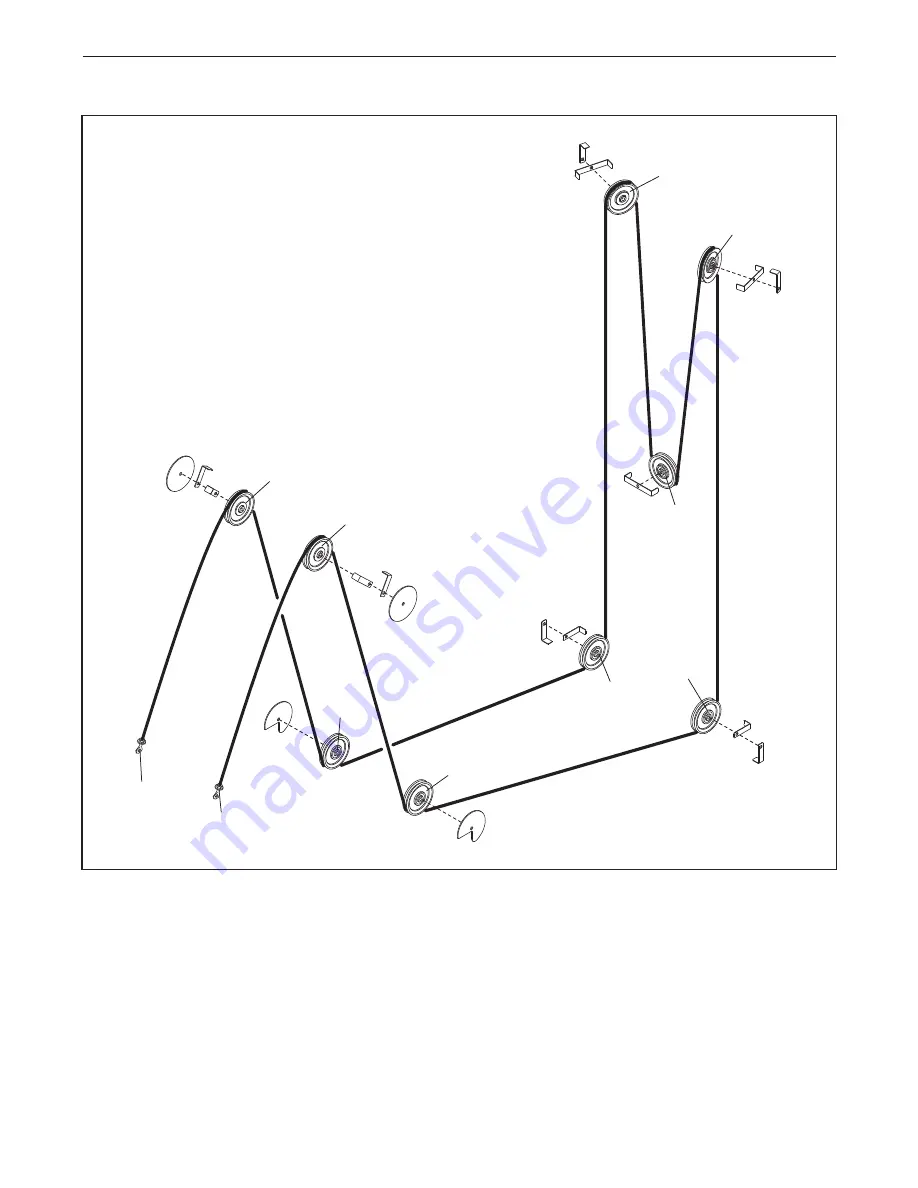
CABLE DIAGRAM

11

The cable diagram shows the proper route of the
cable. Use the diagram to make sure that the
cable and the cable guards have been assembled
correctly. If the cable has not been correctly rout-
ed, the strength machine will not function properly
and damage may occur. The numbers show the
correct route of the cable. 

Make sure that the

cable guards do not touch or bind the cable.

1

2

3

4

8

9

10

11

5

6

7

Summary of Contents for Squat GZFM6010.4

Page 1: ... Visit our website at www proform com new products prizes fitness tips and much more Visit our website at www healthrider com new products prizes fitness tips and much more Visit our website at www nordictrack com new products prizes fitness tips and much more Visit our website at www weiderfitness com new products prizes fitness tips and much more Visit our website at www weslo com new products p...

Page 2: ...RNING DECAL PLACEMENT 4 BEFORE YOU BEGIN 5 ADJUSTMENT 6 MAINTENANCE 7 CABLE DIAGRAM 11 PART LIST 13 EXPLODED DRAWING 14 HOW TO CONTACT CUSTOMER CARE Back Cover TABLE OF CONTENTS FREEMOTION is a registered trademark of ICON IP Inc ...

Page 3: ...e adequately informed of all precautions have read and understood all warning and caution labels and are informed of how to use the strength machine properly 7 Keep children under age 12 and pets away from the strength machine at all times 8 Keep hands and feet away from moving parts Do not lean on or rest your hands on the strength machine when it is in use 9 Always wear athletic shoes for foot p...

Page 4: ...al is missing or illegible see HOW TO CONTACT CUSTOMER CARE on the back cover of this manual Apply the decal in the location shown Note The decals may not be shown at actual size Decal 3 Inside the access cover Decal 4 Decal 2 Decal 1 Decal 1 Part No GZ7003 Decal 2 Part No GZ7005 Decal 3 Part No GZ7004 Decal 4 Part No GZ7026 ...

Page 5: ...ne your body build dramatic muscle size and strength or improve your cardiovascular system the strength equipment will help you to achieve the specific results you want For your benefit read this manual carefully before using the strength equipment If you have questions after reading this manual see HOW TO CONTACT CUSTOMER CARE on the back cover of this manual To help us assist you please note the...

Page 6: ...hould be one that will allow the squat exercise to be performed but not allow the user to become pinned under the shoulder pads if a repe tition cannot be completed Release the release handle and engage the pop pin into the adjustment bracket When finished with the exercise squeeze the release handle and raise the should pads Release the release handle and engage the pop pin into the adjustment br...

Page 7: ...loth damp ened with clean water and dry thoroughly CAUTION When using any cleaning product try it first in an unnoticeable place to ensure that there is no damage to the material Follow the directions and the safety precautions of the manufacturer of each clean ing product used FreeMotion Fitness and its vendors cannot be held liable for damage or injuries resulting from the use or misuse of clean...

Page 8: ...e cable paying close attention at the bends and attachment points Watch for the following conditions which may indi cate a worn cable in need of replacement A a torn or split cable sheath that exposes the cable B a kinked or severely bent cable C a curled or twisted sheath D a stretched cable sheath showing a thinning cross section Cable Guards Check the cable guards to ensure that they are not ru...

Page 9: ...NT on this page If necessary readjust the pulley 5 Replace the access cover Handle End Adjustment Tools required 1 8 hex key cable cutters utility knife torque wrench Note Make this adjustment only if the pulley in the top weight has been fully adjusted to the bottom of the slot as described above and the cable requires more tension This adjustment requires shortening the cable shorten only one en...

Page 10: ...y tap the bushing into place The bushings should be flush with the surface Note There are two sizes of bushings The slightly larger bushing is for the single hole in the top weight the smaller bushings are for the top and bottom of the cylindrical standoff 7 Clean and lubricate the guide rods by wiping them using a soft cloth containing automotive engine oil Apply only a light coating over the ent...

Page 11: ...he cable and the cable guards have been assembled correctly If the cable has not been correctly rout ed the strength machine will not function properly and damage may occur The numbers show the correct route of the cable Make sure that the cable guards do not touch or bind the cable 1 2 3 4 8 9 10 11 5 6 7 ...

Page 12: ...12 NOTES ...

Page 13: ...ge Weight Guide Bushing 30 4 Rubber Bumper 31 4 Nylon Spacer 32 4 Floor Bumper 33 2 Handgrip 34 1 Axle 35 2 Bearing 36 1 Cable Assembly 37 2 3 8 x 3 Non patch Bolt 38 2 1 Nylon Washer 39 4 3 8 x 1 Flat Head Bolt 40 1 3 8 x 2 1 4 Bolt 41 7 3 8 x 1 1 4 Bolt 42 8 3 8 x 1 2 Screw 43 1 3 8 x 3 Bolt 44 4 1 2 x 1 Flat Head Bolt 45 5 3 8 x 1 Bolt 46 2 3 8 x 3 4 Bolt 47 2 3 8 x 3 1 2 Bolt 48 2 1 Retainer R...

Page 14: ... 39 53 31 54 12 11 37 37 53 31 39 54 39 12 11 9 23 20 23 10 69 34 35 35 45 45 8 57 49 36 43 32 42 42 70 74 72 38 58 58 58 58 48 48 71 71 57 57 65 68 54 67 54 73 36 67 54 73 74 76 76 77 77 78 78 78 78 54 67 66 65 61 62 63 64 67 60 60 14 EXPLODED DRAWING Model No GZFM6010 4 R0907A Page 1 of 2 ...

Page 15: ...9 20 22 25 26 26 27 28 40 54 56 55 56 29 54 57 49 20 21 22 49 57 20 21 22 57 3 4 42 32 13 16 51 51 51 51 51 52 52 15 14 32 42 17 18 47 21 21 20 20 21 21 57 59 50 58 58 58 58 58 58 58 58 58 75 75 Page 2 of 2 ...

Page 16: ...roduct GZFM6010 4 The NAME of the product FREEMOTION SQUAT strength machine The SERIAL NUMBER of the product see the front cover of this manual When ordering replacement parts please also provide the KEY NUMBER and DESCRIPTION of the part s see the PART LIST and the EXPLODED DRAWING near the end of this manual HOW TO CONTACT CUSTOMER CARE Customer Care 1 800 201 2109 Monday Friday 8 a m 5 p m Moun...

Reviews: