background image

15

HOW TO PLUG IN THE INCLUDED POWER 

ADAPTER

The exercise bike can be used with or without the 

included power adapter. When the exercise bike is 

used without the power adapter, power will be supplied 

by an internal generator. 

IMPORTANT: If the exercise bike has been exposed 

to cold temperatures, allow it to warm to room 

temperature before you plug in the power adapter. 

If you do not do this, you may damage the console 

displays or other electronic components.

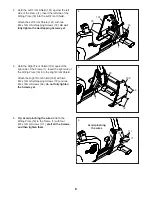
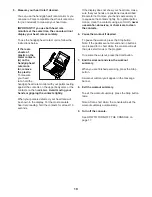
Plug the power adapter into the 

lower power receptacle (A) on 

the frame of the exercise bike. 

Then, plug the power adapter 

into an appropriate outlet that 

is properly installed in accor-

dance with all local codes and 

ordinances.

HOW TO PLUG IN THE DIGITAL TV POWER 

ADAPTER

If the exercise bike has an optional digital TV, the 

power adapter included with the digital TV must be 

used for the digital TV to operate. 

IMPORTANT: If the exercise bike has been exposed 

to cold temperatures, allow it to warm to room 

temperature before you plug in the power adapter. 

If you do not do this, you may damage the console 

displays or other electronic components.

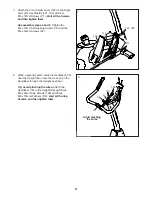
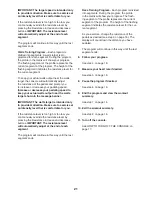
Plug the power adapter for 

the optional digital TV into the 

upper digital TV power recep-

tacle (B) on the frame of the 

exercise bike. Then, plug the 

power adapter into an appro-

priate outlet that is properly 

installed in accordance with all 

local codes and ordinances.

HOW TO CONNECT A COAXIAL CABLE TO THE 

EXERCISE BIKE

If the exercise bike has an optional digital TV, a 

coaxial cable must be connected to the exercise bike 

for cable or over-the-air TV stations to be viewed. 

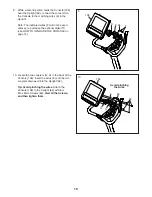
Locate the coaxial cable 

terminal (C) on the frame of 

the exercise bike. Connect the 

coaxial cable to the coaxial 

cable terminal. Route the 

coaxial cable so that it will not 

be pinched or crushed by the 

exercise bike. 

A satellite receiver, VCR, or DVD player can also be 

connected to the exercise bike. Connect a coaxial 

cable from the coaxial output on your equipment (usu-

ally labeled TV OUT or RF OUT) to the coaxial cable 

terminal (C) on the frame of the exercise bike.

Note: Audio/video equipment without coaxial outputs 

may be able to be connected directly to the optional 

digital TV; the optional digital TV has a variety of input 

receptacles.

WARRANTY INFORMATION

The warranty for this product does not cover damage 

or equipment failure caused by electric wiring not in 

compliance with electrical codes or the specifications 

in this manual, or failure to provide reasonable and 

necessary maintenance as outlined in this manual. 

Any failure or damage caused by unauthorized service; 

misuse; accident; negligence; improper assembly or 

installation; debris resulting from any destruction activi-

ties in the product’s environment; rust or corrosion as a 

result of the product’s location; alterations or modifica-

tions without written authorization; or failure on your 

part to use, operate, and maintain the product as set 

forth in this manual will void the warranty.

All terms of the warranty are void if this prod-

uct is moved beyond the continental borders of 

the United States of America (excluding Alaska, 

Hawaii, and Canada) and are then subject to the 

terms provided by that country’s local authorized 

Freemotion Fitness, Inc. representative.

A

C

HOW TO USE THE EXERCISE BIKE

B

Summary of Contents for u 8.9b

Page 1: ...ng this equipment Keep this manual for future reference Model No VMEX81418 0 Serial No Write the serial number in the space above for reference freemotionfitness com QUESTIONS If you have questions or...

Page 2: ...15 COMPLIANCE INFORMATION 24 MAINTENANCE AND TROUBLESHOOTING 25 EXERCISE GUIDELINES 26 PART LIST 28 EXPLODED DRAWING 30 HOW TO CONTACT CUSTOMER CARE Back Cover LIMITED WARRANTY Back Cover FREEMOTION a...

Page 3: ...earance around the exercise bike To protect the floor or carpet from damage place a mat under the exercise bike 6 Inspect and properly tighten all parts each time the exercise bike is used Replace any...

Page 4: ...esigned to make your workouts more effective and enjoyable For your benefit read this manual carefully before you use the exercise bike If you have questions after reading this manual please see the b...

Page 5: ...M4 x 16mm Screw 56 2 PART IDENTIFICATION CHART Use the drawings below to identify the small parts needed for assembly The number in parentheses below each drawing is the key number of the part from t...

Page 6: ...t To identify small parts see page 5 The following tools not included are required for assembly one adjustable wrench one Phillips screwdriver a set of metric hex keys Assembly may be easier if you ha...

Page 7: ...Upper TV Coaxial Cable 68 Slide the covers together and push the small cover A into the large cover B Then insert the excess wire into the Upright 66 Tip Avoid pinching the wires Attach the Upright 66...

Page 8: ...Self tapping Screws yet 5 Hold the Right Front Shield 102 against the right side of the Frame 1 Insert the right side of the Wiring Plate 18 into the Right Front Shield Attach the Right Front Shield 1...

Page 9: ...66 with three M8 x 25mm Cap Screws 109 and three M8 x 16mm Washers 110 start all the Cap Screws and then tighten them 70 66 C 109 110 7 Attach the Front Shield Cover 103 to the Right and Left Front Sh...

Page 10: ...urchase the optional digital TV see HOW TO UPGRADE THE CONSOLE on page 14 66 F D E E G H 106 9 10 Locate the two couplers G H in the back of the Console 106 Insert the wires E and the two couplers dow...

Page 11: ...oupler G that has a wire labeled In I and a wire labeled Out J See the inset drawing Unplug the wire labeled In I and the wire labeled Out J from the coupler G and discard the coupler See the lower dr...

Page 12: ...to the Upright 66 with two M5 x 12mm Screws 111 start both Screws and then tighten them 66 70 70 111 99 C C Avoid pinching the wires 13 100 13 Tip Avoid pinching the wires Attach the Rear Upright Cove...

Page 13: ...Avoid pinching the wires 98 111 111 111 14 84 35 1 15 Loosen the Adjustment Knob 35 and pull it outward Then insert the Seat Post 84 into the Frame 1 and release the Adjustment Knob Move the Seat Pos...

Page 14: ...this manual 9 17 16 Identify the right Pedal 17 Using an adjustable wrench firmly tighten the right Pedal clockwise into the Right Crank Arm 9 Firmly tighten the left Pedal not shown counterclockwise...

Page 15: ...bike for cable or over the air TV stations to be viewed Locate the coaxial cable terminal C on the frame of the exercise bike Connect the coaxial cable to the coaxial cable terminal Route the coaxial...

Page 16: ...r You can even connect your tablet to the console and use the iFit Smart Cardio Equipment app to record and track your workout information You can also use the charging port on the console to charge y...

Page 17: ...RKOUT OR PRESS START TO BEGIN will scroll across the message banner HOW TO TURN OFF THE CONSOLE If the pedals are not moved and no buttons are pressed for a short while the console will turn off autom...

Page 18: ...until a flashing light appears next to the displays in a repeating cycle When the quick start mode is selected the time display will show the elapsed time When a pro gram is selected the time display...

Page 19: ...rt rate reading hold the contacts for at least 15 seconds If the display does not show your heart rate make sure that your hands are positioned as described Be careful not to move your hands excessive...

Page 20: ...te Your maximum heart rate is estimated by subtracting your age from 220 For example if you are 30 years old your estimated maximum heart rate is 190 beats per minute 220 30 190 Therefore if you are 3...

Page 21: ...IMPORTANT The watts target is intended only to provide motivation Make sure to exercise at an intensity level that is comfortable for you If the resistance level is too high or too low you can manual...

Page 22: ...during the 30 second pairing mode or if you are not able to press the Start button within 60 seconds of connecting your tablet to the console press the iFit Sync button and repeat this step 3 Record...

Page 23: ...t the digital TV setup menu Chan increase and decrease buttons Press these buttons to navigate up and down in the digital TV menus Vol increase and decrease buttons Press these buttons to navigate rig...

Page 24: ...d on try to correct the interference by one or more of the following measures Reorient or relocate the receiving antenna Increase the separation between the equipment and the receiver Connect the equi...

Page 25: ...eep the console out of direct sunlight CONSOLE TROUBLESHOOTING If the console does not display your heart rate when you hold the handgrip heart rate monitor or if the dis played heart rate appears to...

Page 26: ...ic Exercise If your goal is to strengthen your cardiovascular system you must perform aerobic exercise which is activity that requires large amounts of oxygen for prolonged periods of time For aerobic...

Page 27: ...27 NOTES...

Page 28: ...x 10mm Flat Head Screw 52 1 Wear Cover 53 5 M5 x 10mm Nickel Screw 54 1 Left Rear Cover 55 1 Right Rear Shield 56 7 M4 x 16mm Screw 57 1 Rear Shield Cover 58 2 Shield Support 59 2 M4 x 76mm Screw 60...

Page 29: ...2 M8 Arc Washer 114 1 Rear Stabilizer 115 1 C SAFE Board 116 6 C SAFE USB Host Board Screw 117 1 Console Shelf 118 1 Tablet Shelf 119 1 Pulse Board 120 4 Pulse Board Screw 121 1 USB Host Board 122 1...

Page 30: ...29 31 36 36 38 39 39 33 37 37 40 41 41 43 46 46 48 50 52 45 47 44 49 51 35 51 53 60 61 63 68 64 69 81 83 82 92 110 19 34 42 67 112 22 30 6 6 66 89 53 65 107 107 108 108 41 8 10 10 12 2 7 9 11 14 14 1...

Page 31: ...B Model No VMEX81418 0 R0619A 57 54 56 56 56 58 58 59 55 111 111 111 49 98 99 100 105 111 111 111 117 118 87 86 122 116 1 101 103 102 85 104 104 56 56 111 111 111 111 79 79 79 85 106 56 115 123 88 12...

Page 32: ...to the original owner and is non transferable 2 The labor warranty applies only to products sold in the US and Canada Contact your authorized Freemotion Fitness dealer for details on labor coverage i...

Reviews: