background image

Part No. 378467 R0916A 

Printed in Taiwan © 2016 ICON Health & Fitness, Inc.

HOW TO CONTACT CUSTOMER CARE

If you have questions after reading this manual, or if parts are damaged or missing, please contact Customer 

Care at one of the phone numbers or addresses listed below. Please note the model number, serial number, 

and name of the product (see the front cover of this manual) before contacting Customer Care. If you are 

ordering replacement parts, please also note the key number and description of each part (see the PART 

LIST and the EXPLODED DRAWING near the end of this manual).

In the United States

Call: 1-800-201-2109, Mon.–Fri. 6 a.m.–6 p.m. MT

Email: customercare@freemotionfitness.com

Write: 

FreeMotion Fitness

1500 South 1000 West

Logan, UT 84321-9813

United States

Outside the United States

Call: 001-800-527-5417 or 001-435-786-3521, 

Mon.–Fri. 6 a.m.–3 p.m. USA Mountain Time

Email: intlcustomercare@freemotionfitness.com

This product is warranted for use in non-dues-paying 

institutional settings to include hotels, apartment fitness 

centers, corporate fitness centers, fire/police stations, 

and hospital/physical therapy settings. This product is 

not warranted for use in large, heavy-use settings such 

as health clubs, colleges/universities, community cen-

ters, or military installations; use of this product in such 

settings or use of this product for more than 6 hours per 

day will void this warranty.

WARRANTY PERIODS AND COVERAGE

FreeMotion Fitness warrants this product to be free from 

defects in workmanship and material under normal use and 

service conditions. Parts and labor are warranted for one (1) 

year, unless otherwise specified on the invoice.

The warranty period commences on the invoice date of 

purchase. Any parts repaired or replaced during this warranty 

period will be warranted for the remainder of the original war-

ranty period. 

CONDITIONS AND LIMITATIONS

The following will void the warranty on this product:

1.  This warranty applies only to the original owner and is 

non-transferable.

2.  The labor warranty applies only to products sold in the US 

and Canada. Contact your authorized FreeMotion Fitness 

dealer for details on labor coverage in your country.

3.  Any misuse, abuse, or improper service.

4.  Users who weigh more than the maximum user weight 

listed in this manual.

5.  Damage caused by moving the product or improper stor-

age including moving or storing the product on its side.

6.  Use or storage of the product outdoors or in high-humidity 

environments including spa and pool areas.

7.  Damage caused by improper wiring or insufficient 

electrical current. Note: This product may not have wiring.

This warranty shall not apply to the following:

1.  Cosmetic items including grips, decals, and labels.

2.  Pick-up and delivery or freight charges involved with a 

repair.

3.  Any problem as a result of improper assembly or delivery.

WHAT TO DO IF SERVICE IS REQUIRED

FreeMotion Fitness warranty service may be obtained by 

contacting the authorized dealer from which you purchased 

this product. Make sure to retain your original invoice and 

serial number information. If this product experiences a fail-

ure under the warranty terms set forth, FreeMotion Fitness 

shall provide at their option either repair, replacement, or 

refund of the purchase price. FreeMotion Fitness compen-

sates service providers for warranty trips within their service 

area. You may be charged additionally for service calls 

beyond this service area. 

FreeMotion Fitness is not responsible or liable for indirect, 

special, or consequential damages arising out of or in con-

nection with the use or performance of the product; damages 

with respect to any economic loss, loss of property, loss 

of revenues or profits, loss of enjoyment or use, or cost of 

removal or installation; or other consequential damages. 

Some regions do not allow the exclusion or limitation of con-

sequential damages. Accordingly, the above limitation may 

not apply to you. This warranty gives you specific rights, and 

you may have other rights that vary from region to region. 

TO CONTACT FREEMOTION FITNESS

See HOW TO CONTACT CUSTOMER CARE above.

LIMITED WARRANTY

Summary of Contents for U8.1

Page 1: ...this equipment Keep this manual for future reference Model No VMEX81414 1 Serial No Write the serial number in the space above for reference www freemotionfitness com QUESTIONS If you have questions...

Page 2: ...L PLACEMENT FREEMOTION is a registered trademark of ICON Health Fitness Inc POLAR is a registered trademark of Polar Electro Oy WARNING DECAL PLACEMENT 2 IMPORTANT PRECAUTIONS 3 BEFORE YOU BEGIN 4 PAR...

Page 3: ...t 0 6 m of clearance around the exercise bike To protect the floor or carpet from damage place a mat under the exercise bike 6 Inspect and properly tighten all parts regu larly Replace any worn parts...

Page 4: ...ures designed to make your workouts more effective and enjoyable For your benefit read this manual carefully before you use the exercise bike If you have questions after reading this manual please see...

Page 5: ...Use the drawings below to identify the small parts needed for assembly The number in parentheses below each drawing is the key number of the part from the PART LIST near the end of this manual The num...

Page 6: ...easier if you have a set of wrenches To avoid damaging parts do not use power tools ASSEMBLY 1 Have a second person hold the Upright 66 near the Frame 1 See the inset drawing Connect the Upper Main Wi...

Page 7: ...8 x 12mm Washers 108 start all the Screws and then tighten them 3 Loosen the Adjustment Knob 35 and pull it outward Then insert the Seat Post 84 into the Frame 1 and release the Adjustment Knob Move t...

Page 8: ...4 and the Front Top Cover 103 together around the Upright 66 Tip Be careful not to drop a screw between the Left and Right Front Shields 101 102 Attach the Front Top Cover 103 to the Front Shield Cove...

Page 9: ...three M8 x 30mm Screws 109 and three M8 Washers 110 start all the Screws and then tighten them 70 66 109 110 Avoid pinching the wires 7 7 Route the Left and Right Control Key Wires 81 82 and the Pulse...

Page 10: ...9 Avoid pinching the wires 83 42 81 82 66 106 106 8 Have a second person hold the Console 106 near the Upright 66 Connect the wires on the Console 106 to the Upper Main Wire 42 the Pulse Sensor Wire 8...

Page 11: ...he Upright 66 with two M5 x 12mm Screws 111 start both Screws and then tighten them 11 Tip Avoid pinching the wires Attach the Rear Upright Cover 100 to the Accessory Tray 99 and to the Upright 66 wit...

Page 12: ...figured to operate with an optional digital TV To learn about the features of the basic console see page 15 To learn about the features of the digital TV see the user s manual included with the digita...

Page 13: ...he power adapter If you do not do this you may damage the console displays or other electronic components Plug the power adapter for the optional digital TV into the upper digital TV power receptacle...

Page 14: ...llation debris resulting from any destruction activi ties in the product s environment rust or corrosion as a result of the product s location alterations or modifica tions without written authorizati...

Page 15: ...using the handgrip heart rate monitor or a Polar compatible chest heart rate monitor You can also use the charging port on the console to charge your USB compatible device while you exercise To activ...

Page 16: ...while you exercise To use the charging port plug a USB charging cable not included into the charging port on the side of the console and into the receptacle on your device make sure that the USB char...

Page 17: ...n will be shown When the lower displays are unlocked the workout information will be shown in a repeating cycle 5 Measure your heart rate if desired You can wear a Polar compatible chest heart rate mo...

Page 18: ...shown Exercise Time This display will show your total workout time in hours minutes and seconds HHMMSS Distance Covered This display will show the total distance that you pedaled in miles ML or kilom...

Page 19: ...am will then begin 5 Begin exercising The program is divided into segments One resistance level is programmed for each seg ment Note The same resistance level may be programmed for consecutive segment...

Page 20: ...press the Enter button The program will then begin If you selected a distance goal the words ENTER DISTANCE will scroll across the lower displays Press the numbered buttons to enter your desired dist...

Page 21: ...f you selected a calories goal the calories display will count down until your calories goal is reached See step 4 on page 16 9 Measure your heart rate if desired See step 5 on page 17 10 Pause the wo...

Page 22: ...d heart rate target appears in the matrix Then press the Enter button 5 Enter your age The words ENTER AGE will scroll across the lower displays Press the numbered buttons to enter your age If necessa...

Page 23: ...nue in this way until the last segment ends 8 Follow your progress See step 4 on page 16 9 Pause the workout if desired See step 6 on page 18 10 End the workout and view the workout summary See step 7...

Page 24: ...e flashing segment indicates the resistance level for the current segment To keep your actual watts output near the watts target the console will automatically adjust the resistance of the pedals and...

Page 25: ...t will then begin 6 Begin exercising The fitness test is divided into segments During the fitness test the profile in the matrix will show your progress The flashing segment of the profile represents...

Page 26: ...26 FITNESS TEST RESULTS CHARTS Male Test Result 5 4 3 2 1 Excellent Good Average Fair Poor Female Test Result 5 4 3 2 1 Excellent Good Average Fair Poor...

Page 27: ...tton to select the setting and return to the settings menu 4 Change settings as desired The following settings can be changed Language The selected language will appear in the displays The console wil...

Page 28: ...d on try to correct the interference by one or more of the following measures Reorient or relocate the receiving antenna Increase the separation between the equipment and the receiver Connect the equi...

Page 29: ...ot display your heart rate when you hold the handgrip heart rate monitor or if the dis played heart rate appears to be too high or too low see step 5 on page 17 If a replacement power adapter is neede...

Page 30: ...c Exercise If your goal is to strengthen your cardiovascular system you must perform aerobic exercise which is activity that requires large amounts of oxygen for prolonged periods of time For aerobic...

Page 31: ...31 NOTES...
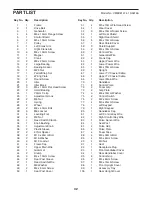
Page 32: ...0mm Flat Head Screw 52 1 Wear Cover 53 5 M5 x 10mm Nickel Screw 54 1 Left Rear Shield 55 1 Right Rear Shield 56 8 M4 x 16mm Screw 57 1 Rear Shield Cover 58 3 Shield Support 59 2 M4 x 76mm Screw 60 1 C...

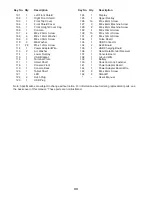
Page 33: ...1 Upper Overlay 126 10 M3 x 8mm Screw 127 3 M8 x 8mm Machine Screw 128 2 M5 x 8mm Machine Screw 129 4 M8 x 10mm Screw 130 15 M3 x 12mm Screw 131 8 M4 x 12mm Screw 132 1 Pulse Board 133 1 USB Connecto...

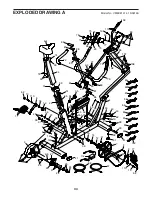
Page 34: ...17 20 21 23 26 28 30 32 25 22 24 27 29 31 34 36 36 38 39 39 33 140 139 35 37 37 40 41 142 141 143 143 41 43 46 46 48 50 52 45 45 44 47 49 51 51 53 60 61 63 66 68 62 62 64 69 70 72 71 74 74 76 78 79 7...

Page 35: ...34 57 54 56 56 56 58 58 59 55 111 111 111 49 98 99 100 105 111 111 101 103 102 104 65 111 111 111 111 111 111 58 114 115 116 117 118 119 120 121 122 123 124 125 126 126 126 126 127 128 129 130 130 127...

Page 36: ...y to the original owner and is non transferable 2 The labor warranty applies only to products sold in the US and Canada Contact your authorized FreeMotion Fitness dealer for details on labor coverage...

Reviews: