background image

FREEWHEELING YOUR SCOOTER

If for the reasons of convenience, you require to push your scooter for a short distance, the drive 

system can be put into "freewheel mode". This will allow your scooter to roll freely.

1. Freewheel Procedure:

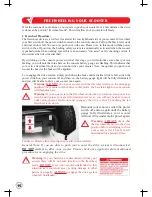
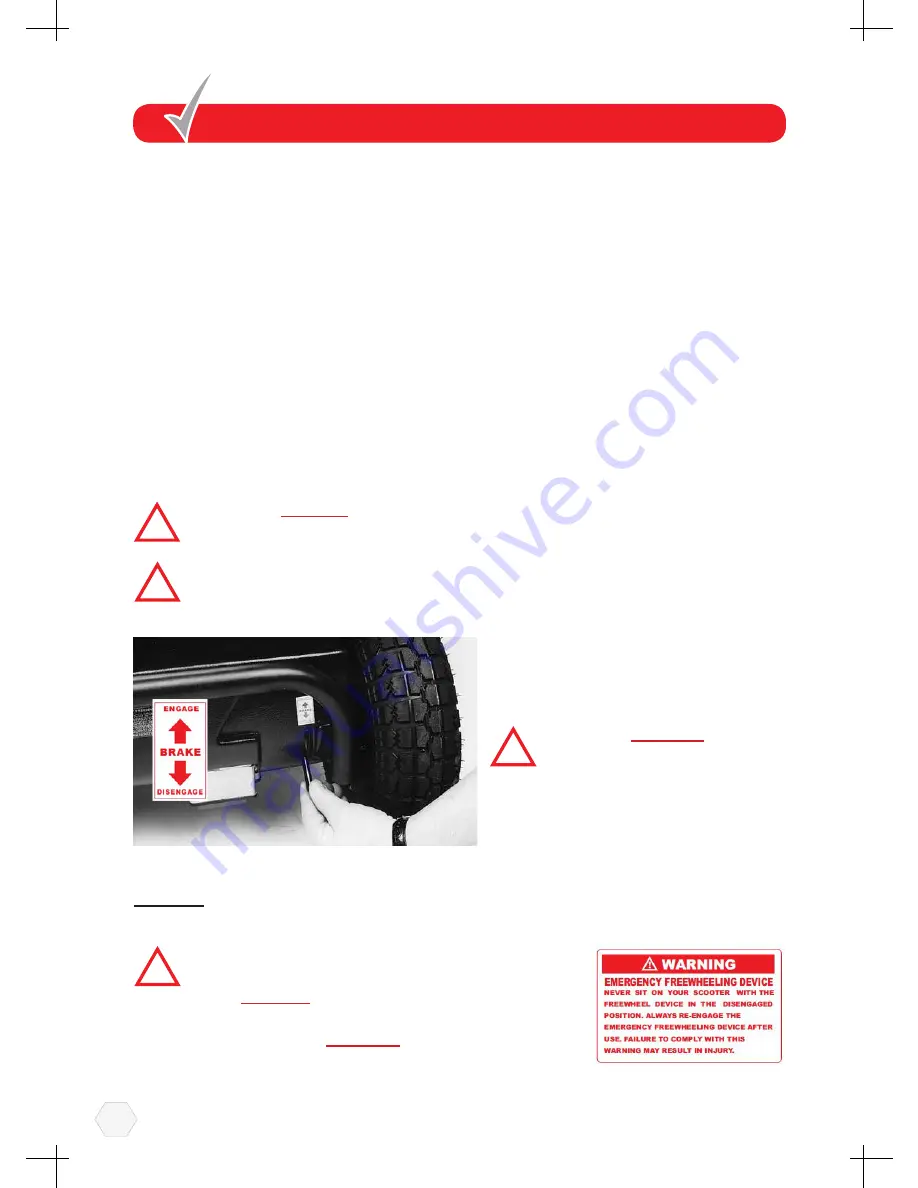
The freewheel device is a red lever located at the rear right hand side of your scooter.To freewheel 

your first switch off the power switch located on the control console. Pull up the black lever until 

a distinct click is felt. You can now push your with ease. Please note, in this mode withthe power 

switch in the off position, the braking safety system is automatically activated when the scooter 

is pushed quicker than walking speed, this is an automatic "run away" safety checking system, it 

also reduces the risk of casual theft.

By switching on the console power switch at this stage you will introduce some heavy motor 

braking, you will note that nine bars on the console battery gauge are flashing. This indicates that 

your is in a freewheel mode and you cannot drive your scooter. Note, the quicker you push your 

scooter the heavier the brake will be applied.

To re-engage the drive system, simply push down the brake until a distinct click is felt, switch the 

power switch on your console off and then on, the battery gauge light will be fully illuminated 

and you will be able to drive your scooter once again.

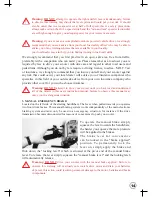
Warning:


DO NOT

 sit on your scooter with the freewheel device in the disengage 

position. Your scooter will not drive in this mode , the bar status light on your console 

will flash nine bars.

Warning:

 If your scooter is in the freewheel mode when you turn on your power key 

switch and depress your speed forward-reverse lever, you will not be able to move 

under motor power, Dismount and re-engage the drive system by pushing the red 

freewheel lever down.

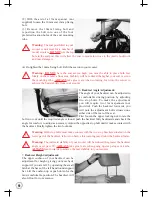
Remount your scooter, switch the power 

switch off and on again until the battery 

gauge fully illuminates, your scooter 

will now drive under motor power again.

Warning:


ALWAYS

 check that 

the freewheel device is in the drive 

position before attempting to drive 

your scooter after it has been left 

unattended for a period of time.

Failure to observe this warning may result in an accident.

General Note: If you are able to push your scooter the drive system is disconnected. 

DO NOT

 attempt to drive your scooter. Please check once again the afore mentioned 

procedure for re-engaging the drive.

Warning:

 If your batteries are disconnected from your 

scooter there will be no brake function in the freewheel 

mode. 

DO NOT

 leave your scooter unattended in this 

situation as it could roll away causing damage to other 

parties or property. 

ALWAYS 

re-engage the drive system 

when left unattended.

15

Summary of Contents for 510GDX

Page 1: ...USER S INSTRUCTION MANUAL 510GDX ATTENTION Read all parts in this manual before operating your scooter ...

Page 2: ...s and explanations in this manual and the product you have purchased The latest current version of this manual is available on our website Freerider dealer ________________________________________________________ Address ______________________________________________________________ Phone Number ________________________________________________________ Purchase Date ______________________ Serial Nu...

Page 3: ...ecification can be found at the rear of this manual Using your scooter safely also depends upon your good judgment and common sense as well as that of your dealer caregiver or health professional CONTENTS Introduction 3 Purpose of your scooter 3 Rules for safe use 4 Getting to know your scooter 6 Comfort adjustments 7 Operating your scooter 9 Freewheeling your scooter 11 Safety instructions warnin...

Page 4: ...f dependable service Please remember that when it comes to service and repairs your authorized dealer knows your scooter best PURPOSE OF YOUR SCOOTER The scooter provides transportation for an elderly or disabled person It can be used in a variety of indoor and outdoor settings The intended user should possess some degree of ability with the use of both arms and hands reasonable balance and good e...

Page 5: ...ying weight DO NOT reverse your scooter onto uneven inclines or surfaces Be cautious when traversing slopes DO NOT drive your scooter in a confined space unless the speed adjustment dial is set low DO NOT turn suddenly at full speed especially on uneven or sloping ground DO NOT drive your scooter where you cannot safely or legally walk DO NOT drive your scooter unless the seat is locked into the d...

Page 6: ...rrosive ALWAYS wash salt splashing from the metal parts of your scooter with hot soapy water as soon as possible DO NOT drive on motorways highways i e those with a speed limit of over 50mph cycle lanes or in bus lanes ALWAYS switch your lights on at night or in poor visibility Wear reflective clothing If unintended movement or brake release occurs turn the scooter OFF as soon as it is safe Report...

Page 7: ...eering handlebars regulate speed and braking Three independent braking systems Steering is controlled by a handlebar attached to a linkage system containing front wheels State of the art micro controller electronics ensures a smooth comfortable and safe drive on all surfaces and gradients 4 8 m p h speed switch selection Automatically charging system Front and rear suspension via sprung hydraulic ...

Page 8: ...g the seat failure to observe this may result in unnecessary wear of the seat post Removing seat from scooter The seat mounting post is designed with a special one position lifting point this will prevent the seat from inadvertently dismounting itself in the case of an accidental upset ofthe scooter The seat can be demounted by turning the seat 90o to right or left from the forward driving positio...

Page 9: ...ing or forward by hitching As soon as the lever is released the seat will lock into the new position Warning DO NOT carry out this operation when your scooter is moving first stop apply the brakes and then carry out the seat positioning Caution Test that the seat has fully locked by hitching backwards and forwards The seat as fitted to your scooter has a fold down backrest The seat has four height...

Page 10: ...s to achieve the best stability for your scooter 7 Backrest Height Adjustment The upper cushion of your backrest can be adjustment for height giving you more back support if you are tall by operating the small latch at the base of the left hand round support bar Lift the cushion up or push down for the most comfortable position The headrest will also lift out for convenience 2 With the aid of a 17...

Page 11: ... is designed to allow you to position it in a comfortable driving position It can be locked into numerous positions or unlocked to move freely for transportation The handlebar lock is operated by a black lever positioned on the right hand side of the handlebar To release the handlebar from a locked position pull the black lever upwards the handlebar will now move freely but under mild tension To l...

Page 12: ...n Indicator Light Switch 9 10 2 Front Rear Light Switch Speed Adjustment Dial 1 6 Diection Warning Lights Diection Warning Lights 7 8 4mph Lo Speed Warning Light Caution The speed adjustment dial 1 works in conjunction with the 4 8mph speed switch 2 if both are set to their lowest settings there may not be sufficient power delivered to the motor to drive your scooter in this case turn the speed di...

Page 13: ...you will note the direction warning light on your console flashing quicker than normal in this situation the appropriate bulb should be substituted 5 6 7 8 Batter Status Indicator Light Located at the top of your console This is a 10 bar segmented colour illuminated display which indicates when your scooter is switched on it also displays the status of the batteries the speed controller and the sc...

Page 14: ...ss This function should only be used in emergencies You will not that both green direction lights at the top of your console are flashing to warn you the hazard system is in operation To cancel the hazard warning simply press and release the red triangular button 2 FORWARD REVERSE SPEED AND BRAKING LEVER Located under the handlebar grips Your speed and braking in forward and reverse motion is cont...

Page 15: ...lise in this field or you could seek advice from your own insurance company who provide other cover for you such as house insurance Warning DO NOT attempt to drive your scooter until you have read and understood all of the details in this users instruction manual failure to observe this manual may place you in a dangerous situation 3 MANUAL EMERGENCY BRAKE Located on the left side of the steering ...

Page 16: ...n the battery gauge light will be fully illuminated and you will be able to drive your scooter once again Warning DO NOT sit on your scooter with the freewheel device in the disengage position Your scooter will not drive in this mode the bar status light on your console will flash nine bars Warning If your scooter is in the freewheel mode when you turn on your power key switch and depress your spe...

Page 17: ... scooter you will probably encounter situations in which you will need some practice Simply take your time and you will soon become confident and in control as you manoeuvre through doorways on and off elevators up and down ramps and over moderate terrain Below are some tips precautions and other safety measures that will help you to become accustomed to the safe operation of your scooter SAFETY C...

Page 18: ...rupt directional changes DO NOT corner at high speed If you feel that you may tip over in a corner reduce your speed and steering angle to prevent your scooter from tipping It is ALWAYS advisable when cornering to lean towards the corner just as you would on a bicycle this will enhance the sideways stability of your scooter BRAKING Your scooter is equipped with two powerful electronic brake system...

Page 19: ...ND ROADWAY DRIVING Your scooter must be driven with due care and compliance with the Road Traffic Acts and conditions of the Highway Code ALWAYS obey all local pedestrian traffic rules Wait until your path is clear of traffic and then proceed with extreme caution Warning Your scooter can decelerate very quickly DO NOT decelerate or turn abruptly when travelling at high speed unless absolutely nece...

Page 20: ...ll ingress of salts DO NOT use a power hose DO NOT operate your scooter if it has been exposed to moisture until has been thoroughly dried out Warning The dealer recommends that you DO NOT operate your scooter in icy or slippery conditions or on salted surfaces i e roads and pavements etc Such use may result in accident personal injury or adversely affect the performance and safety of your scooter...

Page 21: ...r wheels Your tyres are designed for low speed use on pavements and roads They are not for high speeds such as in vehicles designed to travel at speeds in excess of 15 mph Warning DO NOT sit on your scooter while it is in a moving vehicle Personal injury may result Warning ALWAYS make certain that your scooter is properly secured when being transported Failure to comply may result in personal inju...

Page 22: ...th extreme caution as you approach the downgrade of a ramp or other incline sit right back in your seat brace your arms on the handlebars and your feet on the floorboard Take a wide arc with your scooter s front wheels around tight corners your rear wheels will follow preventing you from cutting the corner short and bumping or getting hung up on raised kerbs When descending an incline keep your sp...

Page 23: ...our scooter electronics incorporate a sleep time mode following fifteen minutes of inactivity your scooter will automatically switch itself off To start again simply switch your scooter off then on again Warning If you anticipate being seated in a stationary position for an extended period of time turn off the power key switch this will prevent unexpected motion due to inadvertent movement of the ...

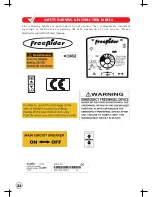
Page 24: ...NSTRUCTION LABELS The following labels are positioned on your scooter they communicate important warnings or instructions regarding the safe operation of your scooter Please familiarize yourself with their location 23 ...

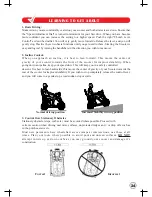
Page 25: ...for improved stability When going down an incline keep your speed slow This will keep you in a safely controlled descent It is best to lean backwards this moves the center of gravity of your Scooter towards the rear of the scooter for improved stability If you wish to stop completely release the control lever and you will come to a gentle stop avoid sudden stop or starts Normal driving position In...

Page 26: ...y chance of a rear or forward upset PLEASE Note The rear stability of your scooter is dependent on a number of factors which you should consider before attempting to climb an incline or other obstacle a Your height b The height of your seat c Your weight d The angle of the incline you are attempting to climb All of these factors can affect the rear stability of your scooter If you are unsure of yo...

Page 27: ...ine condition The metal framework of your scooter should be cleaned twice a year and any paintwork damaged should be treated to prevent further attack from the elements Wash regularly if contact is made with road or sea salt this is very corrosive DO NOT store your scooter in damp conditions This may affect the electronics if left for very long periods of time Moisture if left unattended can cause...

Page 28: ...nd it does not slow down quickly please do not use your machine and contact your dealer Caution Take care when handling the transmission keep well away from clothing It is normal to find a light film of lubrication around this part MANUAL EMERGENCY BRAKE The manually operated Emergency Brake is designed to be operated only in the case of mechanical or electronic failure to the motor and driving br...

Page 29: ... any spacer washers or bushes are correctly located Tighten the special nyloc locking centre nut Note If the plastic locking ring on the nut is damaged the nut should be replaced Note The rear wheel hubs are located to the drive axle by a steel key If the hubs need removing for service you will first need to remove the hub centre nut with a 19mm spanner Please note the hub fits firmly onto the dri...

Page 30: ...batteries ALWAYS insist on the model fitted as original equipment to your scooter DO NOT use less expensive car starter batteries If in doubt consult your local dealer Please note The charger supplied with your scooter is specifically designed for sealed type batteries and may not work correctly with other battery designs LUBRICATION The scooter has been designed with low maintenance in mind Wheel...

Page 31: ...heel hub key All wheel bolts Drive axle securing nuts Motor mounting bolts Magnetic motor brake disc and function Manual brake shoe lining wear Main control box electrical connections Main wiring loom for damage All steering components Clean chassis and repaint any exposed parts Lubricate on off power key barrel with light oil Replace any damaged axle seals Cycle test charger for full operation fu...

Page 32: ... released i e pushed upwards Support steering column With a 10mm spanner not supplied loosen the locking nut positioned on the opposite side to the black locking lever Next to the locking nut is a chrome threaded clamping nut this has a slightly tapered shape Turn this clamping nut clockwise approximately a quarter of a turn Push the black clamping lever down and test that the tiller is tightly he...

Page 33: ...certain the red black terminal covers are secured over each terminal 4 Position each battery onto the scooter frame 5 Secure the two batteries into position with the clamp bracket J bolt and wing nut supplied Note The J bolt hooks into an 8mm hole situated in the seat post support bracket 6 Connect the two grey plugs of the batteries into the two grey sockets of the wiring circuit 7 Switch on your...

Page 34: ...t your carrier prior to departure as they will need advance warning that you wish them to carry batteries Please note Each carrier reserves the right not to carry what may be termed HAZARDOUS CARGO The dealer cannot be held responsible for their final decision BATTERY CHARGER The battery charger supplied is special to your scooter and it may not be suitable for any other powered mobility product O...

Page 35: ...gy to power your vehicle When you ride your scooter the drive motor consumes the energy stored in the batteries The battery s energy is gradually reduced over the period of driving time and will need to be replaced before you can use your scooter again Similar to the situation with a motor car in that you need to replenish the fuel as it is used up as energy likewise with your scooter you need to ...

Page 36: ... your batteries will provide safe and reliable operation 1 2 Depth of discharge The amount of energy you have removed from your batteries when driving your scooter Battery age This is due to the changes in their internal electrical resistance 1 2 3 If you use your vehicle during the day put it on charge as soon as you have finished using it The Charger is fully automatic so it will not overcharge ...

Page 37: ...ensive use of their scooter This is termed Cycle Life Batteries have a defined number of discharge cycles they can make i e the more times you use your scooter the more cycles your battery will make the shorter their life span If you take time to run in your batteries properly it will be worth it Remember how long your batteries will provide service is quite often a reflection of the care they rec...

Page 38: ...e flexible cord should be suitably prepared and the correct plug fitted If any other type of plug is used a 5amp fuse must be fitted either in the plug adaptor or at the distribution board PLUG WIRING INSTRUCTIONS Important The wires in the mains lead are coloured in accordance with the following code Blue neutral Brown live As these colours may not correspond with the coloured markings identifyin...

Page 39: ...ccasions a temporary overload on the electric circuit can occur for instance when climbing a steep incline If this happens reset the circuit breaker wait for two minutes to allow the temperature activated switch to cool down Locate the plunger on the circuit breaker through the access hole Place a finger onto the circuit breaker and press down on the plunger until it remains down You are now ready...

Page 40: ...e fusing Locate and lift the fuse block on its wire lift up the fuse lid and withdraw the red fuse Replace the blown fuse with recommended 10 amp pink fuse close fuse lid and replace fuse block The scooter only uses a fuse of a 10 amp rating Please note this size of fuse has been selected to give your scooter the best protection without premature fusing Warning DO NOT use fuses with a higher ratin...

Page 41: ...long The scooter may have stalled Turn the controller off leave for a few minutes and turn back on again The motor may be faulty Check the motor and associated connections and wiring 5 Park Brake Fault Either a park brake release switch is active or the park brake is faulty Check the park brake and associated connections and wiring Ensure any associated switches are in their correct positions 6 Th...

Page 42: ...Per Charge 1 5 30 miles 48 km Ground Clearance 3 5 inches 8 8 cm Weight Capacity 500 lbs 227 kg Standard Seating Type Foldable Weight w armrests lbs kg Material Grey Vinyl Dimensions 19 inches 49 cm depth 19 inches 48 cm width Drive System Rear wheel drive sealed transaxle 24 volt DC motor Suspension Front and rear shock absorber Dual Braking System Electronic regenerative and electromechanical Ti...

Page 43: ...re pressure Due to manufacturing tolerances and continual product improvement length width turning radius and ground clearance can be subject to variance of or 3 Varies with user weight terrain type battery amp hour AH battery charge battery condition and tire condition These specifications can be subject to a variance of 10 Due to manufacturing tolerances and continual product improvement this sp...

Page 44: ...28 ...
Page 45: ...liance Electrical System 24 volt DC Drive System Rear wheel direct drive via sealed drive axle Brake Automatic dynamic regenerating braking system with spring activated magnetic solenoid parking brake Free wheel facility Manual brake to front wheels Modular Design Easily dismantled into six basic pieces for convenient transporting Adjustable Locking Tiller For driving comfort Proportional Speed Co...

Page 46: ... holder STICK CRUTCH HOLDER ldeal way to carry your walking aids REAR BASKET LOCKABLE STORAGE BOX REAR BASKET Provides easily accessible additional carrying capacity for shopping Basket maximum load 2 kg 4 5 lbs LOCKABLE STORAGE BOX This smart storage box allows you to lock away your valuable items when leaving your scooter unsupervised Maximum load 2 kg 4 5 lbs Please note Accessories illustrated...

Page 47: ...e in certain conditions Moisture and salt may corrode parts left unattended proprietary auto cleaner polishes should be used to prevent long term damage Failure to clean and protect these components may void your warranty SPEED CONTROLLER Servicing of the speed controller or battery charger must ONLY be carried out by your local authorised distributor Any attempt to open or dismantle these items r...

Page 48: ...e dealer will also benefit from a documented record and this book should accompany the scooter when service or repair work is carried out The service dealer will complete this section and return the book to you DETAILS OF WORK CARRIED OUT DEALER STAMP DATE INITIALS DETAILS OF WORK CARRIED OUT DEALER STAMP DATE INITIALS DETAILS OF WORK CARRIED OUT DEALER STAMP DATE INITIALS DETAILS OF WORK CARRIED ...

Page 49: ...aohsiung Facility No 22 Bengong 5th Rd Gangshan Dist Kaohsiung City 820 Taiwan R O C Tel 886 7 6223093 Fax 886 7 6230373 Email sales freerider com tw http www freerider com tw http www luggie com tw TO BE FILLED IN BY LOCAL DEALER YOUR LOCAL DEALER ...

Reviews: