background image

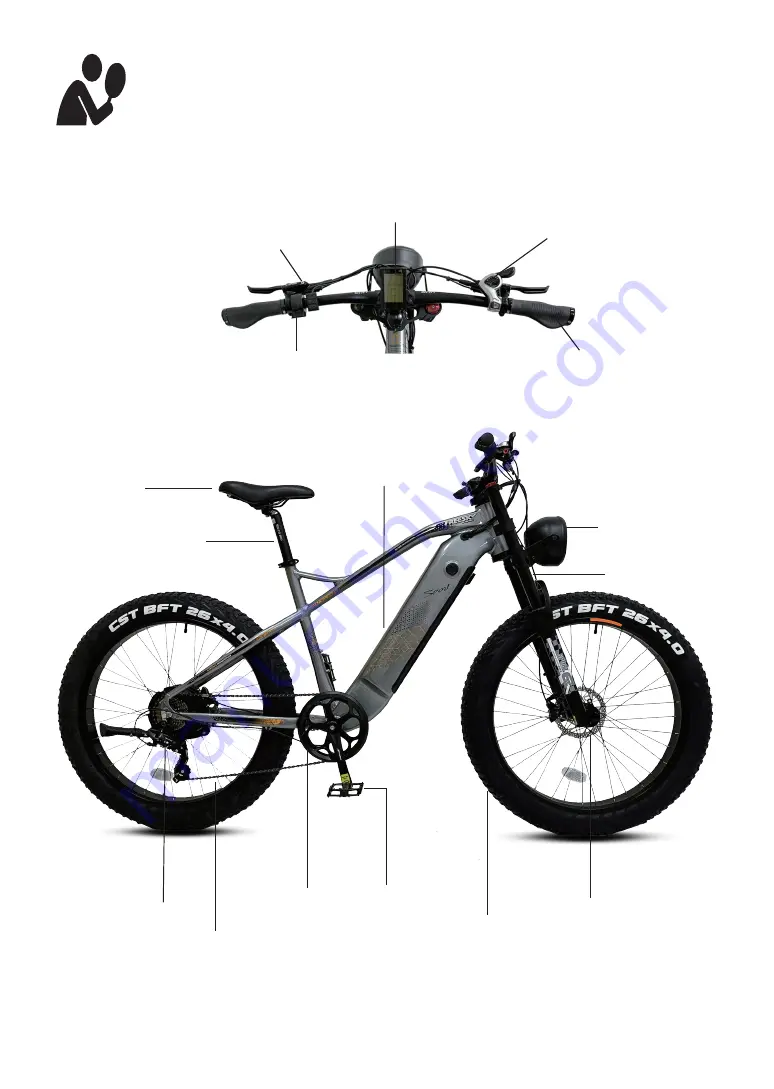
Ba�ery

Saddle

Front Light

Front Fork

 Brake Disc

Tire

Pedals

Crankset

       Chain

Motor

Seat Post

Grip

Display Controls

LCD Display

Derailleur

Thro�le

Product Overview

3

Summary of Contents for Himalaya

Page 1: ...USER MANUAL ELECTRIC BIKE...

Page 2: ...you to experience the product and be safe at riding detailed instruc on is provided from which you can nd the product s instruc on usage and other informa on Before using this product please read the...

Page 3: ...User Precau ons Package List Product Overview Assembly Ba ery Start UpProcedure Display Troubleshoo ng 01 02 03 04 11 15 16 24 Speci ca ons 25 FAQS 26 Limited Warranty 27 Contact Us 30 Contents...

Page 4: ...ics may be damaged due to water which is not covered by our warranty 5 Do not re t your electric bicycle A modi ed bicycle is not covered by our warranty 6 Do not touch the charging port with metal or...

Page 5: ...x Allen Key Wrench 2x Keys 1x Charger 1x Saddle 1x Electric Bike 1x User Manual 2x Pedals Package List Carefully check package contents if anything is missing or damaged please contact Freesky custome...

Page 6: ...Ba ery Saddle Front Light Front Fork Brake Disc Tire Pedals Crankset Chain Motor Seat Post Grip Display Controls LCD Display Derailleur Thro le Product Overview 3...

Page 7: ...plate 2 Insert the handlebar into the locknut on the stem 3 Center the handlebar and adjust the direc on make sure the handlebar is centered on the stem 4 Use the wrench to ghten the screw and x the h...

Page 8: ...wheel on each side The disc brake is on the le 3 Hold the nut on one side and ghten the nut on the other side of the wheel onto the fork 4 Ensure the front wheel and quick release lever are properly...

Page 9: ...clip hook the clip onto the buckle from the inside and close it with the buckle 2 2 Insert the bolt and ghten it with a wrench 3 Repeat on the other side 4 Plug in the front light connectors Front li...

Page 10: ...ur palm or nger Saddle Assembly For be er pedaling safety and overall riding comfort posi oning the seat at the right height is important The rider s leg length is used to determine the seat s posi on...

Page 11: ...esirable for most riders Do not exceed the limit markings on the seat rail which show the minimum and maximum horizontal movement allowed 3 While holding the seat in the desired posi on use an Allen w...

Page 12: ...spension fork can be turned counterclockwise un l it stops to completely lock out the suspension fork s travel To unlock the lockout lever turn the knob clockwise un l it stops When the lockout lever...

Page 13: ...gently by hand turning counter clockwise Then ghten pedal by allen wrench 4 Check the chain alignment Rotate the right pedal and crank toward the back of the bike as though pedaling backward Watch th...

Page 14: ...n 1 the ba ery is in the lock posi on with the ba ery locked to the frame and the key removed so the bike is ready to ride 2 Any me the ba ery is in key posi on 2 o unlocked from the frame the ba ery...

Page 15: ...uld be handled with care When the Ba ery is Removed be careful not to drop or damage the ba ery when loose from the bike Avoid damaging the exposed connector terminals and keep them clear of debris Wh...

Page 16: ...e place and connect the DC output plug from the charger to the charging port on the side of the ba ery 3 Plug the charger into a power outlet charging should ini ate and will be indicated by the LED c...

Page 17: ...the charging port on the right side of the ba ery 3 Plug the charger into a power outlet charging should ini ate and will be indicated by the LED charge status lights on the charger turning red Once f...

Page 18: ...corresponds to the lowest level of pedal assistance and level 5 corresponds to the highest level of pedal assistance Level 0 indicates pedal assistance is inac ve Start in PAS level 0 or 1 and adjust...

Page 19: ...Display Details 1 Light 2 Ba ery Level 16...

Page 20: ...el 5 Speed Display MAX Maximum Speed AVG Average Speed MPH or KM H Measuring Unit The panel will calculate the actual travelling speed based on the wheel diameter and signal data number of magnet stee...

Page 21: ...AS lever increase one level Short press PAS lever decrease one level 2 Change the ways of speed display Long press change the ways of speed display 3 The way to open the front light Long press open th...

Page 22: ...acts Do not dismantle or puncture the casing Keep the contacts away from metal objects to prevent short circuit which may result in ba ery damage or even injuries and deaths 3 Use original power adapt...

Page 23: ...e discovered Balance the ba ery Replace Replace any components con rmed by Freesky Product Support or a cer ed reputable bike mechanic to Replace brake and shi cables if necessary Replace brake pads i...

Page 24: ...ensure they are ght Ensure the locking lever on the quick release skewer is correctly tensioned fully closed and secured 3 Steering Ensure the handlebar and stem are correctly adjusted ghtened and al...

Page 25: ...and the torque arm torque arm bolt and torque washers are in place Ensure ba ery is charged before use Ensure there is no damage to ba ery Lock ba ery to frame and ensure that it is secured Charge and...

Page 26: ...r to removing the re from the rim Failure to remove all air pressure from the inner tube could result in serious injury Even res equipped with built in at preventa ve re liners like those that come wi...

Page 27: ...me without regular charges aged damaged or unbalanced 5 Brakes rubbing 1 Charger not well connected 2 Charger damaged 3 Ba ery damaged 4 Wiring damaged 5 Blown charge fuse 1 Loose or damaged wheel sp...

Page 28: ...Max Speed 32 mph 50km h Ba ery Charger Input 100 240V 50 60HZ AC Plug Output 54 6V 2A Pedal Assist Mode 35 50 miles 56 80km Pure Electric Mode 25 35 miles 40 56km Max Angle of Climb 15 degrees Chargin...

Page 29: ...part replacement Q Will my bike arrive assembled A Your bike will arrive mostly assembled We ll also provide the tools and a comprehensive assembly video for the rest part Q What can I do if something...

Page 30: ...by this Limited Warranty The Warranty Period begins upon your receipt of the e bike and shall end immediately upon the earlier of the end of the Warranty Period or any sale or transfer of the e bike t...

Page 31: ...Freesky will not be liable and or responsible for any damage failure or loss caused by any unauthorized service or use of unauthorized parts The Ba ery is not warranted from damage resul ng from power...

Page 32: ...Contact Us If you have any trouble with setup please search FREESKY EBIKE on YouTube for assembly video or contact us online or through our email address support freeskycycle com 29...

Reviews: