38
11.
ENERGY SAVING
The multideck can be supplied with a door or mechanical night curtains. This option
is available on request. During non-business hours of the shop, an open multideck
be closed with night curtains (if present). Make sure that products arrangement does
not disturb to close the curtain. If the cabinet is with doors, make sure that the doors
are fully closed. The lighting of the multideck must be turned off.
12.
DISPOSAL
A used multideck can be restored and reused. If it is necessary to completely stop
the operation of the refrigerated cabinet, the following steps must be taken:
•
Turn off the power supply.
•
Disconnect of the glycol piping.
•
Collect the refrigerant from the freezing coil.
•
The elements of the refrigerated cabinet require specific disposal; therefore, it
is necessary to contact organizations that dispose of certain types of materials.
13.
STORAGE
If temporary storage and subsequent use of the multideck is expected (during repair
of the shopping premise or change location of the cabinet), the equipment must be
stored in a well-ventilated room with temperature higher than 0
°C
. It is forbidden to
leave the cabinets outdoors. It is necessary to put on cover the multideck or to make
other structures protecting the unit against external damage.
14.
TESTING
Each refrigerated cabinet is factory tested. During the testing, the following checks
are carried out:
•
Hermetic tightness.
•
Pressure tests of the freezing coil.
•
Checks of electrical installation.
•
Load tests.
After the multi-decks are installed, each multideck and the overall system must be
inspected before their start-up.
15.
ACCESSORIES
Variety of special accessories available on request, such as: partitions, tabs, price
holders, a drainage collection tub, evaporation baths, safety bumpers, etc. For more
information, please contact FREOR LT or sales partner.
Summary of Contents for JUPITER H8
Page 1: ...OPERATION MANUAL MULTIDECK JUPITER ...
Page 14: ...14 Install the plastic legs Lower the multideck ...
Page 19: ...19 Seal connection gaps using the adhesive foam tape ...
Page 20: ...20 Apply silicone as shown in the picture to seal the joint ...
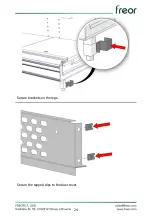
Page 24: ...24 Secure brackets on the legs Secure the tapped clips to the dust cover ...
Page 43: ...43 Date Work Name ...

