background image

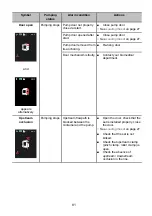
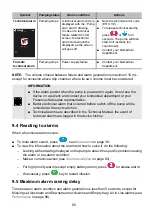
Actions

Alarm condition

Pumping

status

Symbol

Close pump door.

See

Loading the set

on page 27.

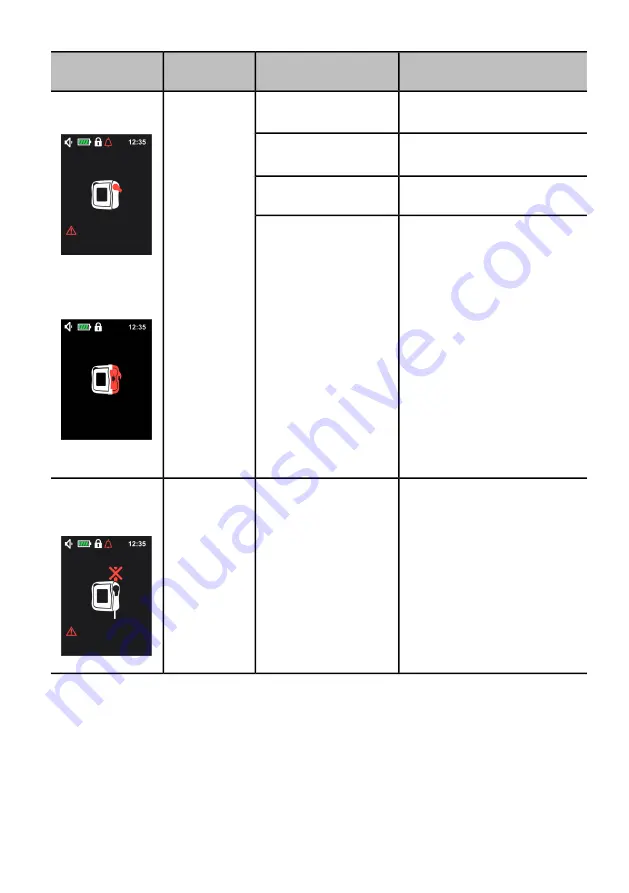
Pump door not properly
closed at start.

Pumping stops

Door open

and

appears

alternatively

Close pump door.

See

Loading the set

on page 27.

Pump door opened after
start.

Re-hang door.

Pump door removed from
its anchoring.

Contact your biomedical
department.

Door mechanism is faulty.

Open the door, check that the
set is installed properly, close
the door.

See

Loading the set

on page 27.

Check that the set is not
kinked.

Check that upstream clamp
(pinch clamp, roller clamp) is
open.

Check the absence of
upstream / downstream
occlusion in the line.

Upstream flowpath is
blocked between the
container and the pump.

Pumping stops

Upstream
occlusion

81

Summary of Contents for Ambix nova

Page 1: ...Ambix nova Ambulatory Infusion Pump Version V1 0 Instructions For Use ...

Page 2: ...p Fragile handle with care Temperature limitation Keep away from rain Atmospheric pressure limitation Humidity limitation Part included in a recycling process General symbol for recyclable material Accompanying documents 01 Product identifier GTIN 21 Product serial number 11 Date of manufacture 240 Product Reference Smart Holder Power IP32 Index of protection against solid foreign objects 2 5 mm a...

Page 3: ...nment section for additional information on temperature pressure and humidity limitations These Instructions For Use IFU are also available online For further information check IFU for Ambix nova ref DHF 0279 on https key2 fresenius kabi com 3 ...

Page 4: ...iled description 14 3 3 1 Pump 14 3 3 2 Smart Holder Power Pump holder 14 3 3 3 Front panel keypad 15 3 4 Display description 16 3 4 1 Infusion screens 16 3 4 2 Menu screen 18 4 Installation and removal 19 4 1 Installation 19 4 1 1 Recommended installation 19 4 1 2 Using the pole clamp 20 4 1 3 Positioning the holder on a rail pole bed or wheelchair 20 4 1 4 Positioning the holder on a table 20 4 ...

Page 5: ...ute alarm 36 5 10 Terminate infusion 36 5 10 1 Stop infusion 36 5 10 2 Reset infusion progress 37 5 11 Switch off pump 38 5 12 Removing Changing the set from the pump 38 6 Pump menu 40 6 1 Access menu 40 6 2 Menus description 41 6 3 Menu navigation 43 6 4 Infusion mode 44 6 4 1 Select the infusion mode 44 6 4 2 Flow rate only mode 46 6 4 3 Continuous mode 47 6 4 4 Ramp mode 48 6 4 5 Intermittent m...

Page 6: ... 3 Alarm description 80 9 4 Reacting to alarms 85 9 5 Maximum alarm raising delay 85 9 6 Alarm settings 86 10 Troubleshooting 87 11 Technical information 88 11 1 Performance 88 11 1 1 Essential performance 88 11 1 2 Flow rate accuracy 88 11 1 3 Flow rate range 88 11 1 4 Volume to be infused VTBI Range 89 11 1 5 Time to detect occlusion 89 11 1 6 Bolus volume at occlusion release 89 11 1 7 Missing ...

Page 7: ...netic immunity 98 13 3 Recommended separation distances between portable and mobile RF communication equipment and pump 98 14 Services 99 14 1 Warranty 99 14 1 1 General conditions of warranty 99 14 1 2 Limited warranty 99 14 1 3 Warranty conditions for battery and accessories 99 14 2 Quality control 99 14 3 Maintenance requirements 100 14 4 Service policy and rules 100 14 5 Notification of Seriou...

Page 8: ...ecific device 1 2 Principle of operation Ambix nova is an ambulatory programmable electronic medical system dedicated to administering a pre determined volume of infusion product at a programmed rate This peristaltic pump ensures fluid delivery using pumping and clamping fingers to advance the liquid to the patient through an administration set Ambix nova is a transportable and reusable device tha...

Page 9: ...nce of pumps according to the technical manual 1 4 4 Intended patient population The pump is intended for use on adults and children It cannot be used on neonates The pump is intended for use in accordance with healthcare facilities and healthcare providers protocols All pump settings must be made according to the medical prescription 1 4 5 Use environment WARNING Keep the pump sets and cables awa...

Page 10: ... system for the infusion of parenteral nutrition neutral solutions and antibiotics volume delivery accuracy of the pump is 5 above 10mL h and flow rate is adjustable from 1 to 600 mL h Provide an easy to use interface and design to facilitate programming monitoring and handling Provide infusion functions adapted to the needs of patients and healthcare professionals several infusion modes flow rate...

Page 11: ...to the mains power supply For ordering information check Accessories on page 102 Smart Holder Power Accessories Holder The holder can be positioned on authorized support such as a pole rail bed wheelchair table and table stand It allows the pump to be attached to it to ensure the pump is securely positioned It is intended to supply the operating power and to charge the battery for the pump install...

Page 12: ...e 102 activ Rucksack Equipment backpack Backpack for children Backpack with a main compartment incorporating a universal fastening system for infusion bags and the pump A second large compartment at the front is provided for accessories and personal items For ordering information check Accessories on page 102 activ Rucksack mini Administration sets Administration sets dedicated to Ambix nova pump ...

Page 13: ... Power referred to as pump holder 1 Power cable User documents Packaging consists of recycled cardboard Check the integrity of the content before use Symbols used on Ambix nova packaging are described in Symbol descriptions on page 2 3 2 General description Legend Pump 1 Infusion set sold separately 2 Smart Holder Power 3 13 ...

Page 14: ...abel 9 Pump identification label 10 Rails for installation on pump holder 11 Speaker 12 3 3 2 Smart Holder Power Pump holder Legend Clamp handle 1 Contact pins for pump to holder connection Power supply 2 Slot for cables 3 Grey locking lever 4 Mains supply light indicator 5 Pole clamp 6 Holder identification labels 7 Power cable inlet 8 Near the power cable inlet of the holder description in Power...

Page 15: ...nformation 3 Mains supply light indicator 4 ON OFF key 5 Scroll up in Menu Select previous field 6 Increase value Active function 7 Decrease value Deactive function 8 Scroll down in Menu Select next field 9 Prime 10 Stop Cancel 11 Start Validate 12 Display described below 13 15 ...

Page 16: ...KVO Keep Vein Open on page 66 3 Remaining time 4 Progress bar 5 Delayed start Detailed information are described in Delayed start on page 55 6 Pumping status indicator 7 To program the infusion parameters see Programming the infusion settings on page 32 Infusion monitoring screen layout Legend Infusion mode symbol 1 Ongoing flow rate 2 Remaining time 3 Progress bar 4 Pumping status indicator 5 16 ...

Page 17: ... bar On the left side of the progress bar 75 mL indicate infused volume and on the right side 150 mL indicate total volume to be infused In flow rate only mode there is no total volume to be infused therefore only the infused volume 600 mL is displayed on the left or in flow rate only mode Infusion mode symbols Continuous mode Flow rate only mode Intermittent mode Ramp mode For infusion screens on...

Page 18: ...ed alarm icon Battery icons check details in Battery operating mode on page 24 Nurse settings lock icon Keypad locked icon Soft key bar Automatic Prime Semi automatic Prime Back to previous screen Back to infusion programming screen Validate the setting Confirm the result Menu list is detailed in Menus description on page 41 18 ...

Page 19: ...the pump height while a patient is connected to it This may lead to patient harm Give particular attention to the risk of strangulation with cables and sets and with the small parts that could be swallowed or inhaled INFORMATION It is recommended not to remove the pump from its pole or rail when it is connected to the patient Check that the power cable is connected and the device is operational af...

Page 20: ...tom X Y min 10 mm X Y max 35 mm Ø min 8 mm Ø max 40 mm 1 Fasten pole clamp firmly on the pole or rail to avoid any movement of the pump 2 Ensure that the pump is securely attached and positioned 4 1 4 Positioning the holder on a table The holder can be placed on a flat and horizontal table as indicated in the figure Ensure the pump is positioned away from table edges to avoid being accidentally pu...

Page 21: ...le to the holder 2 Pinch the cable into the slot provided for this purpose 3 Plug the power cable to the mains socket 4 When the pump is powered by mains power supply check the pump front panel to confirm that the mains supply light indicator is on The mains power supply is indicated by a green light on the holder s front panel as well as on the pump s front panel keypad A beep is emitted by the p...

Page 22: ...e pump up 4 2 2 Removing the pump holder 4 2 3 Electrical disconnection 1 Remove power cable from the mains socket A beep is emitted by the pump when the power cable is disconnected To store the pump see Storage on page 95 2 Remove power cable from the slot 3 Remove power cable from the holder 22 ...

Page 23: ...4 2 4 Attaching Removing the Quick Guide A quick guide can be easily attached and removed from the pump holder 23 ...

Page 24: ...connected to mains power supply Before starting for the first time charge the battery for at least 6 hours by plugging in the power supply cable with the pump powered off INFORMATION During operation leave the device connected to the power supply to maintain the battery s charge and maximum capacity and to maximize battery lifetime and performance The battery icon is always displayed in the status...

Page 25: ...battery life might be reduced from 24 hours to 20 hours by the end of the third year of use 5 1 3 Battery precautions The device uses a Lithium ion rechargeable battery The following actions may cause leakage overheating smoke explosion or fire which could result in deterioration of performance failure damage to the equipment or injury to the user Incorrect handling of a Lithium ion battery Replac...

Page 26: ...e for immediate use especial in homecare environment Before switching on the pump install holder and pump see Installation on page 19 The pump can operate using the battery however we recommend that the pump be connected to a power supply as often as possible during use to ensure that the battery remains charged When the pump is connected to the power supply check that the power supply indicator l...

Page 27: ...it can lead to patient harm Check the infusion set and patient connection integrity before use to protect the patient from underdose trauma and infection Change the set after 24 hours of use to avoid therapeutic issues 5 3 1 Description of the pinch clamp Pinch clamp is closed Pinch clamp is open INFORMATION Patient must not be connected to the set when the pinch clamp is open 5 4 Loading the set ...

Page 28: ...n of the flow 3 Insert the blue pinch clamp 1 into the blue cavity of the pump with 45 angle then push the green connector 2 towards the green area to secure the position 4 Keep the tube straight without any twist and knot and push the upper ring of the blue antikink 3 into the coordinated pump notch circled with blue colour 5 Close the pump door by pushing the door lever down 28 ...

Page 29: ...ng fill drip chamber 2 3 full by pressing gently if applicable Automatic and semi automatic priming fill the infusion set at a rate of 600 mL h and are stopped after 24 mL 10 During priming the air in line alarm is disabled 5 5 1 Access priming interface Priming interface is only accessible when pump is on infusion program interface the following screen illustrates these principles Press prime key...

Page 30: ...e user press and HOLD the key NOTE Before priming is launched press key can exist the priming interface and return to the programming screen 5 5 2 Automatic priming Check the administration set to make sure it is not connected to the patient 1 Under priming interface see Access priming interface on page 29 to access press key to launch automatic priming 2 Wait until the progress bar has filled up ...

Page 31: ...e infusion programming screen as illustrated below Note Automatic priming can be stopped at any time by pressing the key Once it is stopped it is possible to continue priming by using Semi automatic priming on page 31 5 5 3 Semi automatic priming Check the administration set to make sure it is not connected to the patient 1 Under priming interface see Access priming interface on page 29 to access ...

Page 32: ...nfirm Pump automatically goes back to the infusion programming screen 5 6 Programming the infusion settings This section illustrates the programming of an infusion with the continuous mode default infusion mode Check the infusion mode on current display For programming with different infusion mode see Infusion mode on page 44 For staying on the current infusion mode following below steps 32 ...

Page 33: ...s out of setting range the selected and the linked values background flash in black Once all parameters are set go to Start infusion on page 33 INFORMATION A longer keypress provides faster scrolling The flow rate of administration must be adapted individually to the patient Regular checks are required The selected parameter appears in a dark blue background and the linked parameter appears in a l...

Page 34: ...information screen The information screen will last 5 seconds then return to monitoring screen Information screen last 5 s Monitoring screen Programming screen Infusion must be stopped to modify the current infusion parameters more details see Stop infusion on page 36 INFORMATION The infusion parameters cannot be programmed on the information screen and monitoring screen 5 8 Keypad lock Keypad loc...

Page 35: ...ard when keypad lock is activated 2 Check the symbol is displayed in the status bar to confirm the keypad has been locked Once keypad is locked is the only active key If other keys are pressed the forbidden key beep 1 beep is triggered keypad lock symbol is displayed on the main screen see figure below 35 ...

Page 36: ...eps flashing until a corrective action is performed the alarm sound is off for 2 minutes When a low priority alarm is muted the mute icon is displayed and blinks in the status bar the alarm symbol is displayed and the yellow LED is fixed the alarm sound is off for 2 minutes For further information about alarms see Alarms and safety features on page 79 INFORMATION Technical alarms cannot be muted 5...

Page 37: ... 2 Press key for 3 seconds to reset the infusion progress This action will reset the progress bar remaining time and delayed start time if delayed start is activated A new infusion with programmed values can be launched again INFORMATION Stop an infusion to modify or to validate the delayed start settings from menu configuring screen or the maximum flow rate settings will reset the infusion progre...

Page 38: ...ed off before end of the infusion with stop action prior to switch off the next time pump switches on will resume infusion status at switch off point The confirmed pump settings and history information are saved even if the battery is disconnected with no time limit In the case of a powering down the time of powering down is not retained in the history 5 12 Removing Changing the set from the pump ...

Page 39: ...to unlock the door 2 Open the door 3 Remove the set by pull out the blue antikink 1 from the slot first then push the green connector 2 out towards position 3 Install a new set in the pump see Loading the set on page 27 39 ...

Page 40: ...1 minute the display automatically returns to the main screen infusion programming screen 6 1 Access menu The pump menu interface see figure below can be accessed at any time by press key except when infusion is in progress INFORMATION Press or to scroll up or down the menu list the selected menu is displayed with light blue background Press to enter submenu or press to go back to the previous scr...

Page 41: ... volume per cycle the number of infusion cycle and the duration of one cycle Program delayed start duration setting range is 1 min to 24 h when activated Intermittent mode Activate Deactivate night mode Select activation mode between 24 h or programmable time Program start time end time setting if select programmable mode Night mode Basic settings menu Program day month and year of date Select tim...

Page 42: ...larm mode setting between remaining time and remaining volume when the end of infusion pre alarm is actived Program the value according to the selected mode End of infusion pre alarm Activate Deactivate nurse settings lock Nurse settings lock Activate Deactivate KVO Adjust KVO rate value range 1 mL h to 10 mL h KVO keep vein open Set maximum flow rate range 1 mL h to 600 mL h Maximum flow rate Res...

Page 43: ...k to the infusion programming screen To go back to the previous menu screen without validation press Keys and actions in menu and configuring screens Actions Keys Activate the function Select an option on the right Increase value Deactivate the function Select an option on the left Decrease value Scroll up in the menu list Select previous value in the settings Scroll down in the menu list Select n...

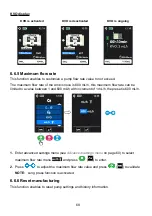
Page 44: ... symbol 6 4 1 Select the infusion mode When the pump is switched on the infusion programming screen is displayed with the last settings or presets as example below in continues mode For programming with the infusion mode displayed for example continuous mode see Programming the infusion settings on page 32 For programming with a different infusion mode for example ramp mode following below steps 1...

Page 45: ...3 Press or to select the applicable infusion mode the selected infusion mode is in light blue background 4 Press to confirm the selection and enter infusion programming screen 45 ...

Page 46: ...rate only mode KVO is only functional when delayed start is activated Flow rate only mode enables continuous infusion at an adjustable flow rate 1 Select the flow rate only mode and press to enter For mode selection see Select the infusion mode on page 44 2 Press to adjust the flow rate value 3 Press to start the infusion 46 ...

Page 47: ...uous mode enables continuous infusion at an adjustable flow rate volume and time 1 Select the continuous mode and press to enter For mode selection see Select the infusion mode on page 44 2 Press or to select the parameter to be programmed then adjust the value by press 3 Repeat step 2 until all parameters are set NOTE In continuous mode flow rate 1 volume 2 and duration 3 are programmable 47 ...

Page 48: ...e of ramp up and ramp down duration can be set from 1 min to 24 h with a default value of 30 min The value of total duration can be set from 3 min to 96 h with a default value of 15 h 30 min Once ramp up phase infusion has started stop the infusion volume total duration and ramp up duration cannot be adjusted anymore Ramp down duration still can be adjusted Ramp mode enables three phases infusion ...

Page 49: ...see Select the infusion mode on page 44 2 Press or to select the parameter then adjust the value by pressing 3 Repeat step 2 until all parameters are set NOTE Volume 2 ramp up duration 5 ramp down duration 3 and total duration 4 are programmable Flow rate 1 is calculated automatically and cannot be programmed 49 ...

Page 50: ... mL with a default value of 50 mL The number of infusion cycle can be set from 2 to 99 with a default value of 3 The target duration of one cycle can be set from 15 min to 24 h with a default value of 8 h Intermittent mode enables cyclic infusion at an adjustable flow rate volume and time 1 Select the intermittent mode and press to enter For mode selection see Select the infusion mode on page 44 5...

Page 51: ...n cycle 3 and duration of one cycle 4 are programmable 4 Press to start the infusion NOTE 1 2 3 indicate the current cycle number total number of infusion cycle programmed Accessing to information screen is described in Start infusion on page 33 6 5 Basic settings menu Under main menu screen see Access menu on page 40 select basic settings menu and press to enter 51 ...

Page 52: ...ht and power LED are set to minimum level when the pump is working In case of alarm the backlight turns back to normal 1 Under basic settings menu screen see Basic settings menu on page 51 to access select the night mode menu and press to enter 2 Press to activate press to deactivate the night mode deactivate by default 52 ...

Page 53: ...ect programmable time mode 4 Once programmable mode activated press to move down to set the start time and end time of night mode press or to switch from one parameter to another and press to adjust the value of the selected parameter 5 Validate the settings by pressing Pump returns to the infusion programming screen 6 5 2 Date and time This function enables to customize pump clock and calendar 53...

Page 54: ...s to enter 2 Press or to select the day month or year that need to be set press to adjust the value of the selected one NOTE The year can be set from 2020 to 2099 with a default value of 2020 3 Press to go down to select the time format press to select 12 h or press to select 24 h the time format is 24 h by default 54 ...

Page 55: ... time is 00 00 which are factory configuration 6 5 3 Delayed start This function enables to postpone start of a new infusion INFORMATION The delayed start duration can be adjusted from 1 minute to 24 hours with a step of 1 minute or 1 hour Delayed start duration is included in the infusion remaining time During an infusion modify the delayed start settings from menu confirguring screen will reset ...

Page 56: ...ameter to another and press to adjust the value of the selected parameter 4 Press to validate the settings Pump returns to the infusion programming screen If the delayed start function is activated on the menu configuring screen the duration of delayed start can also be adjusted from the infusion programming screen the selected area 56 ...

Page 57: ... minutes later 6 5 4 Sound This function enables to customize sound of alarms and beep 1 Under basic settings menu screen see Basic settings menu on page 51 to access select the sound menu and press to enter On this screen you can adjust the sound level set the time between 2 alarm sounds activate deactivate the key beep 2 Press to decrease the sound level or press to increase 57 ...

Page 58: ...between 2 alarm sounds can be adjusted from 3 seconds to 15 seconds with step of 1 second This adjustment can modify the perception of an alarm On this screen the time between 2 alarm sounds is 5 seconds by default 4 Press to select the key beep activation deactivation setting Press to turn off the key beep sound Conversely press for activation NOTE The key beep sound is activated by default 58 ...

Page 59: ...e set for high priority alarms For low priority alarm the interval between two alarm sounds is 30 seconds and cannot be adjusted 6 5 5 Light This function enables to customize screen brightness and pumping LED blinking frequency There are 10 levels of brightness setting and the default value is 5 1 Under basic settings menu screen see Basic settings menu on page 51 to access select the light menu ...

Page 60: ...inking frequency 6 sec by default range 01 60 sec and press to adjust the value 5 Validate the settings by pressing and pump returns to the infusion programming screen NOTE Activation of night mode function does not automatically deactivate pumping LED 6 6 Advanced settings menu An access code is required to enter into the advanced settings menu 60 ...

Page 61: ... is displayed on the screen for 3 seconds then the pump goes back to the access code screen in order to enter a new code 6 6 1 Occlusion pressure Air detection This function enables to customize occlusion pressure and air detection alarms settings 1 Under advanced settings menu see Advanced settings menu on page 60 to access select Occlusion pressure Air detection menu and press to enter On this s...

Page 62: ...the administration set High level an occlusion alarm will be triggered for a pressure value of 787 5 mmHg 262 5 mmHg in the administration set 3 Press to select the single bubble setting Press or to adjust the value NOTE Air in line alarm will be triggered when the detected single bubble volume is to the customized volume value The single bubble setting can be adjusted from 0 125 mL to 0 75 mL wit...

Page 63: ...nd pump returns to the infusion programming screen INFORMATION The value of single bubble means the minimum size of the single bubble that can be detected by the pump the detection will last until the end of infusion The cumulated bubbles volume detection is used to detect the total volume of air bubbles during the set duration the detection will last until the end of infusion 6 6 2 End of infusio...

Page 64: ...he pre alarm Press to select remaining volume before end of infusion or press to select remaining time before end of infusion activated by default 3 Press to go down and press to adjust the parameters 4 Press to validate the settings Pump returns to the infusion programming screen 64 ...

Page 65: ...o 999 mL preset is 10 mL 6 6 3 Nurse settings lock This function enables to lock the pump to avoid misuse The nurse settings lock is deactivated by default When nurse settings lock is activated the infusion parameters flow rate volume duration etc cannot be changed 1 Under advanced settings menu see Advanced settings menu on page 60 to access select nurse settings lock menu and press key to enter ...

Page 66: ...s function enables to customize the KVO KVO is a low flow rate to keep vein open during all infusion interruptions delayed start end of infusion and pause period of an intermittent cycle 1 Under advanced settings menu see Advanced settings menu on page 60 to access select KVO menu and press to access KVO setting 2 Press for activation Conversely press to deactivate KVO activated by default 66 ...

Page 67: ... INFORMATION Check KVO settings before start infusion make sure KVO rate is appropriate for the patient KVO status is displayed on the infusion programming screen and infusion information screen except in flow rate only mode but cannot be adjusted Under flow rate only mode KVO is only functional when delayed start function is activated After activation KVO is functional during all infusion interru...

Page 68: ...w rate can be limited to a value between 1 and 600 mL h with increment of 1 mL h the preset is 600 mL h 1 Enter advanced settings menu see Advanced settings menu on page 60 to select maximum flow rate menu and press to enter 2 Press to adjust the maximum flow rate value and press to validate NOTE Long press function is activated 6 6 6 Reset manufacturing This function enables to reset pump setting...

Page 69: ...nd rotates for 3 seconds the pump returns to the menu screen INFORMATION When reset manufacturing settings is done Pump settings revert back to factory settings except date and time settings The records in the history menu are erased and back to factory settings including infusion history alarm history and cumulated counter 6 7 History Under main menu screen see Access menu on page 40 select the h...

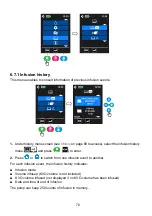
Page 70: ...e infusion history menu and press to enter 2 Press or to switch from one infusion event to another For each infusion event the infusion history indicates Infusion mode Volume infused KVO volume is not included KVO volume infused not displayed if no KVO volume has been infused Date and time of end of infusion The pump can keep 250 events of infusion in memory 70 ...

Page 71: ...o enter 2 Press or to define the period of days from the current day the cumulative volume value is displayed automatically INFORMATION You can consult the cumulative volume infused during the number of days from 1 to 99 days defined by the user The counting start from the present day 6 7 3 Alarm history This menu enables to consult information of previous alarm events Alarm events are automatical...

Page 72: ...s or to switch from one alarm event to another INFORMATION Each event is characterized by an alarm symbol and its time and date of occurrence The pump can keep 250 alarm events in memory When the history is full the system overwrites the oldest event with any new event 6 8 Information This menu enables to consult pump technical information 72 ...

Page 73: ...mation menu and press to access 2 Press or to check the information NOTE the information menu displays Serial number Software version Production date dd mm yyyy Last maintenance date dd mm yyyy Next maintenance date dd mm yyyy Total infused volume Total running time 73 ...

Page 74: ...tion is not cleaned 7 1 Recommended cleaning and disinfection agents Didecyldimethylammonium chloride Please contact the appropriate service responsible for cleaning and disinfection products in your establishment for further details 7 2 Prohibited cleaning or disinfection agents Do not use cleaning or disinfection agents that contain the following substances as these aggressive agents may damage ...

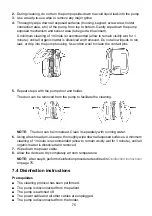
Page 75: ... with the pump door and holder The door can be removed from the pump to facilitate the cleaning NOTE The door can be immersed Clean it separately with running water 6 Using a fresh ready to use wipe thoroughly wipe down all exposed surfaces A minimum cleaning of 1 minute is recommended allow to remain visibly wet for 1 minute until all organic matter is dissolved and removed 7 Wipe down the power ...

Page 76: ...cracks crevices and hard to reach areas Do not allow liquids to run leak or drip into the pump housing 4 Using a fresh ready to use wipe repeat steps 3 Ensure that the minimum contact time for each step is 3 minutes for bactericide activity surface remain visibly wet for 3 minutes Respect the indicated contact time from the manufacturer recommendations for the required antimicrobial activity 5 Wip...

Page 77: ...5 Switch on the pump 6 Check the autotest sequence LCD display intact speaker LED and the backlight Do not use with a damaged screen 7 Check the mains LED lights up 8 Remove the Ambix nova pump from its holder and check the battery symbol on the display 9 Install the Ambix nova pump on the holder 10 Check that the pump and its holder are securely attached or positioned 11 Check that all menu setti...

Page 78: ...play beep sound blinking status light indicator 1 Missing set alarm 2 Door open alarm 3 Upstream occlusion alarm 4 Downstream occlusion alarm 5 Empty bag Air in Line alarm 6 Empty battery alarm 7 End of infusion alarm 8 End of infusion pre alarm 9 Action reminder 10 Empty battery pre alarm 11 Check the flow rate by measuring the delivered volume 78 ...

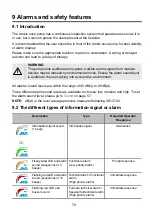
Page 79: ...count the environment All alarms sound levels are within the range of 45 dB A to 85 dB A Three different alarm sound levels are available to choose low medium and high To set the alarm sound level please go to Sound on page 57 NOTE dB A is the level average pressure measured following ISO 3744 9 2 The different types of information signal or alarm Required Operator Response Type Description Awaren...

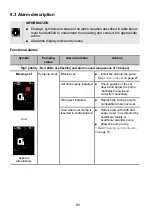
Page 80: ...of 10 beeps Install the set into the pump See Loading the set on page 27 Missing set Pumping stops Missing set and appears alternatively Check position of the set above and below the pump mechanism and insert correctly if necessary Set not properly installed Replace the wrong set with compatible Ambix nova set Wrong set installed Remove dirt with cloth and soapy water or as directed by healthcare ...

Page 81: ...hang door Pump door removed from its anchoring Contact your biomedical department Door mechanism is faulty Open the door check that the set is installed properly close the door See Loading the set on page 27 Check that the set is not kinked Check that upstream clamp pinch clamp roller clamp is open Check the absence of upstream downstream occlusion in the line Upstream flowpath is blocked between ...

Page 82: ...umping stops Downstream occlusion End infusion or connect to a filled container Infusion container is empty Pumping stops Empty bag Air in line and appears alternatively Fill set to the end See Priming the set with the pump recommended on page 29 Air is in the set Open the door and remove dirt with cloth and soapy water or as directed by healthcare facility policy or healthcare provider policy see...

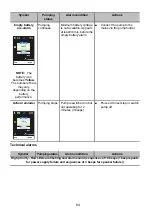
Page 83: ...lder Charge battery to resume pump operation Minimum battery voltage is not available Appears approx 10 min before battery is fully discharged Pumping stops Empty battery Low priority Yellow LEDs are fixed and alarm sound sequences of 3 beeps Get prepared for end of infusion Target volume will be reached The time of message before target volume is reached can be set in the menu See End of infusion...

Page 84: ...attery icon becomes Yellow The number of bars may vary depending on the battery performance Proceed to next step or switch pump off Pump is switched on but not operating for 2 minutes 3 beeps Pumping stops Action reminder Technical alarms Actions Alarm condition Pumping status Symbol High priority Red LEDs are flashing and alarm sound sequences of 10 beeps 1 beep repeats for power supply failure a...

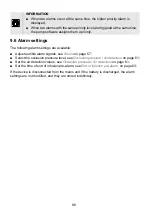
Page 85: ...t and contact your biomedical department or your Fresenius Kabi sales representative Battery technical alarm that occurred before switch off the pump will be reminded at the next switch on Technical alarms are described in the Technical Manual the event of technical alarms are logged in the device history 9 4 Reacting to alarms When a functional alarm occurs To mute alarm sound press see Mute alar...

Page 86: ...are available Adjust audible alarm signals see Sound on page 57 Select the occlusion pressure level see Occlusion pressure Air detection on page 61 Set the air detection values see Occlusion pressure Air detection on page 61 Set the time of end of infusion pre alarm see End of infusion pre alarm on page 63 If the device is disconnected from the mains and if the battery is discharged the alarm sett...

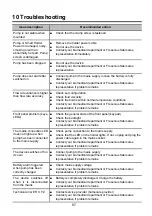
Page 87: ...d Check the backlight Contact your biomedical department or Fresenius Kabi sales representative if problem remains Front panel problem keys LEDs Check pump connection to the mains supply Check that the LED on the holder lights If not unplug and plug the power cable again in the mains socket Contact your biomedical department or Fresenius Kabi sales representative if problem remains The mains conne...

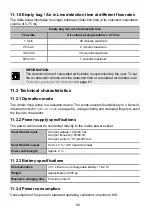
Page 88: ... mL h Flow rate 10 mL h In Ramp mode the values stated are the average flow rate accuracy of the ramp up phase and the ramp down phase Test initial conditions following 60601 2 24 Cumulative volume measured on a two hour period with 25 mL minimum volume and medical water apply to 12 mL h above Temperature 20 2 C Container height 50 cm above the upside of the pump 11 1 3 Flow rate range Increments ...

Page 89: ...ime Downstream occlusion detection time High pressure level 787 5 mmHg 262 5 mmHg Low pressure level 487 5 mmHg 187 5 mmHg Flow rate 1 hour 30 minutes 2 hours 30 minutes 1 mL h 4 mintues 4 minutes 75 seconds 25 mL h 1 minute 2 minutes 20 seconds 100 mL h NOTE Maximum infusion pressure generated by the pump is 1050 mmHg 11 1 6 Bolus volume at occlusion release Accuracy High pressure level 1 5 mL Lo...

Page 90: ...nical characteristics 11 2 1 Operation mode The Ambix nova pump is a reusable device The pump ensures fluid delivery in 4 kinds of infusion mode for Infusion mode on page 44 using pumping and clamping fingers to push the liquid to the patient 11 2 2 Power supply specifications The power cable must be connected directly to the mains power socket AC input voltage 100 240 Vac AC input frequency 50 60...

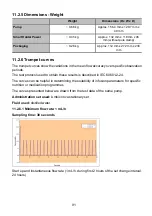
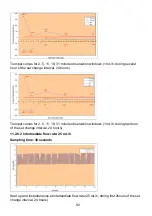
Page 91: ...rvation periods The test protocol used to obtain these results is described in IEC 60601 2 24 The curves can be helpful in determining the suitability of infusion parameters for specific nutrition or medication programmes The curves presented below are drawn from the test data of the same pump Administration set used Ambix nova stationary set Fluid used distilled water 11 2 6 1 Minimum flow rate 1...

Page 92: ... 24 hours Trumpet curves for 2 5 11 19 31 minute observation windows 1 mL h during last hour of the set change interval 24 hours 11 2 6 2 Intermediate flow rate 25 mL h Sampling time 30 seconds Start up and instantaneous at intermediate flow rate 25 mL h during first 2hours of the set change interval 24 hours 92 ...

Page 93: ...or Medical electrical equipment Conform to IEC 60601 1 2 Electromagnetic compatibility Requirements and tests for Medical electrical equipment Conform to IEC 60601 2 24 Particular requirements for the basic safety and essential performance of infusion pumps and controllers Conform to IEC 60601 1 8 General requirements tests and guidance for alarm systems in medical electrical equipment and medical...

Page 94: ... Notified body number TÜV SÜD Product Service GmbH Ridlerstrasse 65 80339 München Germany NOTE The full list of applicable standards is available upon request The device is protected against leakage current and does not disturb ECG or EEG devices 94 ...

Page 95: ...are during storage 12 1 1 1 Prepare the device for storage WARNING Remove the battery and store it as per storage conditions above in case of a prolonged storage period To prepare the device before storage proceed as specified below 1 Be sure the pump is not being used on a patient 2 Switch pump OFF and remove installed set see Removing Changing the set from the pump on page 38 3 Disconnect pump p...

Page 96: ...ase of prolonged storage or before being used on a new patient 12 2 Recycling and disposal Batteries accessories and devices with this label must not be disposed of with general waste They must be collected separately and disposed of according to local regulations Before disposal make sure that a qualified technician removes the battery from the device according to the procedure described in the T...

Page 97: ...rauma 13 1 Electromagnetic compatibility and interference guidance The Ambix nova has been tested in accordance with the electromagnetic compatibility standards applicable to medical devices Its immunity is designed to ensure correct operation Limitation of the emitted radiation avoids undesirable interference with other equipment The Ambix nova is classified as a Class B device according to CISPR...

Page 98: ...environment in which radiated RF disturbances are controlled Users of the Ambix nova may prevent electromagnetic interference by maintaining a minimum distance between portable and mobile RF communications equipment transmitters and the Ambix nova as recommended below and according to the maximum output power of the communication equipment transmitters WARNING Portable RF communications equipment ...

Page 99: ...ery of the device must not have been replaced by a battery other than that specified by the manufacturer the serial number SN must not have been altered changed or erased INFORMATION In case of failure to comply with these conditions Fresenius Kabi will prepare an estimate for repairs covering the parts and labour required When a return and or a repair of the device are required please contact you...

Page 100: ...senius Kabi spare parts When using the device on a patient no maintenance action must be performed Life cycle of Ambix nova pump 10 years provided that the maintenance is properly performed as described above 14 4 Service policy and rules If the device must be sent for servicing proceed as follows 1 Contact Fresenius Kabi to have packaging shipped to your facility 2 Clean and disinfect the device ...

Page 101: ...http www fresenius kabi com 101 ...

Page 102: ...nary Set 15 3 Accessories Do not use the device with damaged accessories WARNING Use ONLY recommended accessories described below Patient must not be connected to the set when installing the pump with accessories Please refer to its specific instructions for use Reference Accessories 2892091 activ Rucksack 2892101 activ Rucksack mini CS1000428 Smart Holder Power EU Accessory CS1000429 Smart Holder...

Page 103: ... on Radio Interference CISPR Centimeters cm Days d Decibel dB Digital Enhanced Cordless Telecommunications DECT Electrocardiogram ECG Electroencephalogram EEG Electromagnetic compatibility EMC Error message ER X Y Z Gram g Hours h Height Width Depth H x W x D High Frequency HF Hecto Pascal hPa Hertz Hz Serial number SN International Electrotechnical Commission IEC Instructions for Use IFU Intraven...

Page 104: ...er mL Milliliter per hour mL h Millimeters mm Magnetic Resonance Imaging MRI Nuclear Magnetic Resonance NMR Radio Frequency RF Radio Frequency Identification RFID Seconds s Uninterruptable Power Supply UPS Volt V Volt Alternating Current Vac Volt Direct Current Vdc Watt W 104 ...

Page 105: ...evolution of standards and of legal texts and materials the characteristics indicated in the text and images of this document are applicable only to the device with which it is included This document may not be reproduced in whole or in part without the written consent of Fresenius Kabi Made in China Revision date November 2020 Reference DHF 0279 10_Master_IFU_Ambixnova_eng 0123 http www fresenius...

Page 106: ...bi Nanchang CO Ltd Qin Lan Road Nanchang Economic Technological Development Zone 330013 Nanchang Jiangxi Province Fresenius Kabi AG 61346 Bad Homburg Germany Tel 49 0 61 72 6 86 0 PEOPLE S REPUBLIC OF CHINA DHF 0279 10_Master_IFU_Ambixnova_eng ...

Reviews: