AREC4000
23
EN
Unit with electrical heating
208V3~/480V3~/600V3~ power supply for heat
and control (*1 *2) should be connected to a
terminal block in the primary terminal box. See
Fig. 4.
Note! If you want to divide the output
between two connection points,
the series cabling must first be removed
(AREC4020/25E, 2x480V3~/600V3~).
*1 480V3~/ 600V3~ Control supply is
transformed via internal transformer to 230V~
and routed through 2x 10A fuses in the primary
terminal box.
*2 208V3~ Control supply is connected
internally through 2x 10A fuses in the primary
terminal box.
The largest cable diameter for the terminal
block is 16 mm²/0.025 in². The cable glands
used must meet the protection class
requirements. In the distribution board it is
to be indicated that ”the air curtains can be
supplied from more than one connection”.
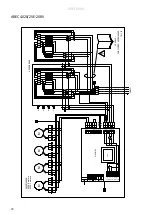
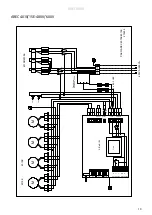
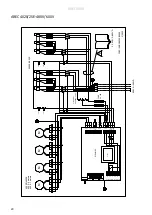
See wiring diagrams.
Start-up (E)
When the unit is used for the first time or after
a long period of non-use, smoke or an odour
may result from dust or dirt which has collected
on the element. This is completely normal and
disappears after a short time.
Connecting the water coil (W)
The installation must be carried out by an
authorised installer.
The water coil has copper tubes with
aluminium fins and is suitable for connection
to a closed water heating system. The heating
coil must not be connected to a mains pressure
water system or an open water system.
Note that the unit shall be preceded by a
regulating valve, see Frico valve kit.
The connections to the heating coil must
be equipped with shut off valves to allow
trouble-free removal. Water coil is equipped
with a drain and a vent valve. The water coil
is connected via connections with dimensions
DN20 (3/4’’), inside thread, inside the unit.
Knockouts are placed on the top and the side of
the unit.
Hoses are mounted via cable glands at
knockouts to protect the hose and prevent air
leakage. Fig. 5
Adjustment of the air curtain and airflow
The direction and speed of the airflow should
be adjusted considering the load on the
opening. Pressure forces affect the airstream
and force it inwards towards the premises
(when the premises are heated and the
outdoor air is cold).
The airstream should, therefore, be directed
outwards to withstand the load. Generally
speaking, the higher the load, the greater the
angle required.
Basic setting fan speed
The fan speed when the door is open is
set using the control. Note that the airflow
direction and the fan speed may need fine
adjustment depending on the loading of the
door.
Filter (W)
The water coil is protected against dirt and
blockage by an internal air filter which covers
the coil face.
Service, repairs and maintenance
For all service, repair and maintenance first
carry out the following:
1. Disconnect the power supply.
2.
The service hatch is opened by loosening the
snap fixings located on the bottom of the unit
(turn 90°). See Fig. 3.
3.
After service, repairs and maintenance close
the service hatch and make sure that the
snap fixings lock securely.
NOTE: Care must be taken when connecting
the pipes. Use a pipe wrench or a similar tool
to grip the air curtain connections to prevent
straining of the pipes and subsequent water
leakage during connection to the water supply
pipe-work.
!
Maintenance
Since fan motors and other components are
maintenance-free, no maintenance other than
cleaning is necessary. The level of cleaning can
vary depending on local conditions. Undertake
cleaning at least twice a year. Inlet and exhaust
grilles, impeller and elements can be vacuum
cleaned or wiped using a damp cloth. Use a
brush when vacuuming to prevent damaging
sensitive parts. Avoid the use of strong alkaline
or acidic cleaning agents.


